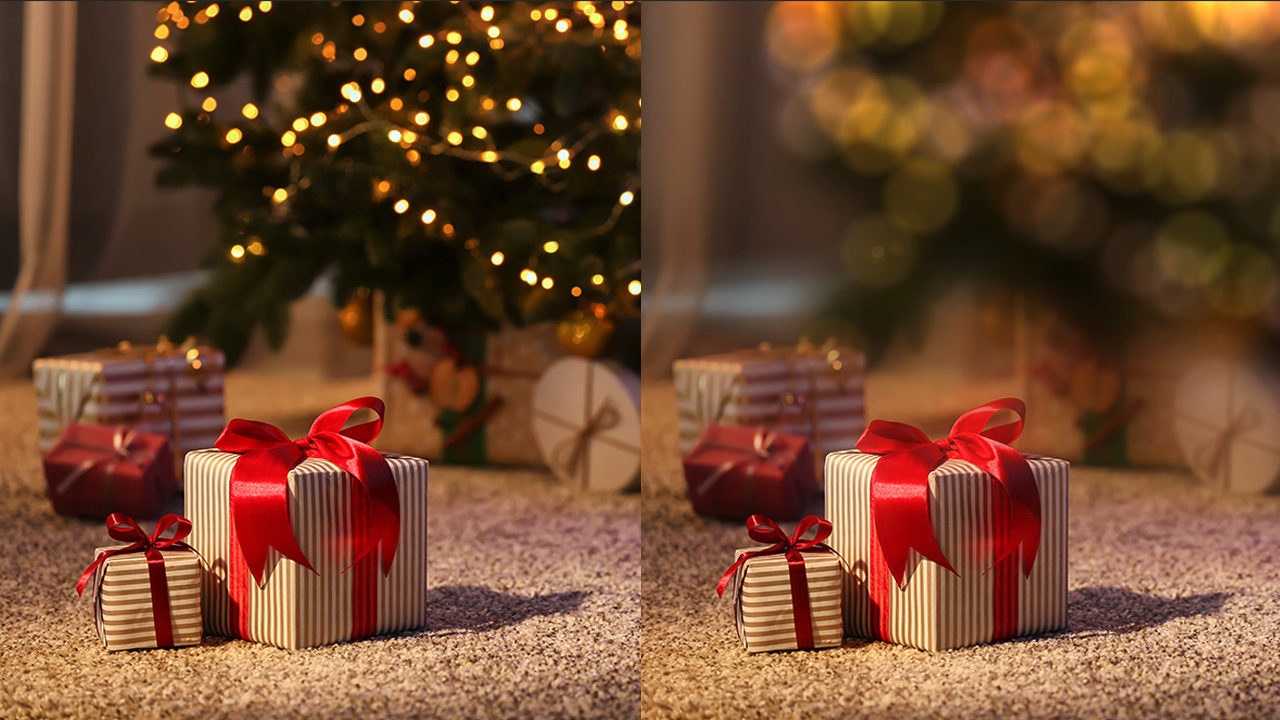
Bokeh is a Japanese term for the aesthetic qualities of out-of-focus highlights, also known as specular highlights. You can create this effect in-camera using a shallow depth of field, which can require an expensive lens; however, you can mimic the effect in Photoshop using the Bokeh settings in the Field Blur filter. Read on to learn how!
Step One: Open an image in Photoshop. (If you’re starting in Lightroom, select the photo’s thumbnail and choose Photo>Edit In>Edit In Adobe Photoshop CC 2019.) Shift-click to select the layers in your image and then choose Filter>Convert for Smart Filters. This converts the layer(s) into a smart object, which serves as a protective wrapper for the original content. That way the filter happens to the wrapper and not the layers inside it.
Tip: To access the original layers again—say, to fine-tune a color-correction adjustment—double-click the smart object thumbnail in the Layers panel and those layers open in a new, temporary document. Make your changes, choose File>Save—not File>Save As—then close the temporary document.
If you’d like to download the low-res watermarked version of this image to follow along, click this link, log in with your Adobe ID, and click the Save to Library button. Double-click the image in the Libraries panel (Window>Libraries) to open it in Photoshop.
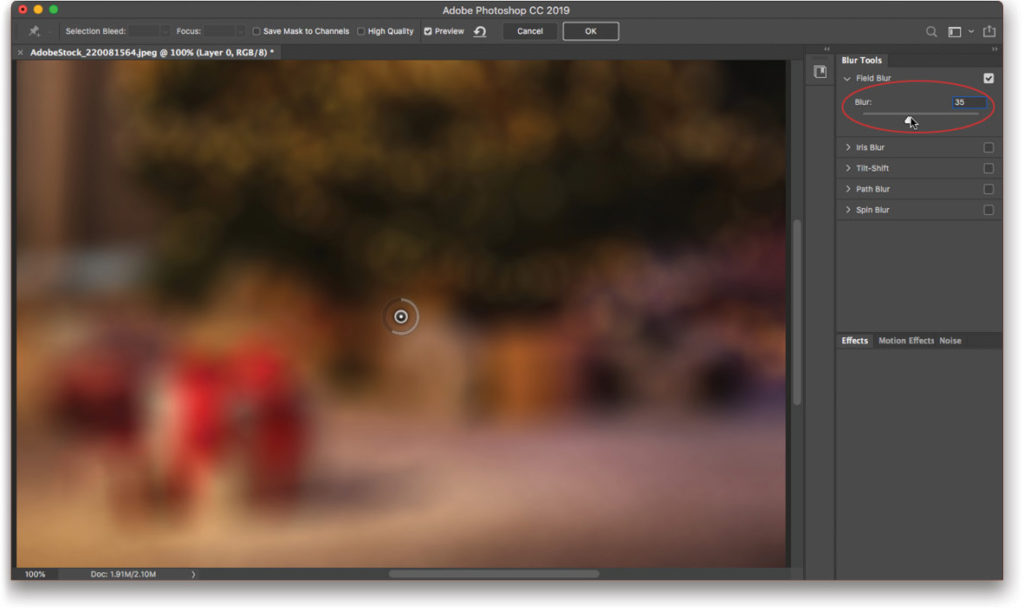
Step Two: Choose Filter>Blur Gallery>Field Blur. Your workspace changes to include a big image preview on the left and collapsible panels with a slider on the right. In the preview, you’ll see a single pin (it looks like a dot inside a circle) with a two-tone gray blur ring around it. The pin controls which part of the image is blurred, and the blur ring controls blur strength. For this technique, there’s no need to reposition the pin because we’re blurring all of it.
The next few steps require experimentation, so put on your Patience Hat! At the upper right of the work-space, locate the Blur Tools panel and then drag the Blur slider to around 35 pixels. This blurs the image quite a bit. Note: The settings we’re using here are for the low-res Adobe Stock preview file; for higher-res images, you’ll need to use higher values. Don’t click OK yet.
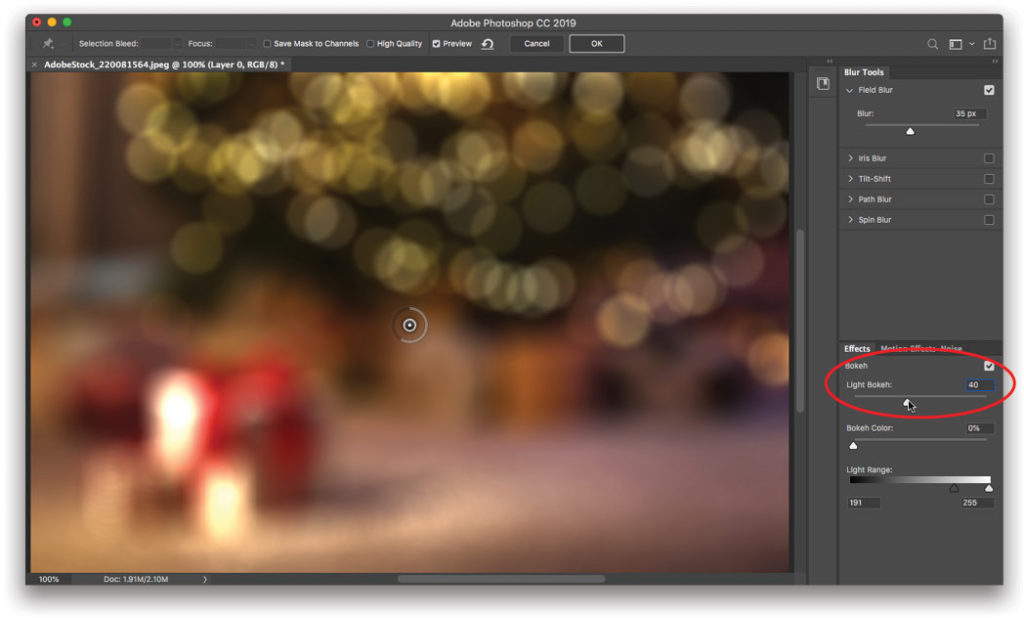
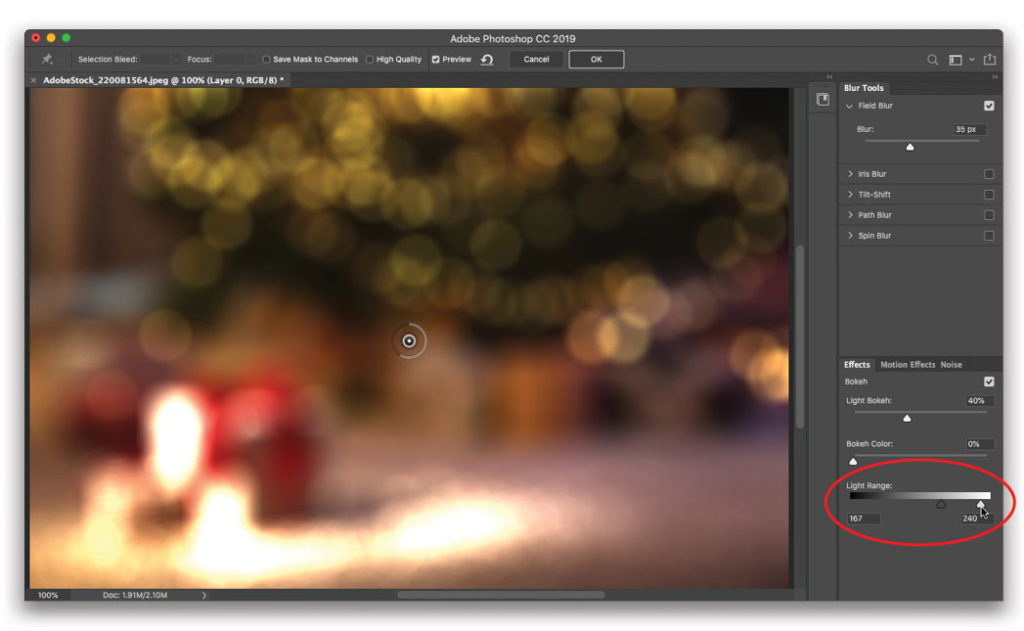
Step Three: Now click the Effects tab to expand that panel and reveal the Bokeh controls. Drag the Light Bokeh slider rightward to increase the brightness of any out-of-focus highlights—you may have to drag the slider fairly far to the right before you see any change. We used a setting of 40% here.
Step Four: Let’s skip the Bokeh Color slider for the moment and focus on the Light Range sliders. This is how you tell Photoshop which lightness values should be impacted by the Bokeh settings; just drag the black and white triangular sliders to set a range of tonal values—the tones in between the dark and light triangles are the tones that will be affected. A fairly small range of the lighter highlights can often work well and it’s actually fine to place the sliders atop each other to create a very small range. Again, this takes experimentation. We used a Light Range of 167 to 240 here.
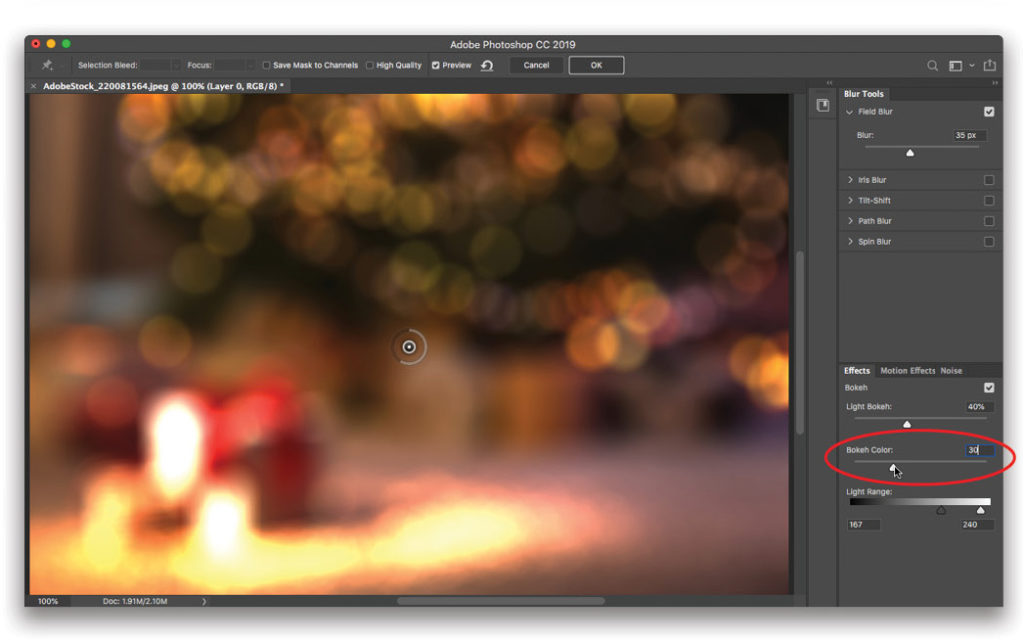
Step Five: Now, we’ll use the Bokeh Color slider to shift the affected highlights from no color or white (0%) to colorful (100%). This causes the highlights to pick up some of the colors of surrounding pixels. A setting of 30% was used here.
Tip: To make Photoshop display a more accurate preview of your changes to the Bokeh settings, turn on the Options Bar’s High Quality setting (it’s at the top of the workspace).
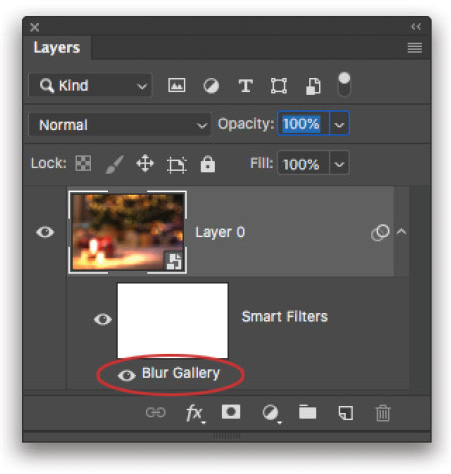
Step Six: When you’re finished, click OK at the top of the workspace to apply the filter and switch back to the regular workspace (visible in the previous screenshot). Alternatively, cancel out of the filter by clicking the Options Bar’s Cancel button or tapping the Esc key on your keyboard. To see a quick before and after version, turn off/on the visibility Eye to the left of the words “Blur Gallery” in the Layers panel (circled here).
If at any point you want to adjust your bokeh settings—and you may need to—simply double-click the words “Blur Gallery” in the Layers panel and the Blur Gallery workspace reopens. Adjust the Blur Strength and Bokeh settings to your liking and then click OK.
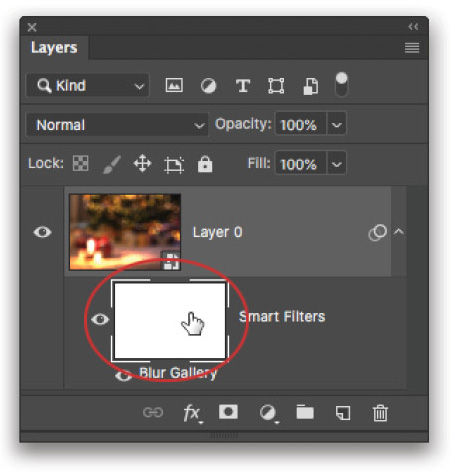
Step Seven: Now let’s hide the blur from the foreground of the image. To do that, use the Smart Filter mask that tagged along for the ride when you ran a filter on a smart object. In the realm of masking, the color black conceals and white reveals. The Smart Filter mask is currently white, meaning that the filter is 100% visible across the image; however, if you apply black to the mask, you can hide the filter in those areas. To start, click the Smart Filter mask to activate it so it has little brackets around its edges.
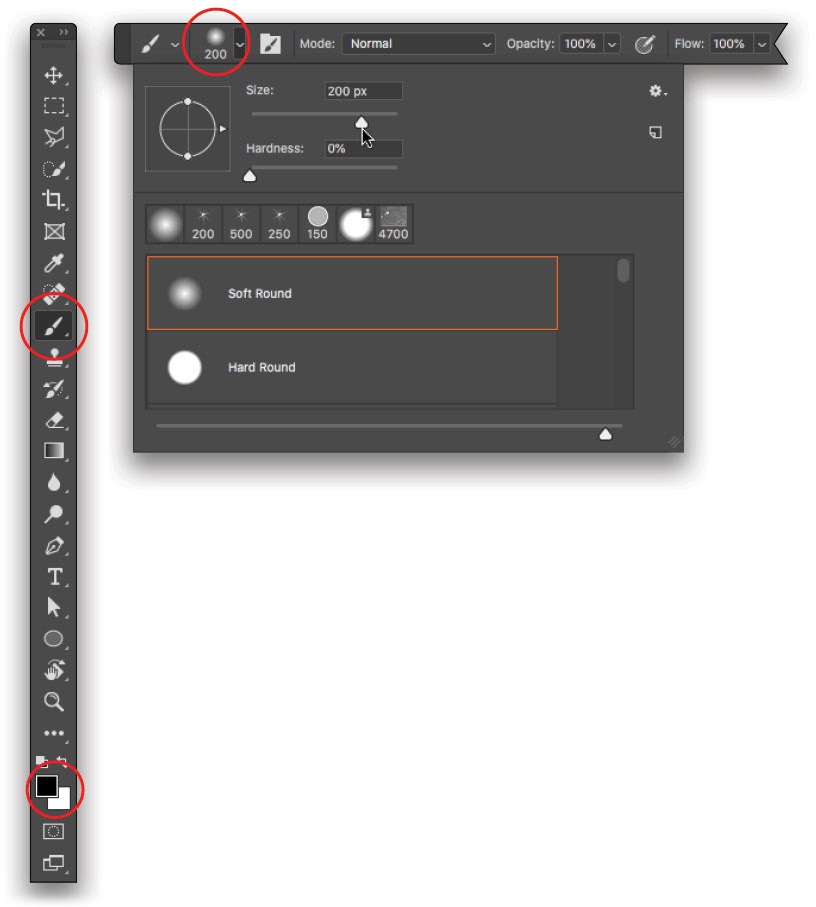
Step Eight: To add black paint, press B to grab the Brush tool (circled). Trot up to the Options Bar and open the Brush Preset Picker by clicking the down-pointing triangle next to the brush preview (also circled). Pick a soft-edged brush that’s big—around 200 pixels (the larger the soft-edged brush, the softer the transition will be between the in-focus area and the blurry area). Make sure Opacity and Flow are set to 100%. Take a peek at the color chips at the bottom of the Toolbar (circled), press D to set them to their default values of black and white, and then press X until black hops on top (remember, in a mask black conceals).
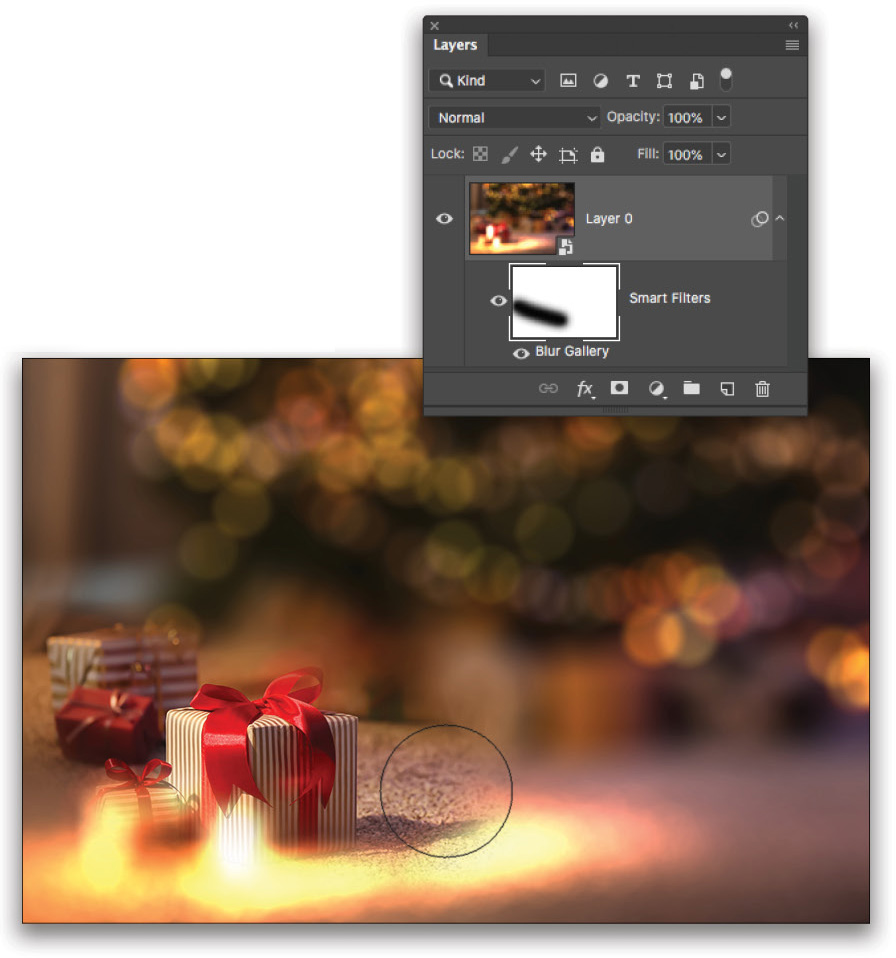
Step Nine: Mouse over to the image and brush across the areas that you want to remain in focus. In this example, that would be the gifts and carpet in the foreground. If you hide too much of the blur, press X to swap color chips so white is on top then brush back across that area to reveal the blur. Press X to switch back to painting with black if you need to hide some of the blur again. When you’re working with a layer mask, you may do a lot of color-chip swapping (from black to white and vice versa). As you paint, your brushstrokes appear on the Smart Filter mask.

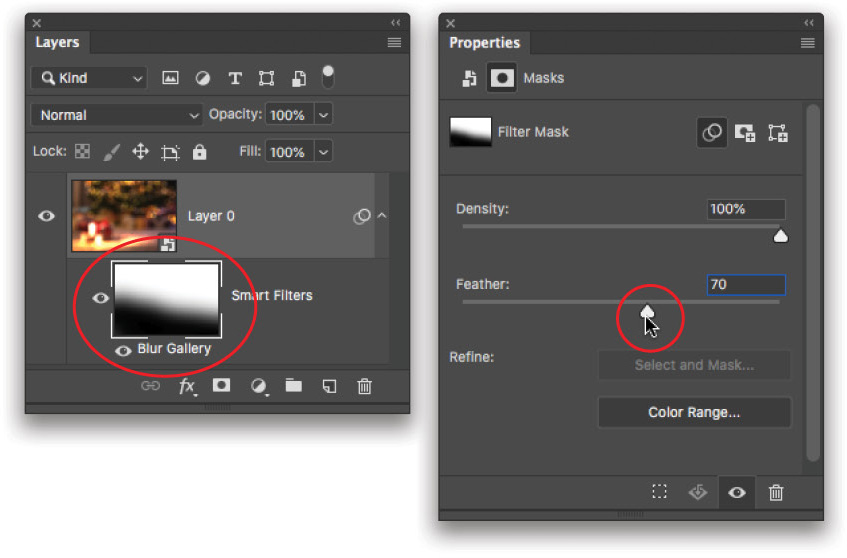
Step 10: To soften the transition area even further between in-focus and blurry, double-click the Smart Filter mask in the Layers panel (circled) and in the Properties panel that opens, drag the Feather slider (also circled) rightward to soften the mask edge. A setting of 70 pixels was used here. If you start to see some of the original lights peeking through, edit the layer mask or lower the Feather setting. Here’s a before and after version:
As you can see, the Field Blur filter’s Bokeh settings really made the tree highlights sparkly. For extra pizazz, you could add a new layer containing a few clicks of a sparkle-shaped brush. Until next time, may the creative force be with you all!


This article originally published in the November/December 2019 issue of Photoshop User magazine.


