Adobe named this the “Basic” panel, but I think it may be the most misnamed feature in all of Lightroom. It should have been called the “Essentials” panel, since this is precisely where you’ll spend most of your time editing. Here’s the order in which I use the Basic panel sliders (and yes, I pretty much do the same thing every time, in the same order). Everything else I apply to an image (special effects, or looks) happens after I’m done here.
1) I choose my RAW Profile
The default Adobe Color is okay, but I usually go with Adobe Landscape, or in some cases, Adobe Vivid as my RAW profile and starting place.
2) I set my white balance
If your color isn’t right…it’s wrong. I use the White Balance Selector tool (the eyedropper) most of the time.
3) I have Lightroom set my white and black points
I expand my overall tonal range by Shift-double-clicking on the word “Whites,” and then on the word “Blacks.”
4) I tweak the overall brightness
If after setting the white and black points, I feel the image is too dark or too bright, I drag the Exposure slider until it looks right.
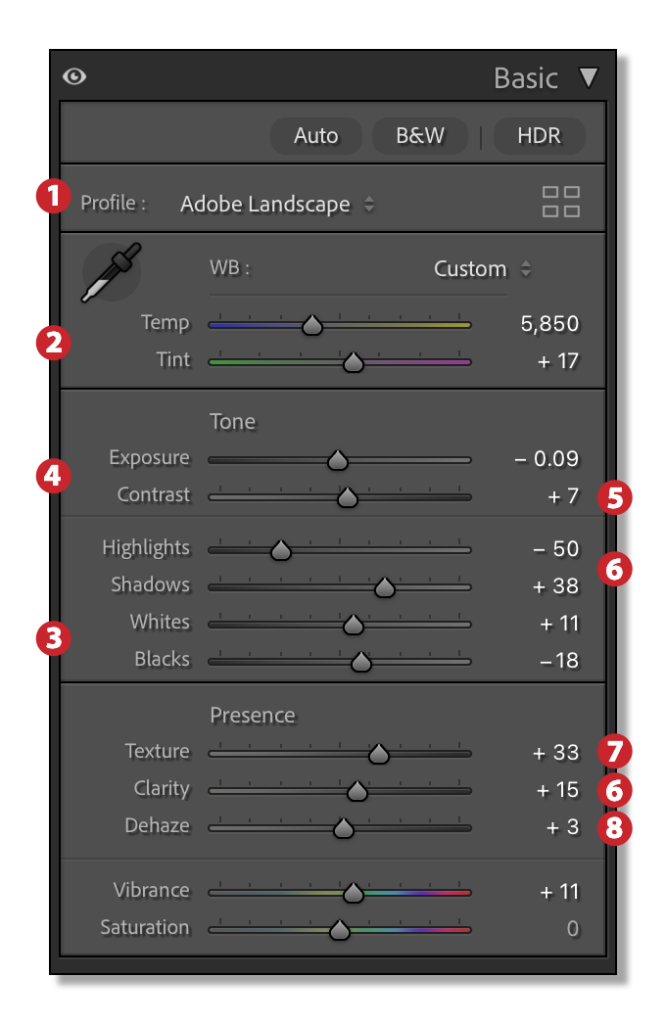
5) I add lots of contrast
I don’t want a flat-looking image, so I generally add a pretty good amount of contrast (probably more than your average bear).
6) If I have problems, I fix ‘em now
If the photo is backlit, I open up the Shadows. If there’s clipping, I pull back the Highlights. If it’s hazy, I use Dehaze.
7) Enhance Details
To bring out detail (in photos that should have their detail brought out), I use a lot of Texture and half as much of Clarity.
8) Boost colors
By this time my color usually looks pretty poppin’, but if I think it needs more, I increase the Vibrance amount.
Excerpted from The Adobe Photoshop Lightroom Classic Book by Scott Kelby.
If you liked this tip and want lots more Lightroom learning, I hope you’ll join us for our upcoming KelbyOne Lightroom Conference – happening April 16th and 17th (with 2 pre-con sessions on the 15th). It’s 2 full days, 2 simultaneous training tracks, and an instructor team made up of some of the best in the business. You can find all the details here.