All photographers are students of light. Without light, there is no image. Landscape photographers get up at the crack of dawn to capture crimson sun rays as they scroll down jagged peaks. Sports photographers dial up their ISO to 6400 to freeze a slam dunk while working in low-light arenas. And wedding photographers fire speedlights to backlight the first dance between bride and groom. The quality and style of lighting directly affects what these photographers capture. In some situations, we can control the light, while in other scenarios, we are at nature’s discretion for interesting light.
Experimenting with Light
As a photographer, I think a lot about light. Sure, I have to find interesting and compelling subjects for my photographs. But when you think about it, we’re photographing the light on the subject, and this greatly influences the final image. Studio portrait photographers have one big advantage with their image making: They completely control the light. In other words, they decide what style of lighting to use for the best effect with their portraits.
Recently, I decided to do a portrait experiment, another step in my career-long lighting apprenticeship. If I only had one hour to photograph, how much could I use lighting to transform a portrait? No elaborate sets and makeup, just the same model with simple attire changes and different lighting setups. How much did my lighting really change the mood of the shot? I recruited a model, prepared the studio, set my iPhone for a 60-minute countdown, and hit Start. Let the lighting charades begin!
Film Noir
Film noir has always been one of my favorite genres of portrait photography. Moody, mysterious, and loaded with intrigue, film noir lighting is often hard-edged with lots of contrast. Since I couldn’t shoot in a gritty alley, I really needed my lighting to do the trick. For this image, I used two Elinchrom ELB 1200s. The main light had a 10° grid to produce a narrow beam on my subject and was positioned at a high angle. The second background light used a 20° grid and faintly lit the black background to give some separation between the background and the dark clothes my model was wearing.
There are other lighting options to create narrow beams of light, but two simple gridded lights did the trick. Did this style of lighting work to set the mood of the shot? To answer that question, imagine the same image photographed using a large softbox. No more shadows, more light on the background, and the mood and tension of the image is totally lost. To really establish a film noir look, I converted the image to black and white. Twelve minutes into our lighting experiment, and we had our first shot.
Split Lighting
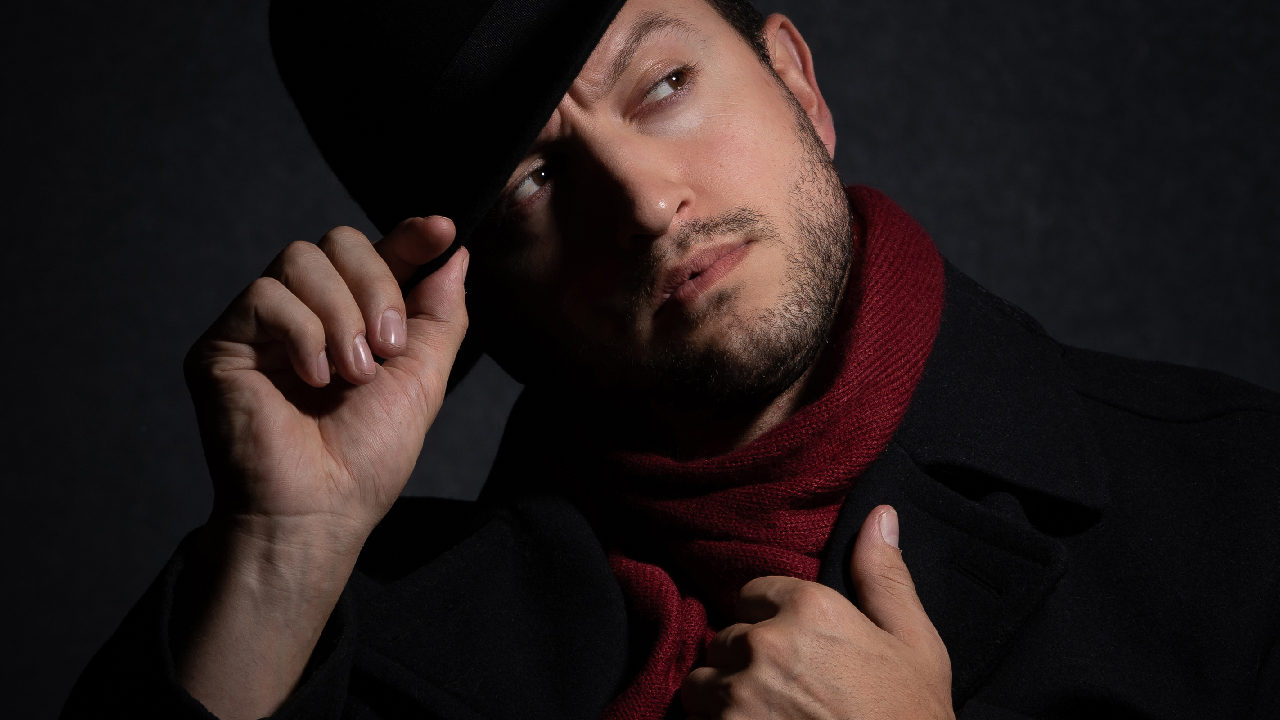
To keep the shoot moving quickly, we kept things low-key and created split lighting using one light. Split lighting is somewhat self-explanatory: one-half of your subject is illuminated, and the other half is totally dark. We switched backgrounds, and had our model put on a coat and hat, going more urban for this shot.
I used a strip softbox and positioned the light so it only illuminated one side of the model’s face, with some light spilling onto the gray background. Of all the lighting styles we used, split lighting had the strongest impact on the image. Tension is oozing in this shot, supporting the intense expression of the model. If you want drama in an image, this simple lighting technique will produce it. We pulled this shot off in 10 minutes—two different lighting styles/portraits in 22 minutes. So far, so good.
Rembrandt Lighting
Still holding onto a low-key look, we kept our gray background but moved our model further away from it, so it would go dark. We had our model take off the hat and jacket so he was in his tank top. Next up on the lighting menu was Rembrandt lighting. This style of lighting mimics the famous painter’s style of portraiture. Key to Rembrandt lighting is a small triangle of light on the model’s face opposite the main light. Rembrandt lighting can be very low-key with lots of contrast, or with very faint shadows.
We used a single Elinchrom 27.5″ Rotalux Deep Octabox as our only light. The deep profile of this softbox creates more contrast and stronger shadows, which I wanted for this image. Modeling lights are very helpful when positioning the light and producing the classic triangle light on the model’s face below the eye. On the same note, your model must remain still since any head movement will change the light and shadow in the image.
Our model, Jeremiah, was going for a contemplative look. Would a specific lighting style support this mood? Yes—a technique with some shadow, but not dominated by shadow—Rembrandt would be perfect for this image. Split lighting would be too intense, and high-key lighting would minimize the contemplative mood. I glanced at my iPhone stopwatch and saw 39 minutes’ elapsed time. Not good. We had spent 17 minutes lining up the triangle shadow in this portrait. Gotta hurry up!
Short Lighting
We had two more lighting styles I wanted to do and only 21 minutes left. More importantly, I wanted to stay focused on lighting styles and their effects on the portrait, even if we went past our original 60 minutes of shooting. Our next image required the most wardrobe change, and a new background. Short lighting was next, and we needed a Colorado cowboy for the shot. Short lighting refers to lighting techniques where the shadow side of the model’s face is facing the camera. You can use many different light modifiers and techniques with short lighting; just position your model with the shadow side toward the camera.
For our cowboy portrait, we used an Elinchrom 39″ Rotalux Octabox as our main light. We also used a silver Lastolite reflector to open up the shadows on the shadow side of the model’s face. To create a “country” feel, we used a brown seamless background, supplied a cowboy hat and lariat, and we were ready to go.
One key aspect to the success of this shoot was having a model who was a chameleon of expressions and poses. I’ve worked with Jeremiah for years, and knew he could mix things up on demand. For the cowboy shot, I wanted something serious, disarming, but not light-hearted or funny. We found a good pose to work with, but the challenge was deciding how much fill to add.
Without the reflector, the shot looked similar to split lighting, and way too serious for the shot. With the reflector close, the shadows became very faint, almost invisible, and didn’t support the mood we wanted. Finally, after using precious minutes of our 60-minute countdown, we found the right amount of fill. But what really resonated with me was how much shadow, and lighting style, affected the tone of the shot. Moving the silver reflector mere inches transformed the shot and overall mood. It became apparent to me I needed to be a lighting technician to get the perfect mix of shadow and highlight. Unfortunately, after we finished this shot, I glanced at my phone, and we only had 3 minutes left. Not gonna happen.
Broad Lighting
Broad lighting was the easiest setup we planned, and we could create it in minutes. Broad lighting refers to lighting styles where the lit part of the model’s face is closest to the camera—it’s the opposite of short lighting. I moved the Octabox from the last shot and positioned it at roughly 45° and slightly above Jeremiah. At the same time, my assistant set up our massive Elinchrom 75″ Indirect Litemotiv Octa Softbox. We placed this light behind our subject, and used an ELB 1200 to fire the strobe in the box, which created a bright, high-key background. Jeremiah switched into a yellow sweatshirt, and started smiling at the camera.
This high-key portrait was the most light-hearted shot of the session. The main light produced a soft light on our model and it allowed him to be more animated, since precise shadow placement wasn’t an issue. As I expected, this high-key lighting style beautifully supported our model’s easygoing pose.
The stopwatch now confirmed what we all knew: We were 9 minutes past our 60-minute deadline—so close! But, in the end, we wanted to explore lighting styles, not set a land-speed record. Our lighting setups had confirmed what I already knew. Light is transformative to a portrait. While lighting shouldn’t be the subject of the image, it is a strong supporting actor to the portrait, and critical in establishing mood and concept. I came away remembering how minor flash adjustments really determine the outcome of a shot. And I also learned that, with a little prior planning, I could roll through a wide range of portraits in a short amount of time. I’m already planning my next “transformation shoot,” and this time I am going to beat the clock!
This article originally published in Lightroom Magazine, Issue 56. All images by Tom Bol unless otherwise noted.