Did you ever compose an image and ask yourself why the composed objects look sort of fake? Well, maybe it was because they don’t have the right shadows. It’s not complicated to create a physically correct shadow, but there are a few things that you should consider. There are three types of shadows, and the good news is all three of them can be created in Photoshop.
Let’s start with shadowed areas on buildings or other objects. Imagine a tall building that’s lit by the sun from the left. The side facing the sun is brightly lit; the side not facing the sun is a lot darker and has considerably less contrast. This type of shadow can simply be painted onto the building using a Levels adjustment layer and a layer mask. But that’s not all: the building itself creates a shadow, as well. This type, the so-called drop shadow, is a bit more complex to build, but with a little Photoshop strategy it’s not a big problem. The third type of shadow is an effect you can see. For example, if you observe a cup on a table, there’s a thin black line between the cup and the table surface. This thin black line is very important to make a shadow look real. Let’s begin by taking a look at all three types of shadows.
SHADOW TYPES
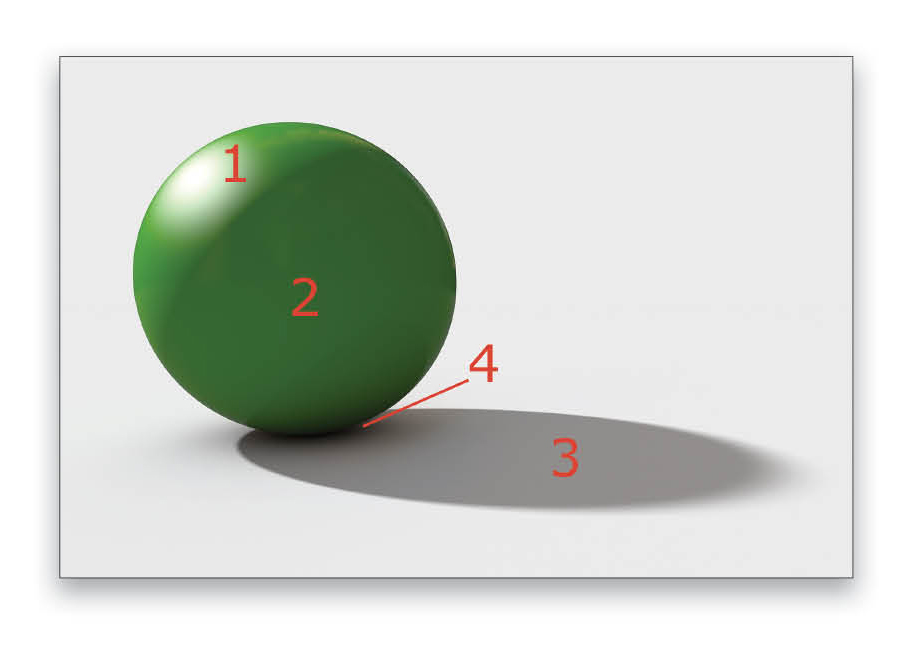
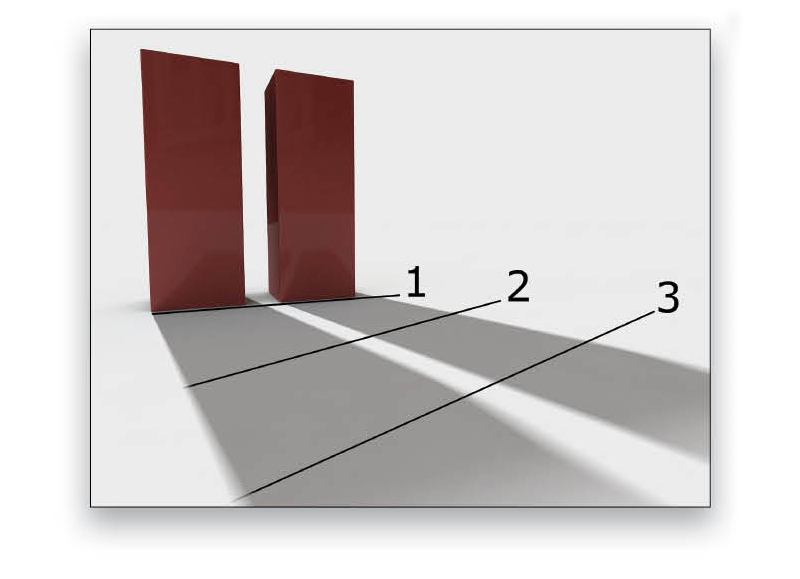
In this simple image, you can see all three types of shadows. The main light source comes from the upper-left corner and divides the sphere in a bright, sunlit part (1) and a darker one that has a lower contrast (2). On the right side of the sphere we see the cast shadow, which is basically a projection of the sphere’s shape (3), and right underneath the sphere there’s the deep shadow that leads from middle gray into deep black (4).
Step One: Preparation—Levels
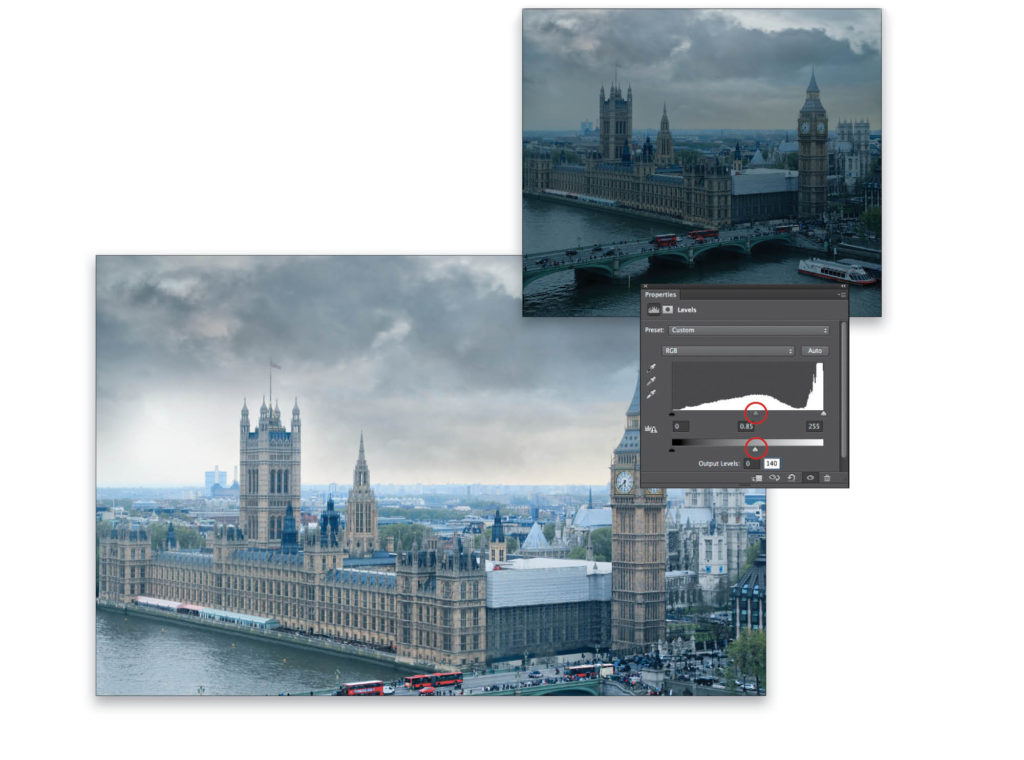
This photograph of London was taken on a cloudy day. The light is very soft and—let’s face it—quite boring. This beautiful view, taken from the London Eye, deserves much better lighting, so we’ll paint the shadows into the photograph. First, use a Levels adjustment layer (Layer>New Adjustment Layer>Levels) to produce a dim, shadowlike lighting by pushing the Output Levels highlight slider to the left. This reduces the brightness and the contrast of the image. Then, you might increase the shadow contrast a little by moving the midtones Input Levels slider (below the histogram) to the right.
Step Two: Painting Shadow
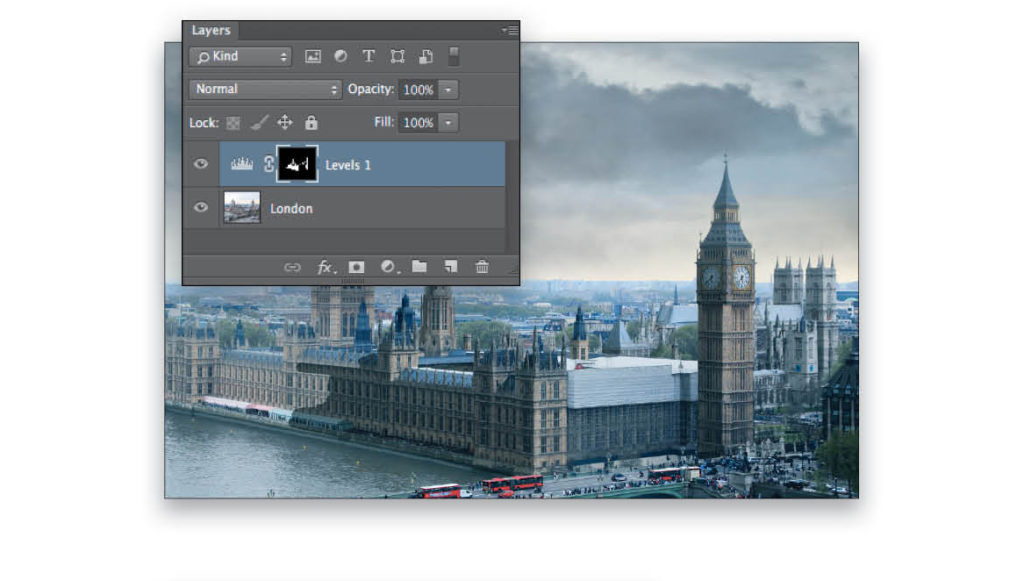
Of course, we don’t want the entire image to be dark, so mask the whole Levels adjustment layer by inverting its layer mask to black (press Command-I [PC: Ctrl-I]). In this scene, I decided to let the sunlight come from the right side. That means that the shadow areas can only be on the parts of the buildings that look to the left. Just take the Brush tool (B), use a soft brush with a Hardness of 30–50%, and begin to paint the shadows onto the layer mask. (Note: You can find the Hardness setting by either clicking on the brush preview thumbnail in the Options Bar, or by Right-clicking in the image.)
DIRECTION OF LIGHTING
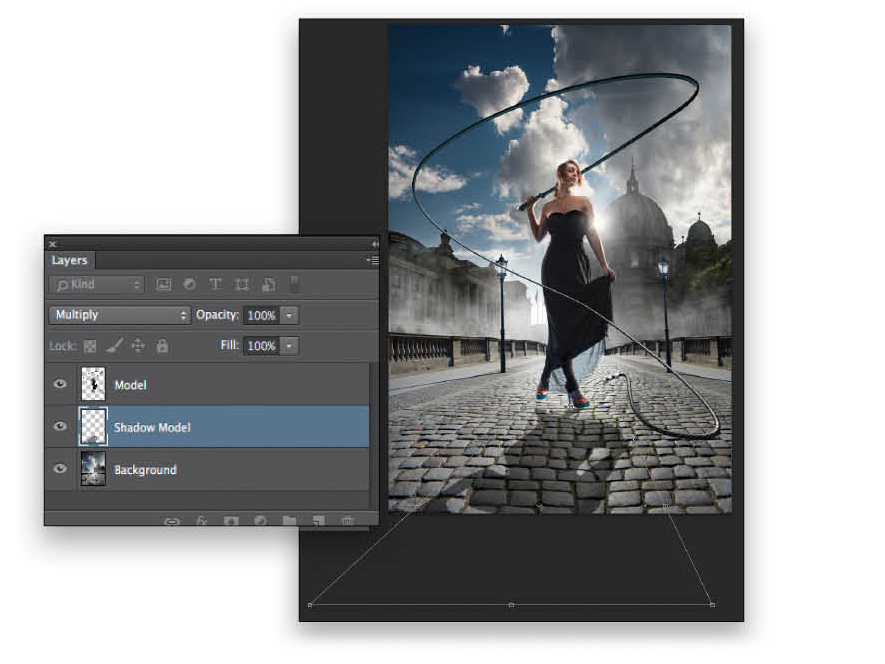
Before you even think of building a drop shadow, you should analyze the position of the main light source in your picture. In the picture here, we have two light sources: the sky, which lights the whole scene without producing any hard shadows; and the sun, which is positioned right behind the model. That’s a good starting position because we can use the silhouette of the model to create the shadow.
Step One: Creation of the Shadow
First, we need a selection of the model’s outline. Since she’s already on her own layer, this is easy to get by holding the Command (PC: Ctrl) key and clicking on the model’s thumbnail in the Layers panel. We need to remove the whip from the selection, so press L to switch to the Lasso tool, hold down the Option (PC: Alt) key, and drag around the various sections of the whip to remove it from the selection. Of course, we want the shadow to be on its own layer, so click the Create a New Layer icon at the bottom of the Layers panel to create a new layer underneath the model’s layer. Go to Edit>Fill, select 50% Gray in the Use drop-down menu, and click OK to fill the selection with 50% gray. Press Command-D (PC: Ctrl-D) to deselect. Go to Edit>Transform>Flip Vertical to flip the layer vertically. Then, move the shadow down with the Move tool (V) until the bottom of its right foot touches the bottom of the model’s right foot. (Note: We’ve lowered the Opacity of the Background layer in the image here so you can better see the shadow.)
![]()
Step Two: Blend Mode and Transformation
A drop shadow like the one we just created is always translucent. Lowering the Opacity of the layer looks unnatural, so we keep it at 100% and instead change the blend mode from Normal to Multiply at the top of the Layers panel. Considering the sun as the projection light source for the shadow, it needs a perspective transformation. In the Edit>Transform menu you’ll find the Perspective transformation. Click-and-drag the bottom-left corner of the bounding box to match roughly the perspective lines of the cobblestones and your transformation will be perfect! Press Enter to commit the transformation.
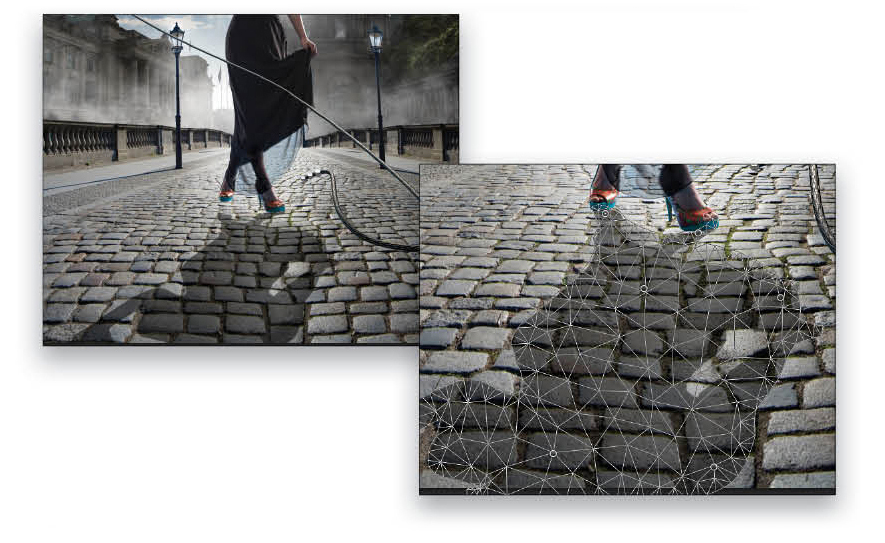
Step Three: Adaption of Perspective View
The model’s left foot is positioned slightly behind her right foot. Unfortunately, this means that the foot and its shadow have a different level, so we have to pull the shadow toward the model’s left foot. This is a great task for the Puppet Warp tool, which you’ll find in the Edit menu. Just click on five or six spots on the shadow that you want to lock into position (you don’t have to click on the intersection of the lines), then click on the spot representing the foot and pull it right underneath the model’s foot. Done! Press enter to commit the Puppet Warp.
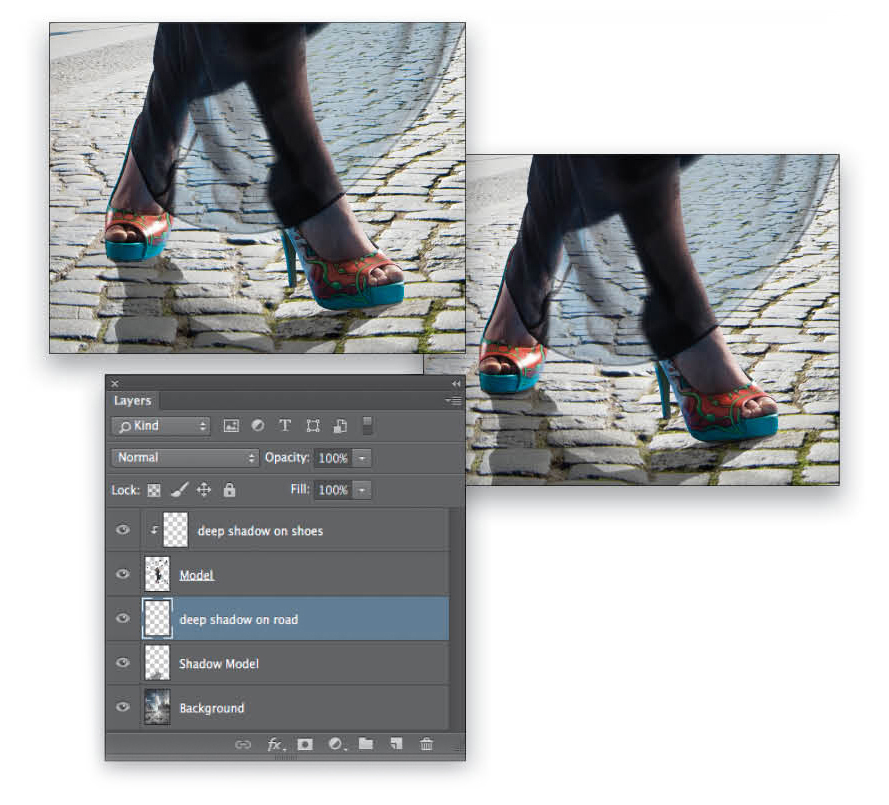
Step Four: Painting the Deep Shadow
This seems to be a small detail that’s not important, but believe me, it’s very important: The thin line of the deep shadow where her shoes meet the road is necessary to nail the model to the ground. Create a new layer above the shadow model layer, and paint right underneath her shoes with a small brush set to black with a Hardness of 0% and an Opacity of 20%. You get an even better result if you do the same to the model’s shoes in a separate layer above the model’s layer. Hold the Option (PC: Alt) key and click on the line between these two layers to add a clipping mask; otherwise, you darken not only the models shoes but the road, as well.
Step Five: Softness
Still, our shadow doesn’t look very natural. There’s a physical effect called diffraction, which simply means that the light collides with the edge of an object. Looking at the shadow where it’s close to the object, this effect is hardly visible (1). The further away from the object, the more the shadow gets blurred (2). On the end of the shadow that represents the top edge of the object, the blur reaches its maximum (3).
Step Six: Creating Softness by Using the Filter Gallery
There are two different ways of creating this kind of blur in relation to the distance between model and shadow. The easiest way is to use the Tilt-Shift filter, which you find in the Filter>Blur Gallery. If you’re not sure yet how much blur you want to apply, convert the model’s shadow layer into a smart object (Filter>Convert for Smart Filters) before applying the filter. Then, open the filter and move the solid bottom line close to the shoes and the bottom dashed line toward the end of the shadow. A Blur of around 20 px in the Blur Tools panel is perfect. Click OK in the Options Bar to apply the blur.

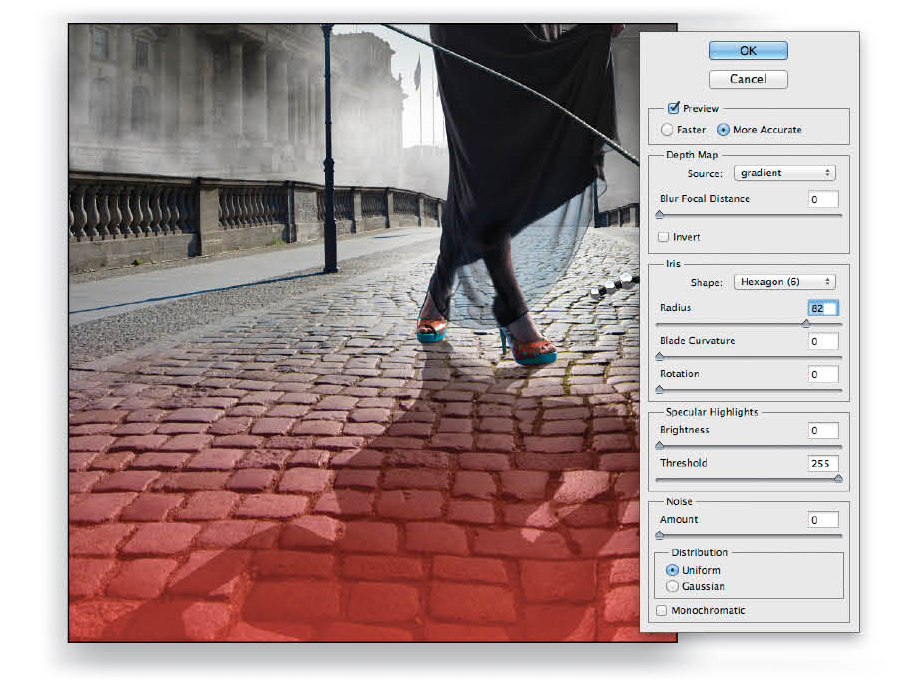
Step Seven: Creating Softness by Using the Lens Blur Filter
If you’re using Photoshop CS6 or older, you can choose another way. First, switch to Quick Mask mode by pressing Q. Then, using the Gradient tool (G), create a linear gradient that starts at the shoes and reaches all the way down to the bottom of the image. (Note: If your red overlay doesn’t match the one shown here, don’t worry, we’ll fix that in Lens Blur.) Press Q to change back to normal mode, save the selection as a channel (Selection>Save Selection), give the selection a name such as “gradient,” and click OK. Then, open the Lens Blur filter (Filter>Blur>Lens Blur) and make sure the channel you saved is selected in the Source drop-down menu (unfortunately, this filter doesn’t work with a smart object). Use a blur Radius between 60 and 90. If for any reason the blur appears on the wrong end of the shadow, just click Invert. Click OK to apply the blur.
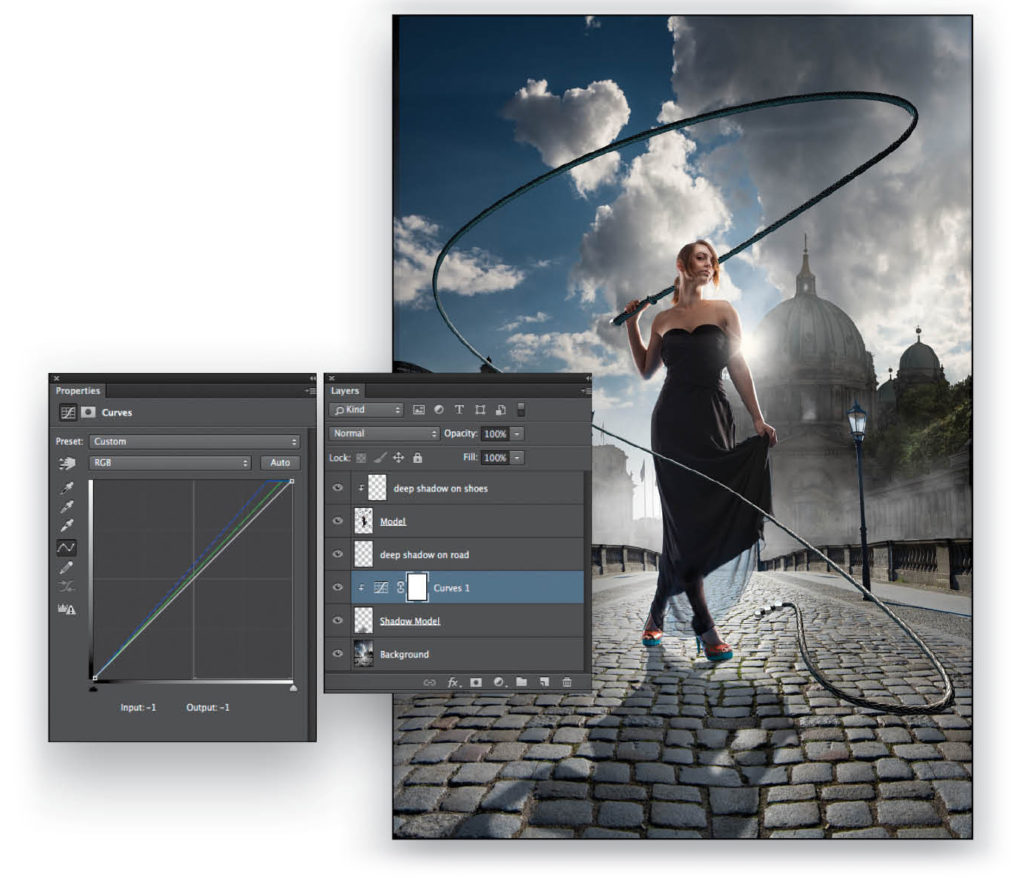
Step Eight: Color Adaption
We’re almost there; we just have to take a final look at the color. The shadow we created is a projection of the model’s silhouette. Although not hit by any sunlight, shadows are never black, but translucent. There’s always a surrounding light source: the sky in this case. On an overcast day, the shadows are almost colorless, but in this image, we have a great blue sky. Create a new Curves adjustment layer (Layer>New Adjustment Layer>Curves) for the shadow layer—don’t forget the clipping mask. Then, choose the Blue channel in the channel drop-down menu near the top of the Properties panel and lower its highlight Input level (white slider) to 224. Lower the Green channel to 243. That’s it.
This article originally published in the February, 2015 issue of Photoshop User magazine.