I’ll start right off and warn you, this is not a “sexy” subject, but if you’ve ever retouched a face in Adobe Photoshop, you need to learn about this topic. It will tremendously alleviate lots of retouching frustrations, and anything I can do to help you not be discouraged when it comes to using Photoshop is considered a “win” in my book.
Portrait retouchers, like myself, rely heavily on the Healing Brush, Spot Healing Brush, and Patch tools. Back when Photoshop 2015 was released, it came with a new upgrade to these tools, and Adobe boasted about the improvements they made to them. They promoted the fact that they had enhanced the mercury performance of these tools to make them 120 times faster than their older versions. They also included a new effect that would show you the real-time results of what the heal/patch would look like if you were to release your mouse or pen at that exact moment.
While Adobe did take the time to try and describe this enhancement on their website, unless you’re an engineer, I wouldn’t necessarily recommend reading it. Here’s an excerpt about the new tools’ enhancement:
“The new healing algorithm is better in diffusing the color and spreading them over an area. However, you need to be very clear about the area being sampled or filled. For soft selection, Photoshop thresholds the soft selection at 128 to display an 8-bit mask. As a result, the screen feedback in patch tool can misrepresent what [the] user is actually sampling or trying to heal. This can manifest itself in bright or dark color contamination at the boundary of the filled area, which will be spread over the filled area. The new algorithm is enhanced to deal with very soft brushes. To limit the contamination, you may want to try different diffusion slider values and be careful with the sampling region.”
I don’t know about you, but that might as well be written in Greek! I think probably only about 5% of Photoshop users can truly follow this and understand it. So, in this article, I’m hoping to shed light on this feature using language that everyone can understand.
Diffusion Slider History
Before we move on, a little history: While the effect was cool, it totally changed the end product and the way the tools removed the spots that users were trying to eliminate. Portrait and beauty retouchers all over the world started complaining because they couldn’t use the tools anymore for their retouching work—they gave a smudgy appearance to all the areas that had been healed! Retouchers went as far as to revert to using the previous version of Photoshop to temporarily fix this problem!
So what did Adobe do about it? The response may make you cock your head to the side a little. Adobe suggested the user create a text (.txt) file and save it within Photoshop’s preferences folders. You would choose which “legacy” version of the healing brush you’d like to go back to, and depending on which one it was, you’d type a 0, 1, or 2 in the text file. I’m sorry, Adobe, but most of your users would sooner be struck by lightning, then go through this trouble to try to “patch” this problem in this way. (See what I did there?) Thankfully, this nonsense didn’t last too long. With the Adobe Photoshop CC 2015.1 release came the advent of the Diffusion slider. If
I had to boil down the definition of what this slider setting does to its most direct meaning, it means: how much Photoshop looks at the surrounding area when removing a blemish.

In my experience, the higher the Diffusion slider setting, the less Photoshop cares about matching the healed area to the surrounding pixels in your image. This may be because lower slider values are meant for images with noise, grain, and fine details, while high values are better for smoother areas of images, like skies and walls. Since I’m a portrait retoucher, I deal with faces. I think the reason I’m a little bit partial to the lower slider values is because Photoshop regards pore structure as “fine detail/texture.”
Diffusion Slider Color Test
Now let’s take a look at the example below, which is our first visual experiment. Here, you’ll find two segments in this image: each section has five rainbow-colored lines stacked on top of one another, and then at the bottom, each section has one set of colored dots. This experiment is using the Healing Brush tool. On the left, I used a
Diffusion slider value of 1, and on the right, a Diffusion slider value of 7. Which side do you think does a better job of trying to blend the surrounding grey color in with the
colors? I think it’s the left side.
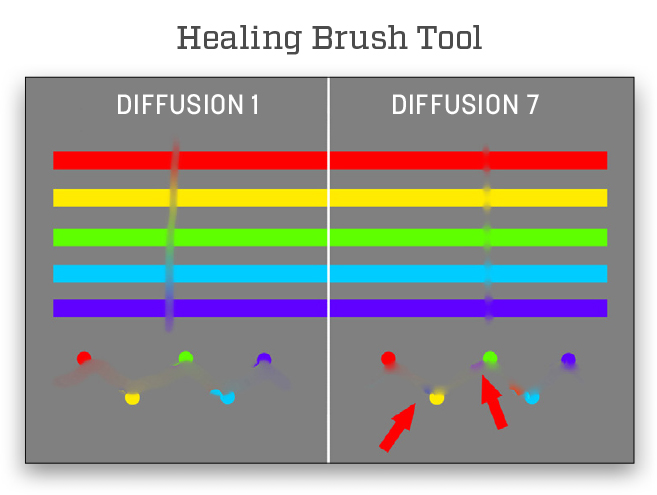
Take a moment to pay particular attention to the colored dots on the right side (the Diffusion 7 side). When I tried to blend them into one another using the Healing Brush tool, it gave me exceptionally strange results. If you look closely, you can see a diagonal, accordion shaped-like line I drew between the colors. How in the world did Photoshop think to add blue in between me trying to heal between red and yellow? And again, and even more apparent, when I healed in between yellow and green, the tool decided to throw some purple in there! If you look at the same dots on the left side (Diffusion 1), you can see that there have been no contaminating colors added into the healed sections by the tool. (Look for red arrows; there aren’t any.)
Skin Test
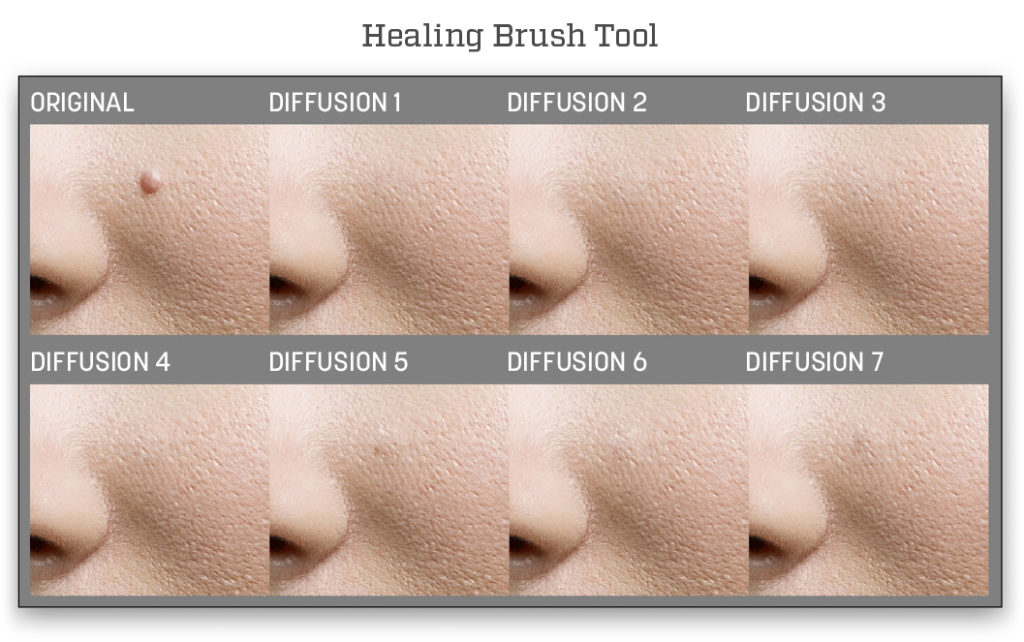
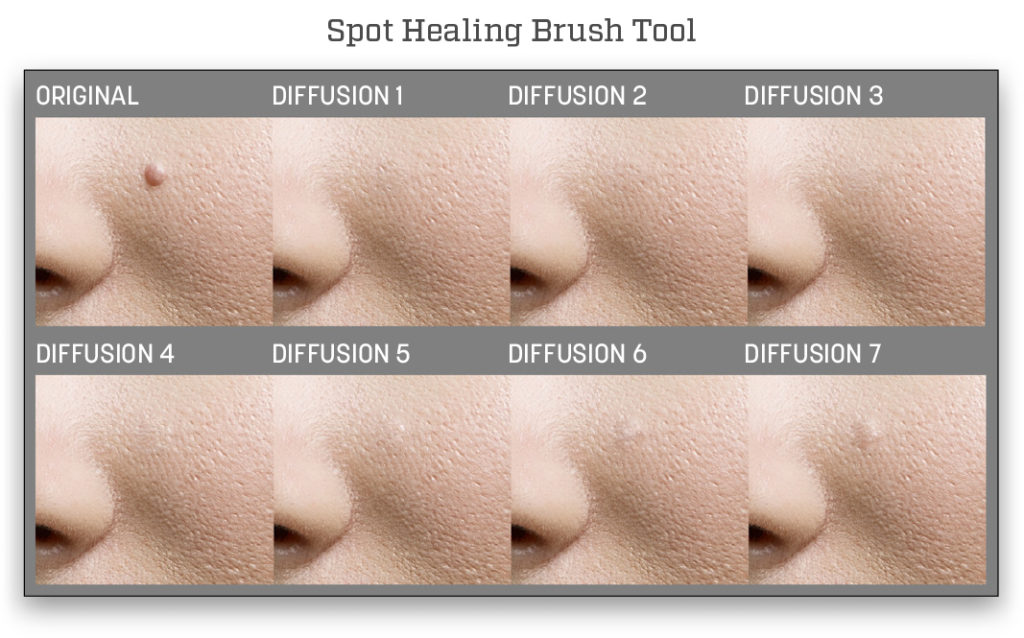
Now, what exactly does this mean for you portrait and beauty retouchers out there? Let’s look at this next experiment. Here, you’ll see a grid of an image by Michael Corsentino. (Before anyone complains about why I’d remove a beauty mark from a model, this is purely for explanation sake. I would never remove a mark like this during a regular retouch, but it’s a perfect example to show you how the Diffusion slider works on skin texture.)
First, I tested the Diffusion slider values for the Healing Brush tool, and then, the Spot Healing Brush tool. When we use a tool to remove a blemish, we not only want it to erase the blemish, but also blend in the new skin color and texture with the surrounding areas, so it looks like there was nothing there in the first place. So, for both these tools, a Diffusion slider value of 1 gives a much better result when it comes to skin retouching.
Sky Test
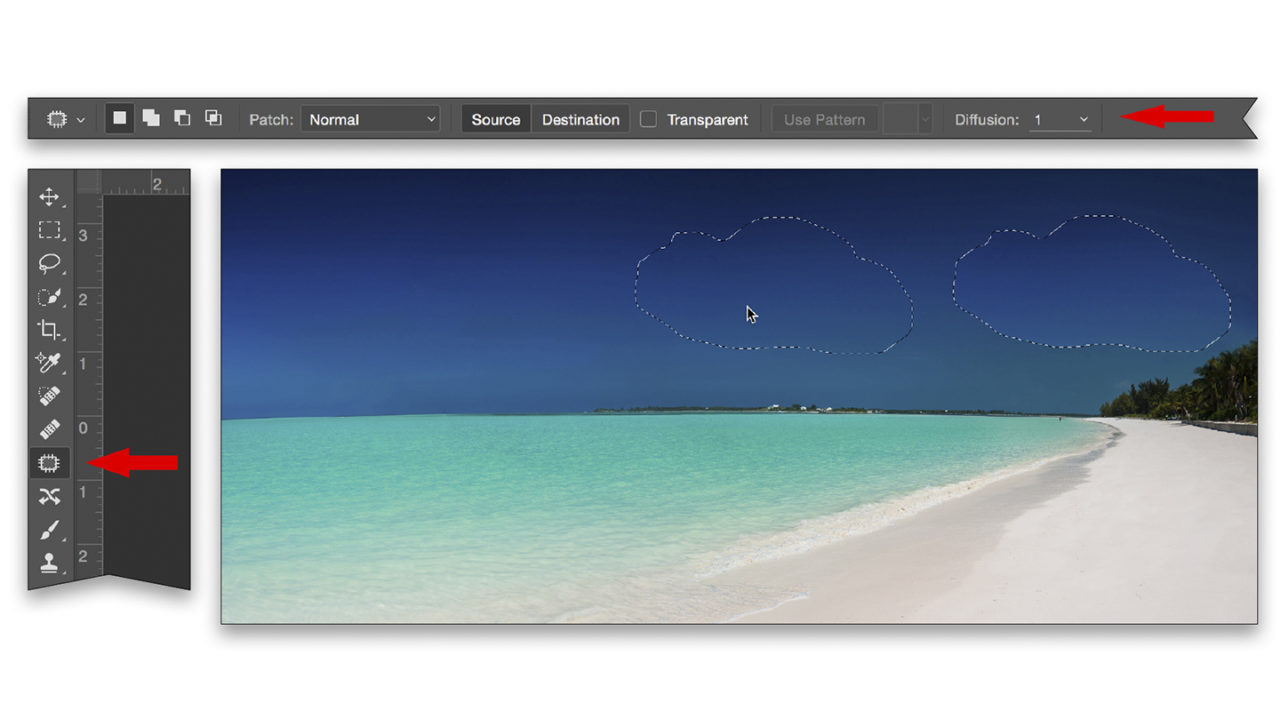
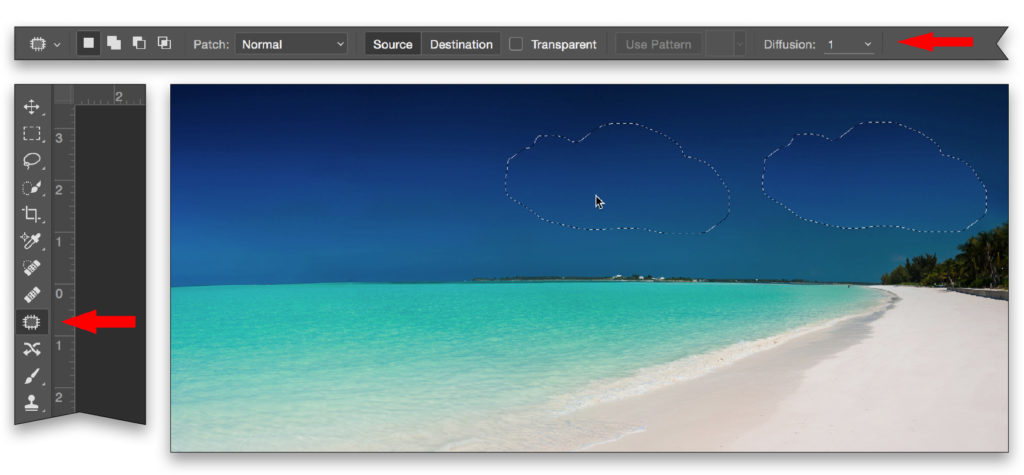
Now, even though I’m a portrait retoucher, I don’t want to leave out all my landscape photographers out there, because these tools and how they react to the Diffusion slider are important for you, as well. In the image above, let’s pretend I want to get rid of the one, big cloud in the sky. This area (the sky) has completely different characteristics than skin texture does—it’s smooth with lots of minute color gradient shifts and has absolutely no noise or texture in it. Thus, the Diffusion slider value that will work best for this may be different! Let’s find out. We’re going to try to use the Patch tool to remove the cloud using two different values for our Diffusion slider, first using a value of 1 and again using a value of 7 to see which one looks best.

Step One: First, duplicate the Background layer by pressing Command-J (PC: Ctrl-J). Then, select the Patch tool by pressing Shift-J, until you have it.
Step Two: Next, make sure your Patch tool settings are set to the Option Bar settings shown below. Please note that the Diffusion slider is set to a value of 1.
Step Three: We can now draw a circle around the cloud, and then click-and-drag the area with the cloud directly to the left to remove the cloud.
Step Four: Here are the zoomed out and zoomed in results of using a Diffusion slider value of 1. Needless to say, not ideal for this type of work.

Step Five: Now let’s change our Diffusion slider to a value of 7 and do the same thing.

Step Six: We’ll select the cloud again, and drag it using the Patch tool to the same exact place we dragged it to before, and see if we get different results.

Wow, I’m impressed! This result is much better. I always tell students in my classes: the more knowledge you have about how the tools in Photoshop work, the better results you’ll get when using them, and you’ll also know the best scenario to use each setting. We’ve absolutely accomplished learning which settings are best for different types of work in this article, and I hope the knowledge here enables you to start working smarter, not harder.
This article originally published in the March, 2017 issue of Photoshop User magazine.


