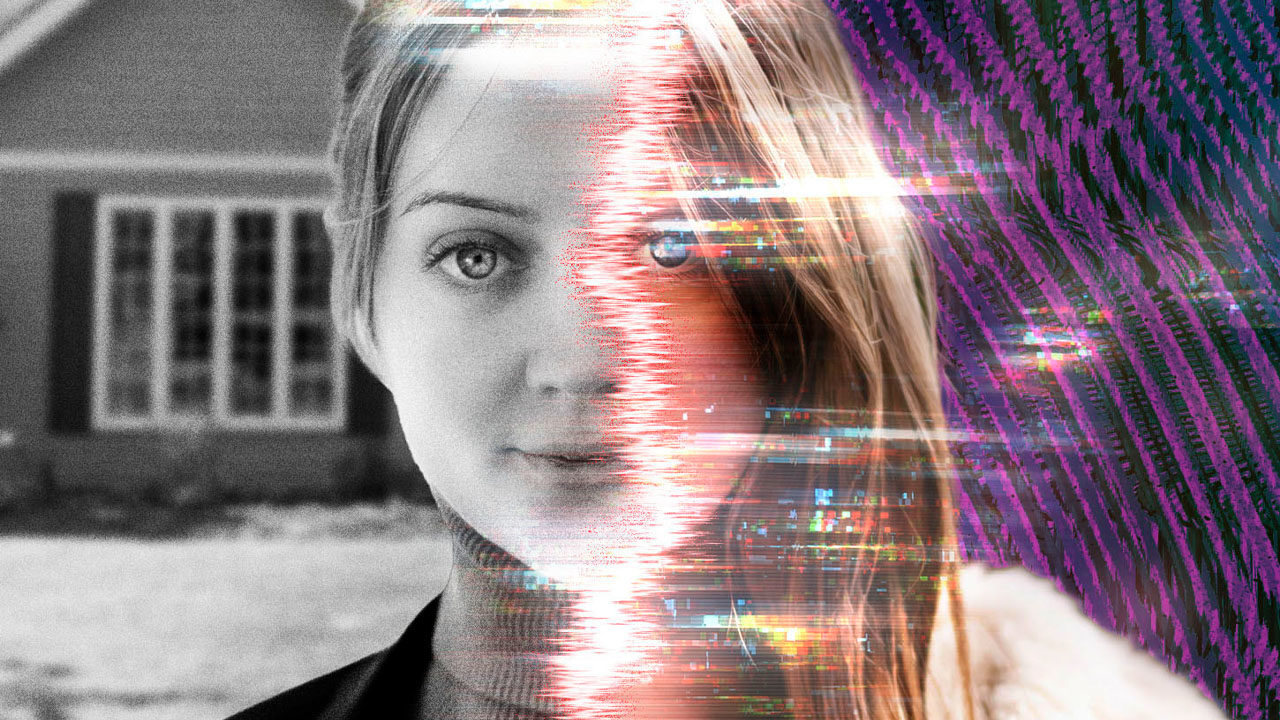
One of the most intriguing properties to come out of Marvel Studios is the short Disney+ series WandaVision. Not only is it deliciously weird, oddly mysterious, and abounding with fun fan theories, but it also has some great effects that we don’t often get to see in small-screen productions. The marketing materials feature one of those effects where the border to the “Hex” is seen and the characters are half in and half out. With a bit of Photoshop magic, we can create a similar effect ourselves, all without having super powers infused by an Infinity Stone!
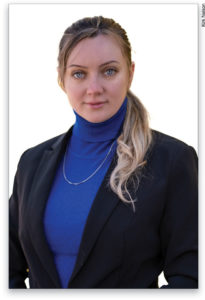
We’ve provided the base portraits to use on this project, BusinessSuitBlonde.jpg and FurCoatBlonde.jpg. [KelbyOne members may download these two files by clicking here or visiting members.kelbyone.com/magazine. All files are for personal use only.] The effects are also powered by a handful of Adobe Stock images. It’s possible to use the smaller, watermarked versions to learn the technique so you can use your own images later on.
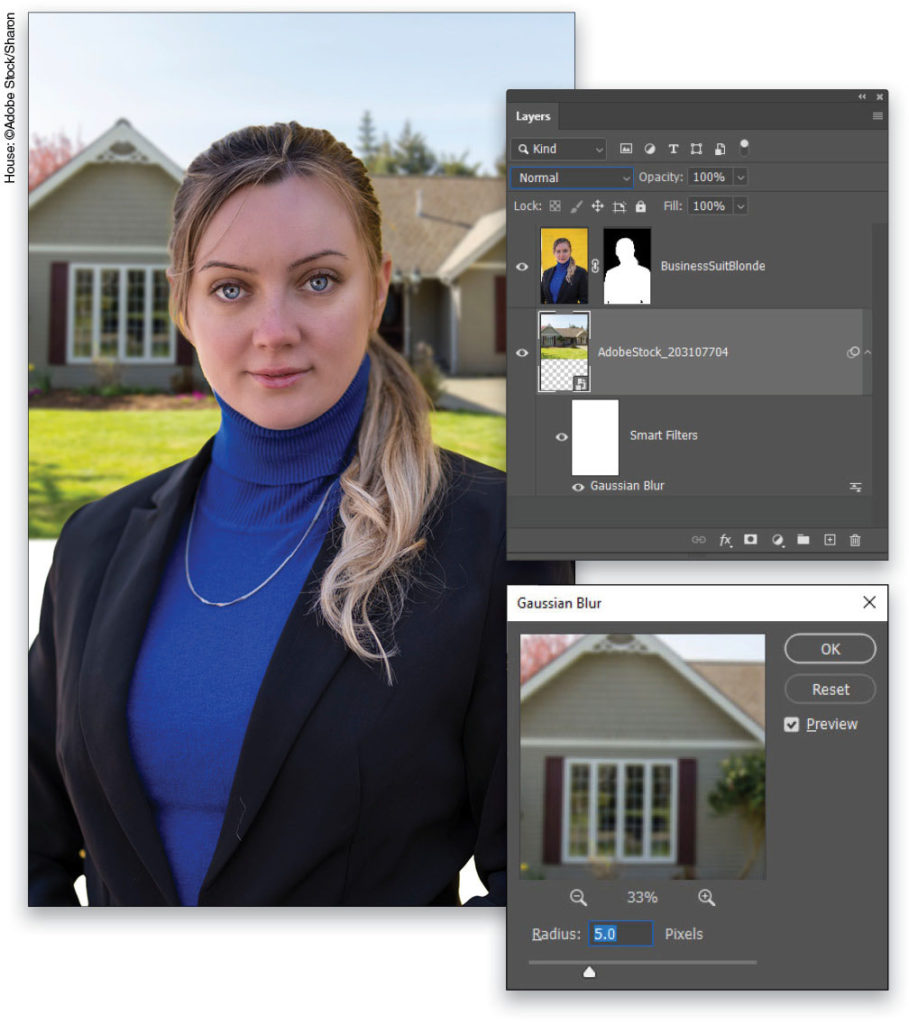
Step One: Open the photo BusinessSuitBlonde.jpg in Photoshop. This will be the base photo on which the entire effect is built, but first that yellow background needs to be replaced. Go to Select>Subject, and follow that with Select>Select and Mask. Then click the Refine Hair button in the Options Bar and, in the Output Settings in the Properties panel, set the Output To drop-down menu to Layer Mask. Click OK. Double-click the layer’s name in the Layers panel and rename it “BusinessSuitBlonde.”

Step Two: Grab an image of a suburban house to go into the background (in this case, this image from Adobe Stock works well). Place it into the composition with Edit>Place Embedded. If you’d like to download the low-res watermarked version of this image from Adobe Stock to follow along, click this link, log in with your Adobe ID, and click the Save to Library button. Drag the image from the Libraries panel (Window>Libraries), and drop it into your working file.
Resize and position the image so it fills the background behind the model. Don’t worry about the empty space behind her in the bottom half; that will get covered up later. Once satisfied with the placement, press Enter, and then drag the house layer below the subject layer in the Layers panel. Go to Filter>Blur>Gaussian Blur, use a Radius of 5 pixels, and click OK.
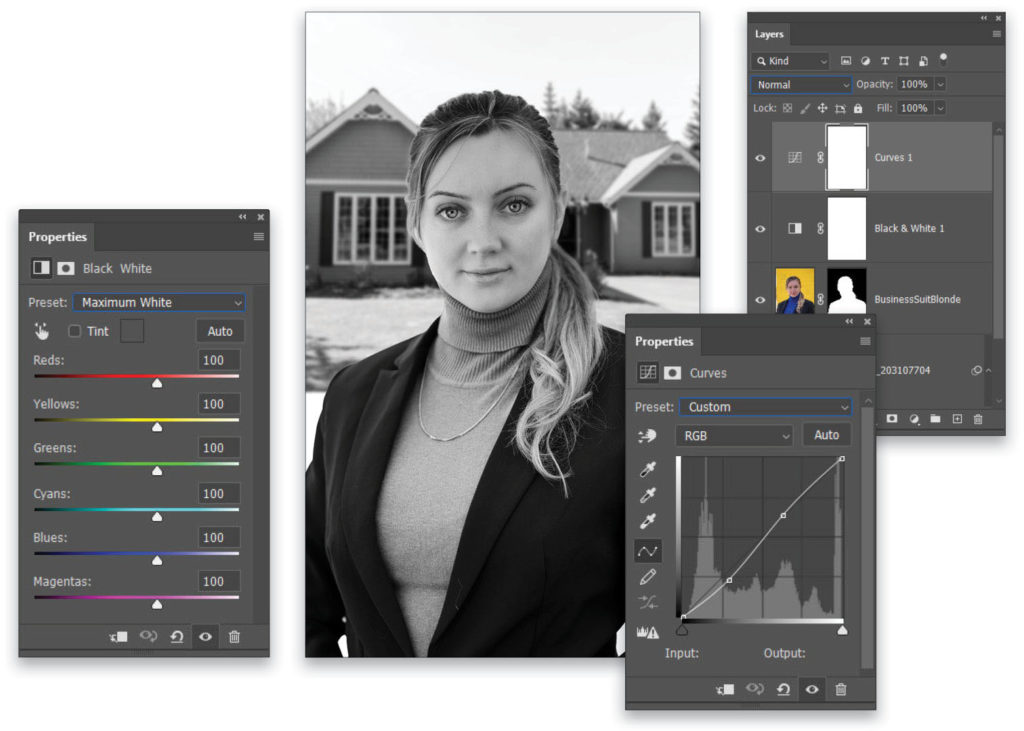
Step Three: Add a Black & White adjustment layer (Layer>New Adjustment Layer>Black & White) to the top of the layer stack, and set the Preset drop-down menu in the Properties panel (Window>Properties) to Maximum White. Then add a Curves adjustment layer (Layer>New Adjustment Layer>Curves) and create a subtle S shape with the curve in the Properties panel to enhance the contrast.
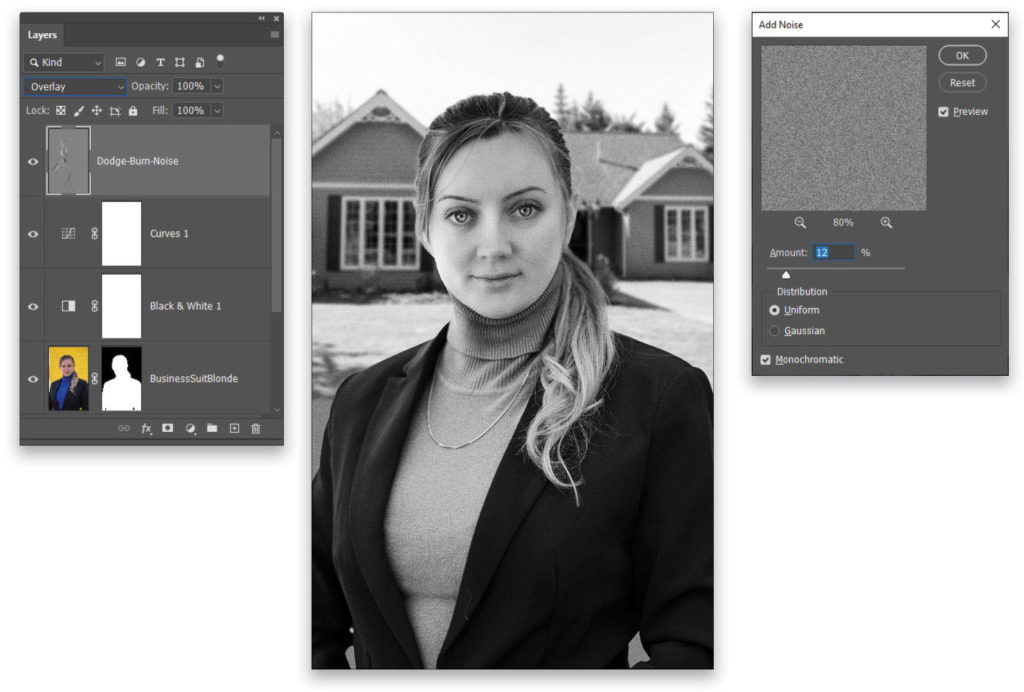
Step Four: Use the Layer>New>Layer command to get the New Layer dialog. Name the layer “Dodge-Burn-Noise” and set the Mode to Overlay. Before clicking OK, enable the option for Fill with Overlay-Neutral Color (50% Gray). Once the layer is in place use the Dodge tool (O) to brighten the lighting on the side of her face closest to the light source and the Burn tool (nested below the Dodge tool in the Toolbar) to darken the shadows a bit.

Step Five: Go to Filter>Noise>Add Noise, and set the Amount to 12%, Distribution to Uniform, and check the Monochromatic box. Click OK. This adds some grain to the image and makes it reminiscent of old sitcom TV shows.
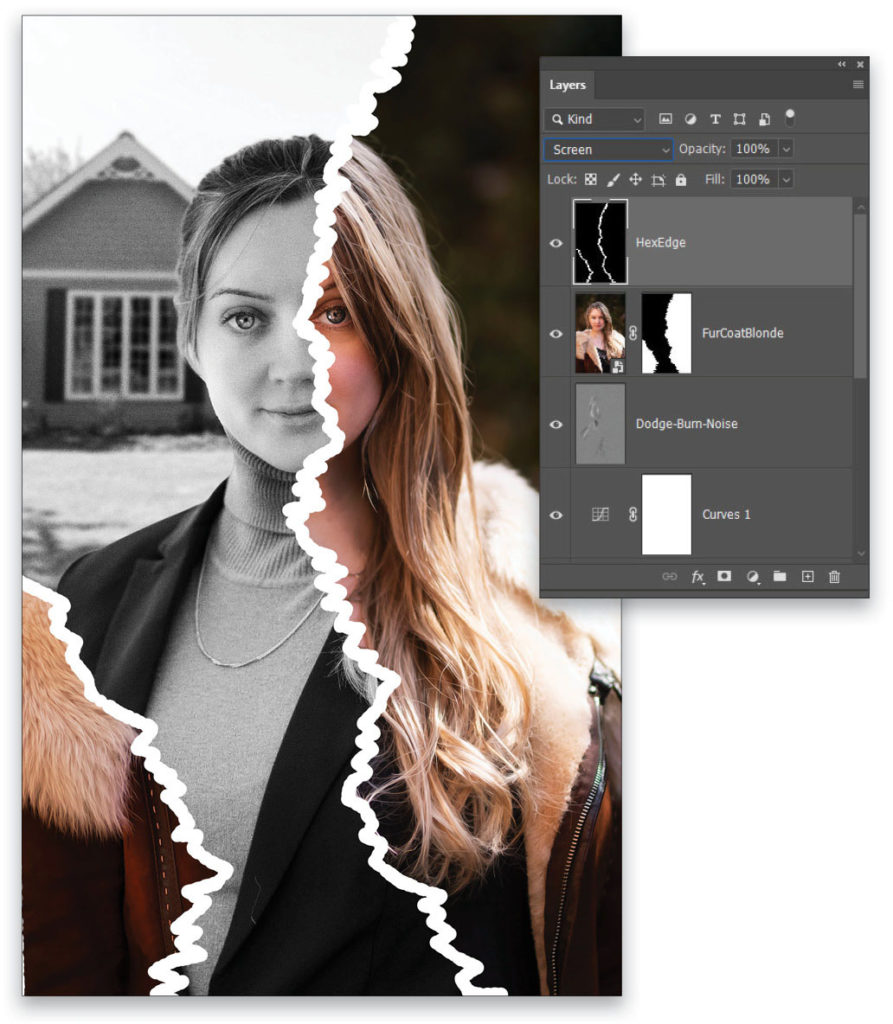
Step Six: Use File>Place Embedded to place the photo called FurCoatBlonde.jpg from the download files. Press Enter to commit the image. Place it above the Dodge-Burn-Noise layer in the Layers panel. This image is already sized to match up with the previous photo, so if you’re using a different set of photographs, it would be necessary to transform the photos so they align.
Go to the Paths panel (Window>Paths) and look for the built-in path called Hex Border (feel free to draw your own paths using the Pen tool [P] if you like). Command-click (PC: Ctrl-click) the path in the Paths panel to load it as a selection. Click the Add Layer Mask icon (circle in a square) at the bottom of the Layers panel to use the selection as a layer mask.

Step Seven: Add a new layer above the FurCoatBlonde layer using the Layer>New>Layer command again. Name this layer “HexEdge,” set the Mode to Screen, enable the option for Fill with Screen-Neutral Color (Black), and click OK.
Then grab the Brush tool (B) and press D then X to set the paint color to white. Open the Brush Settings panel (Window>Brush Settings), select the Hard Round brush, and set the brush tip Size to 35 pixels. Enable the Shape Dynamics on the left side of the Brush Settings panel and set the Size Jitter to 100%.
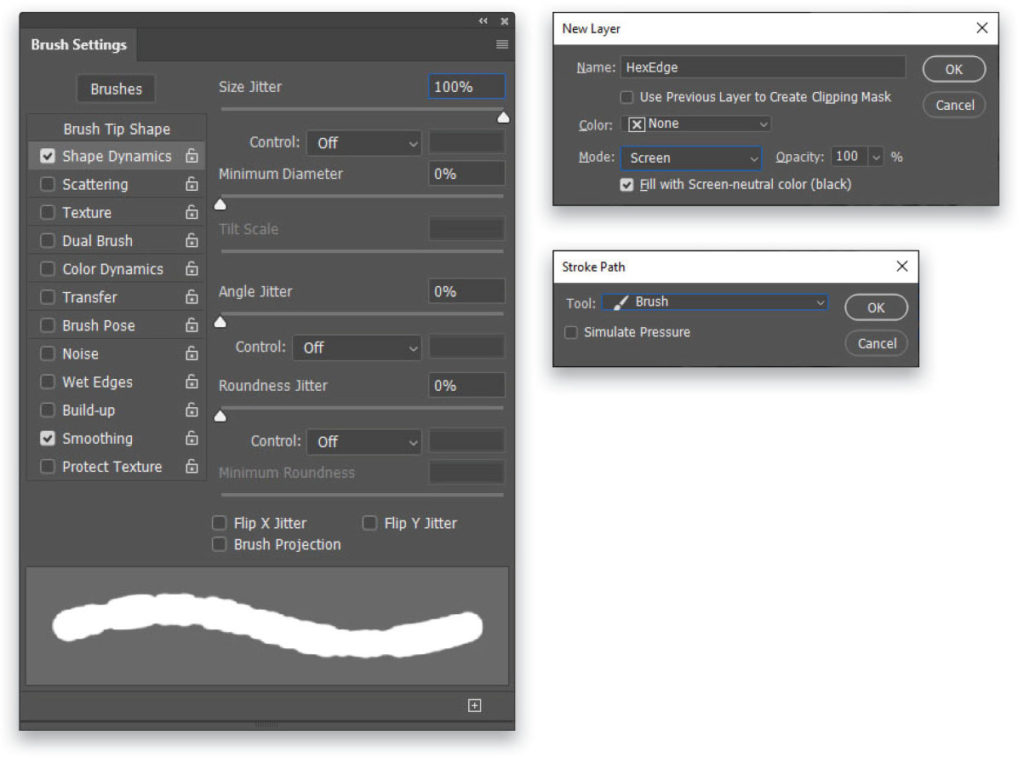
In the Paths panel again, Right-click on the Hex Border path and select Stroke Path from the context menu. When prompted, make sure the Brush tool is selected in the Tool drop-down menu, and click OK. This generates a painted border along the path. (Afterwards, click in the empty space in the Paths panel to deselect the path so you can see the brushstroke.)
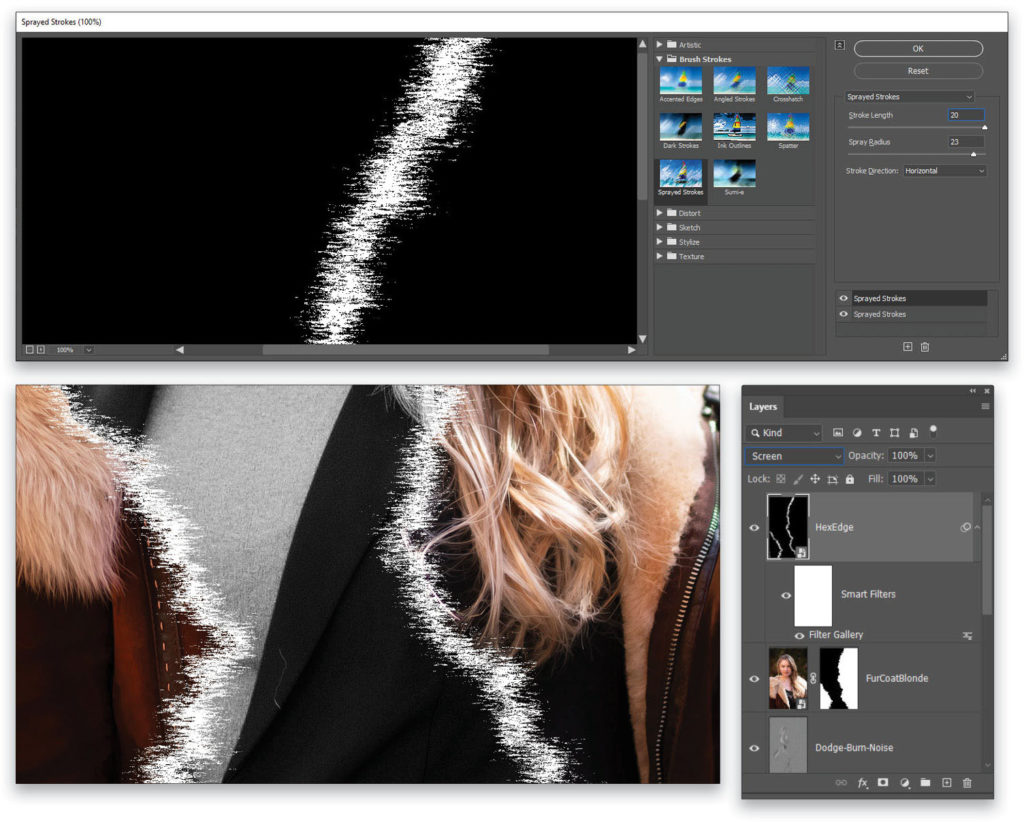
Step Eight: Go to Filter>Convert to Smart Filters to turn the layer into a smart object. Then go to Filter>Filter Gallery and in the Brush Strokes folder choose the Sprayed Strokes filter. Set the Stroke Length to 20, Spray Radius to 23, and Stroke Direction to Horizontal. Then in the lower-right portion of the window, click the plus icon to duplicate the filter so it’s applied twice. Click OK.
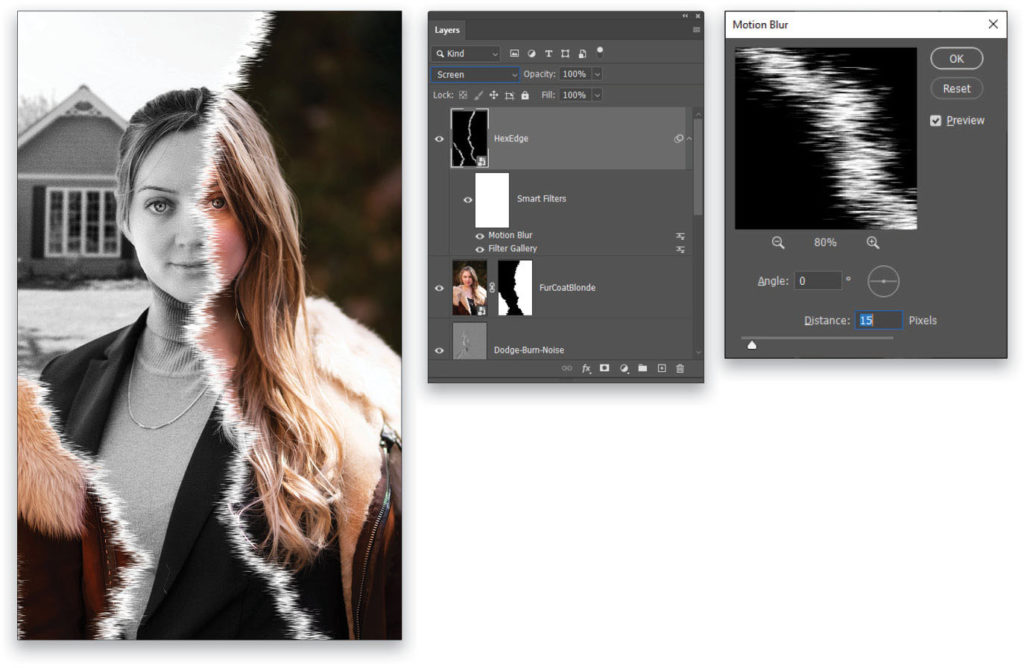
Step Nine: Next, go to Filter>Blur>Motion Blur. Set the Angle to 0°, the Distance to 15 pixels, and click OK. This stretched, static effect will serve as the basis for the rest of the transition effect.
Step 10: Temporarily set the HexEdge layer blend mode back to Normal in the Layers panel so the black fill is visible. In the Channels panel (Window>Channels) Command-click (PC: Ctrl-click) on the RGB channel to select the luminous pixels, which are the pixels in the white scatter effect. Set the blend mode of the HexEdge layer back to Screen, add a new layer beneath the HexEdge layer, and call the new layer “Edge Glow.”
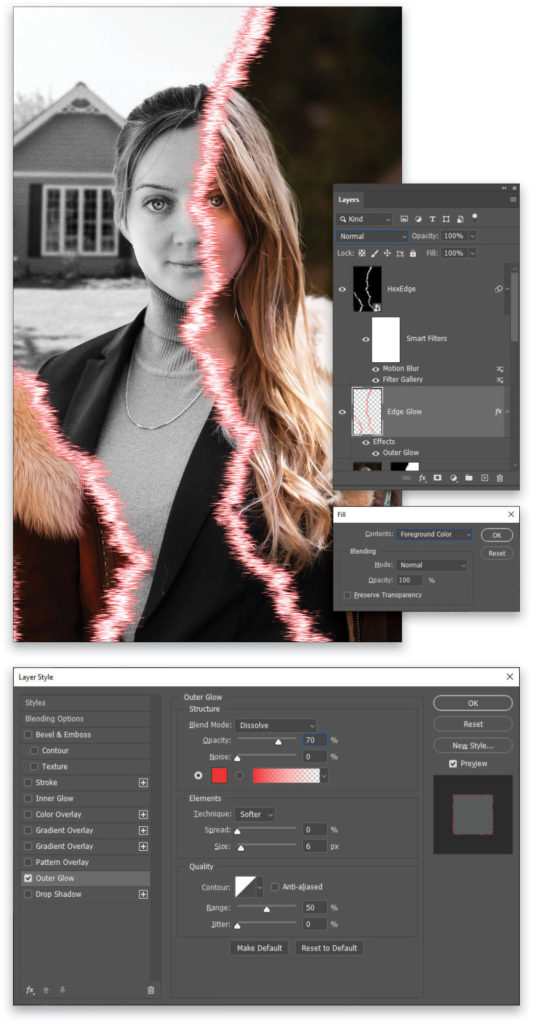
Click on the Foreground color swatch near the bottom of the Toolbar, set the color to a bright red (#ff2e2e), and click OK to close the Color Picker. Fill the selection by using Edit>Fill, setting the Contents drop-down menu to Foreground Color, and clicking OK. Then press Command-D (PC: Ctrl-D) to cancel the selection.
Add an Outer Glow layer style (Layer>Layer Style>Outer Glow) with the same red color, Opacity at 70%, Spread at 0%, and Size at 6 px. Then comes the crazy part: set the Outer Glow Blend Mode to Dissolve. Yes, Dissolve! Click OK. [For more on the Dissolve blend mode, check out the “Photoshop Proving Ground” in the April 2021 issue of Photoshop User magazine.—Ed.]
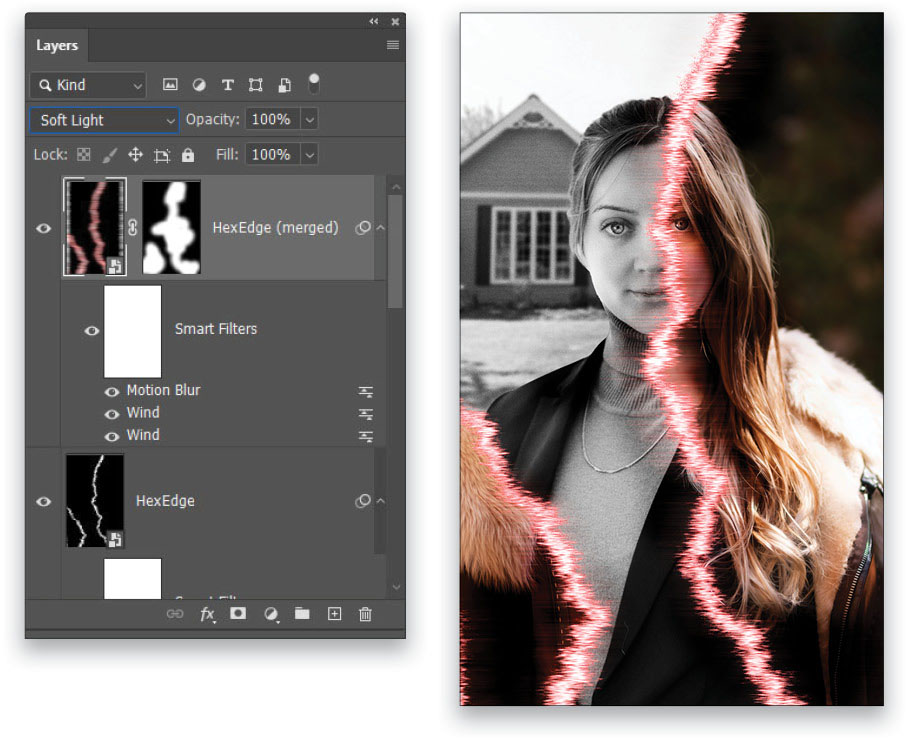
Step 11: With the Edge Glow layer active in the Layers panel, Shift-click the HexEdge layer so they’re both selected. Hold down the Option (PC: Alt) key and go to Layer>Merge Layers to create a merged copy of those two layers.
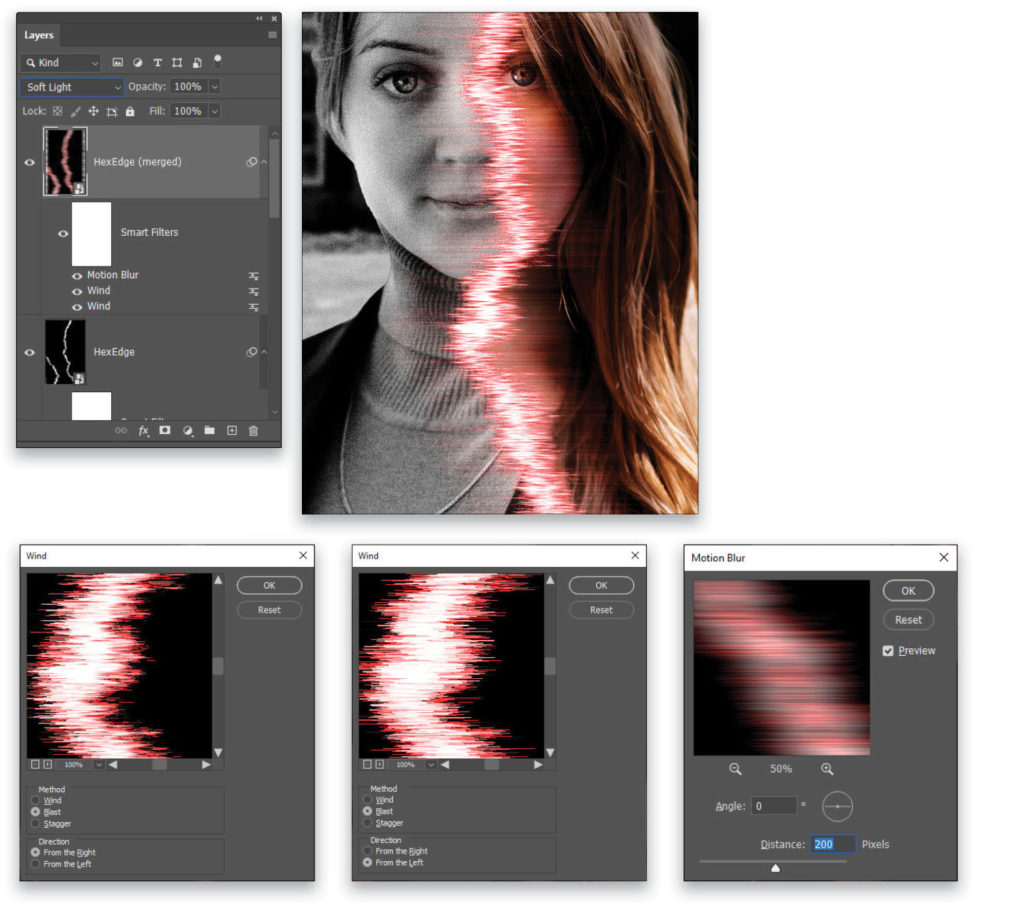
Turn this layer into a smart object, set the blending mode to Soft Light, and go to Filter>Stylize>Wind. Set the Method to Blast and the Direction to From the Right. Click OK, and run the Wind filter again, but this time set the direction to From the Left. Follow this with the Motion Blur filter set to an Angle of 0° and Distance of 200 pixels. Click OK.
Step 12: The merged layer tends to darken the rest of the image and needs to be constrained to the edge area of the glowing Hex effect. Hold down the Option (PC: Alt) key and click the Add Layer Mask icon at the bottom of the Layers panel to add a layer mask filled with black, which completely hides the layer. Then use the Brush tool again set to white with a much larger and Soft Round brush (be sure to turn off Shape Dynamics in the Brush Settings panel), and paint on the mask to reveal the effect only along the glowing edge.
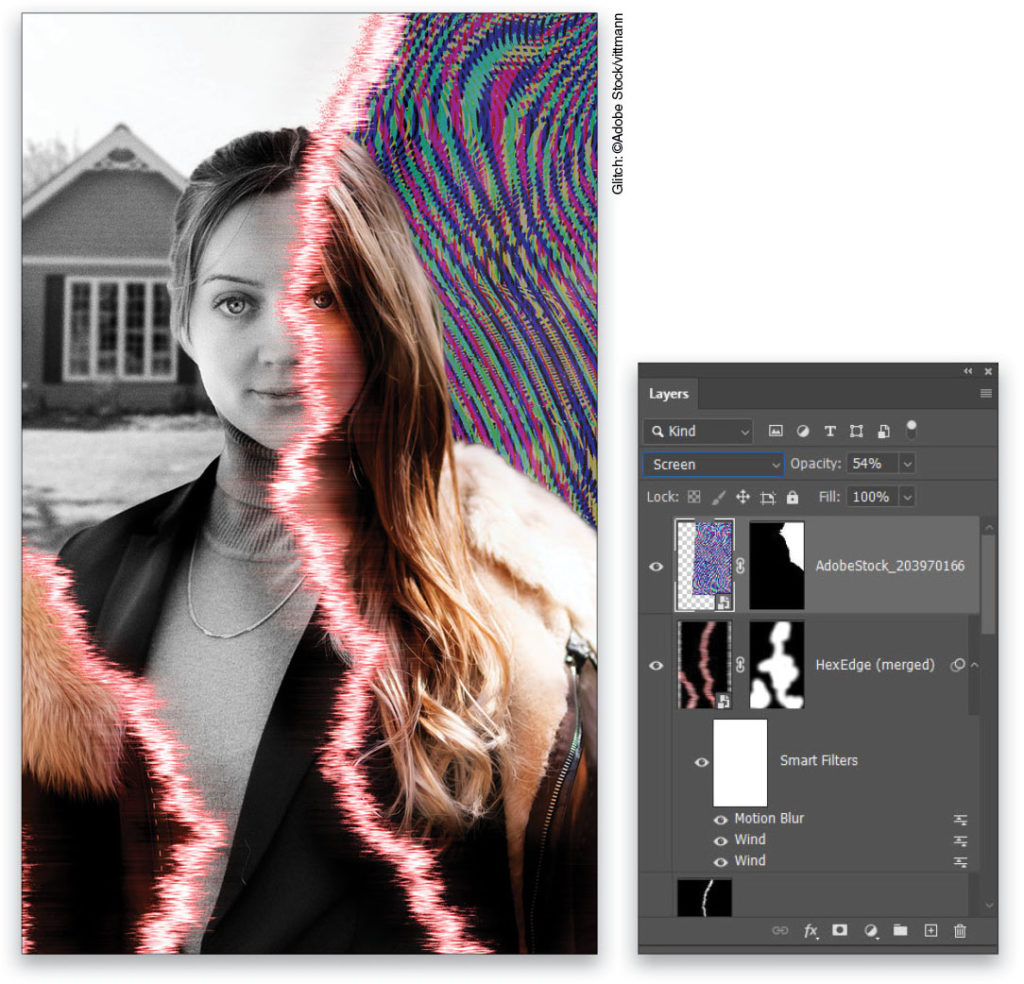
Step 13: Now we’re going to place the Adobe Stock image of the colorful static (click here to download the preview image from Adobe Stock, and then drag the image from your Libraries panel into your working file). Transform the texture to cover the top-right portion of the image, and then rotate it into position. Set the blending mode to Screen and reduce the Opacity to 54%.
The static should look like it’s behind the model, so a layer mask is needed. First, make the FurCoatBlonde layer the active layer and go to Select>Subject. Inverse that selection with Select>Inverse. Hold down the Shift-Command-Option (PC: Shift-Ctrl-Alt) keys and click on the layer mask thumbnail for the FurCoatBlonde layer in the Layers panel. This will intersect the selection with that mask and create the perfect selection for generating the mask on the static texture layer. So click on the static layer to make it active, and then click the Add Layer Mask icon at the bottom of the Layers panel.
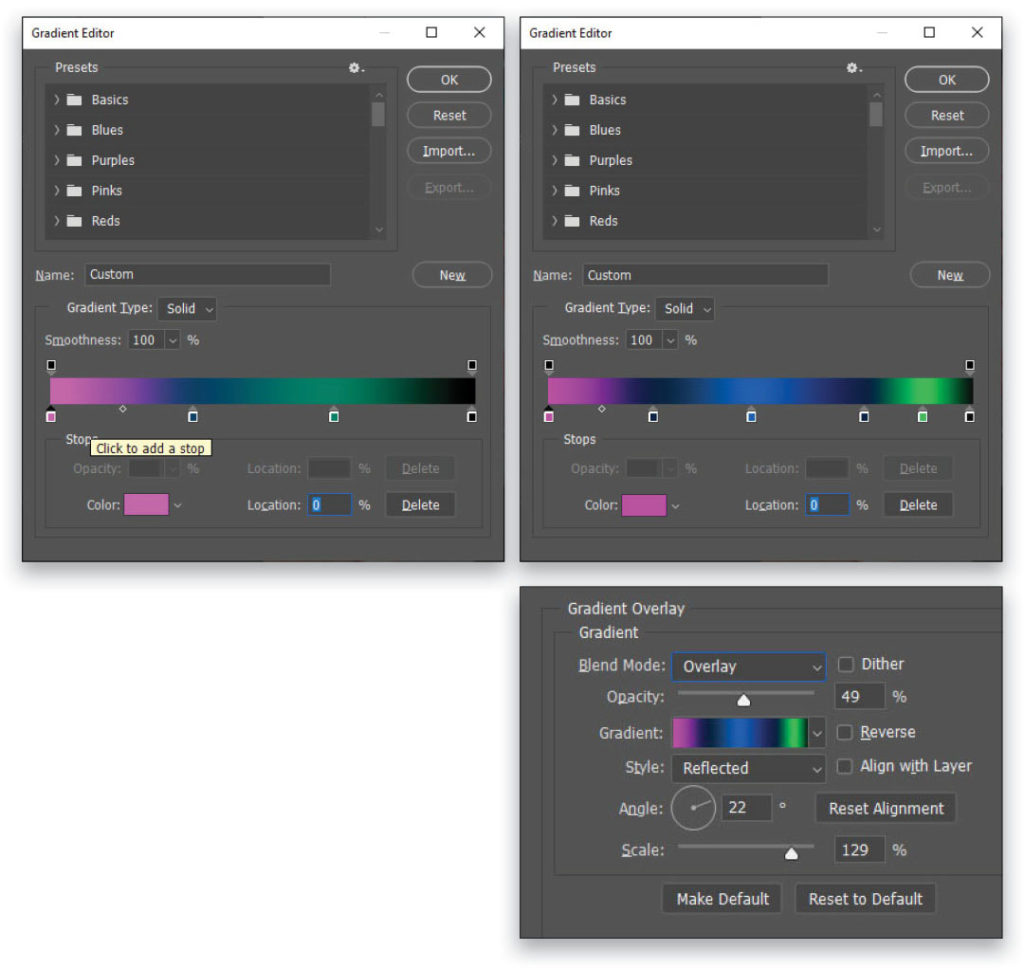
Step 14: Click on the static texture layer’s thumbnail in the Layers panel, and go to Image>Adjustments>Gradient Map. In the Gradient Map dialog, click on the gradient bar to open the Gradient Editor (see next page). Edit the gradient to have four color stops equally spaced apart (click below the gradient ramp to add color stops). Double-click each of the color stops to edit its color using these colors: bright magenta (#ec4eff), navy blue (#1f4065), sea green (#277e64), and black. Click OK to close the Gradient Editor, and then click OK to apply the Gradient Map.
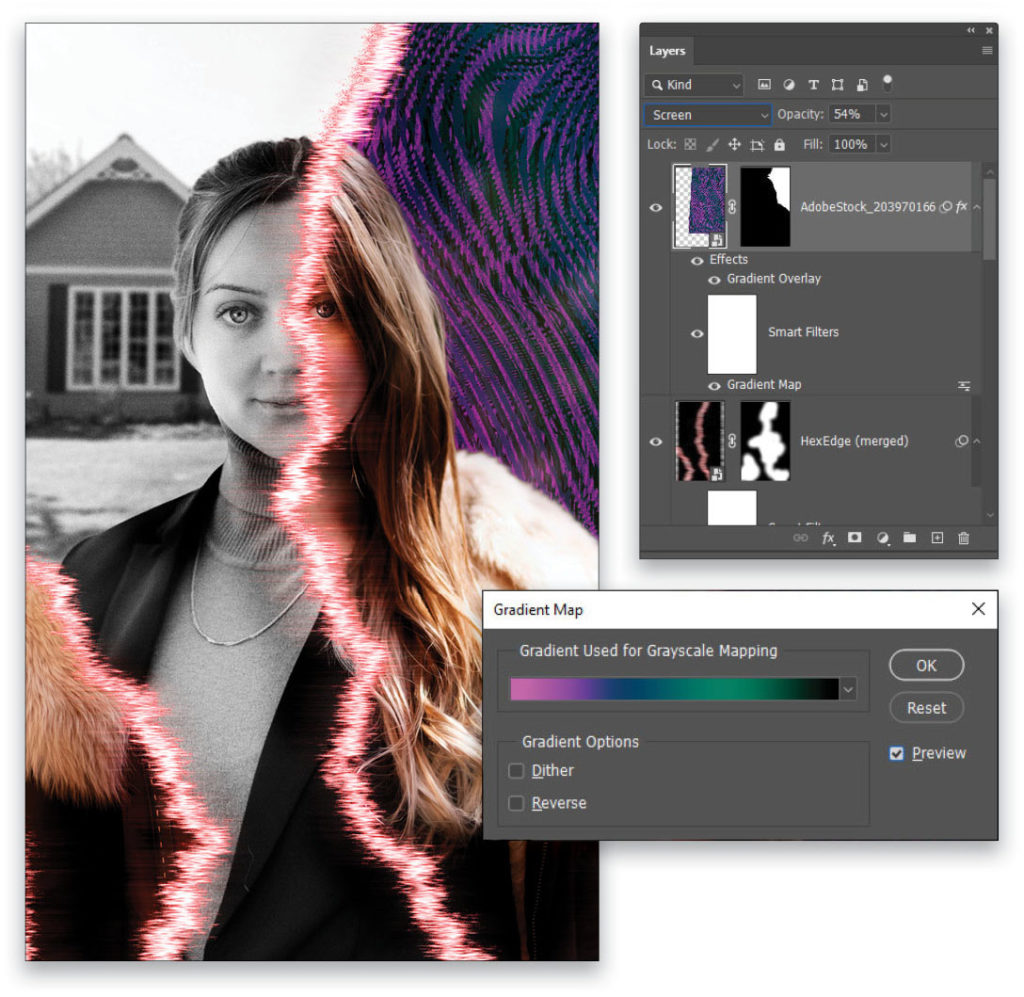
Then add a Gradient Overlay layer style (Layer>Layer Style>Gradient Overlay) using another custom gradient this time with six color stops: magenta (#db13ff), midnight blue (#012445), royal blue (#045cb7), midnight blue again (#012445), bright green (#04cc62), and black. Click OK to close the Gradient Editor. Back in the Layer Style dialog, set the Blend Mode to Overlay, Opacity to 49%, Angle to 22°, and Scale to 129% before applying the layer style.
Step 15: Now we’re going to place another static texture Adobe Stock image into the composition (click here to download the preview image). Size this stock image down to be about 30% of the composition’s size and press Enter. Press Command-J (PC: Ctrl-J) twice to duplicate the stock layer twice and use the Move tool (V) to position the three copies so most of the canvas is covered.
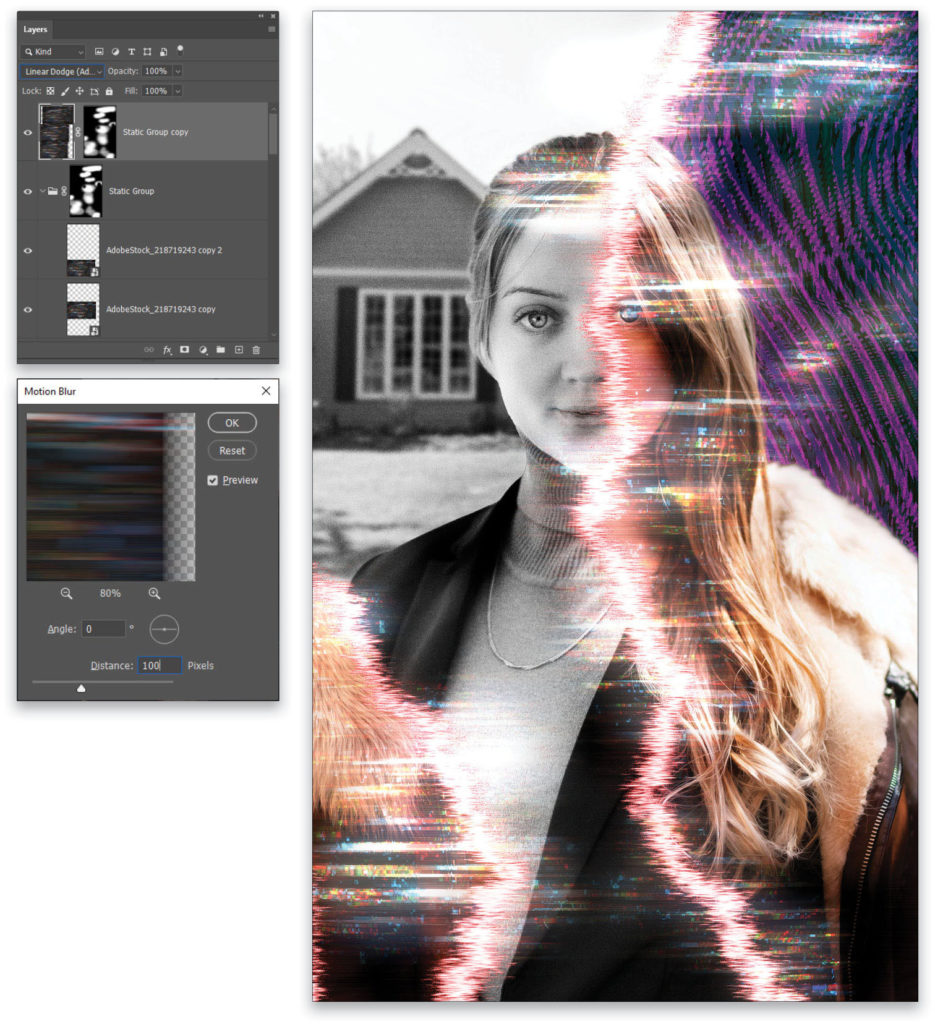
Then select all three stock layers in the Layers panel and press Command-G (PC: Ctrl-G) to group those all together. Name this group “Static Group,” and set the group’s blending mode to Linear Dodge. Add a black-filled layer mask to the group to hide the full effect. Use a white brush on the mask to reveal the effect in small areas of your choice.
Step 16: Duplicate the group, Right-click on the duplicate group, and select Merge Group from the context menu. Then apply the Motion Blur filter again with a Distance of 100 pixels. Click OK to add the final touch, completing the WandaVision-inspired magical transition effect.
Crafting a magical border barrier is a concept that may not come up very often. But learning how to use various filters, brushes, and effects in Photoshop is really the best takeaway from a project like this. It’s all about finding new ways to apply the tools you have to create new and interesting effects.
This article originally published in the April, 2021 issue of Photoshop User magazine.
About Photoshop User and KelbyOne
Photoshop User magazine comes out digitally 12 times a year and is part of KelbyOne, the leading educational resource for Photoshop, Lightroom, and photography. Pro members have access to more than 900 video courses and 100 back issues of Photoshop User. To learn more about KelbyOne, click here.