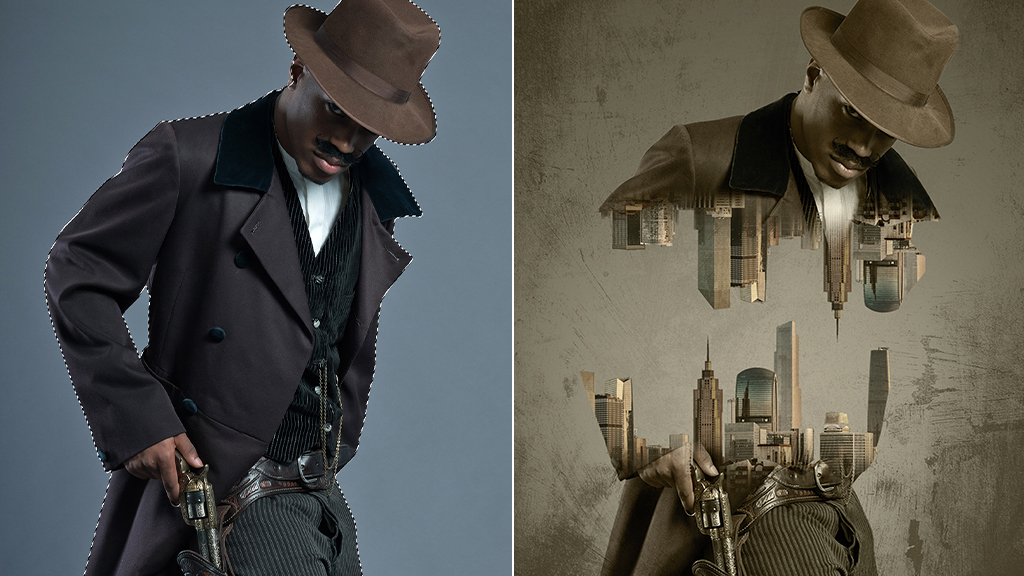
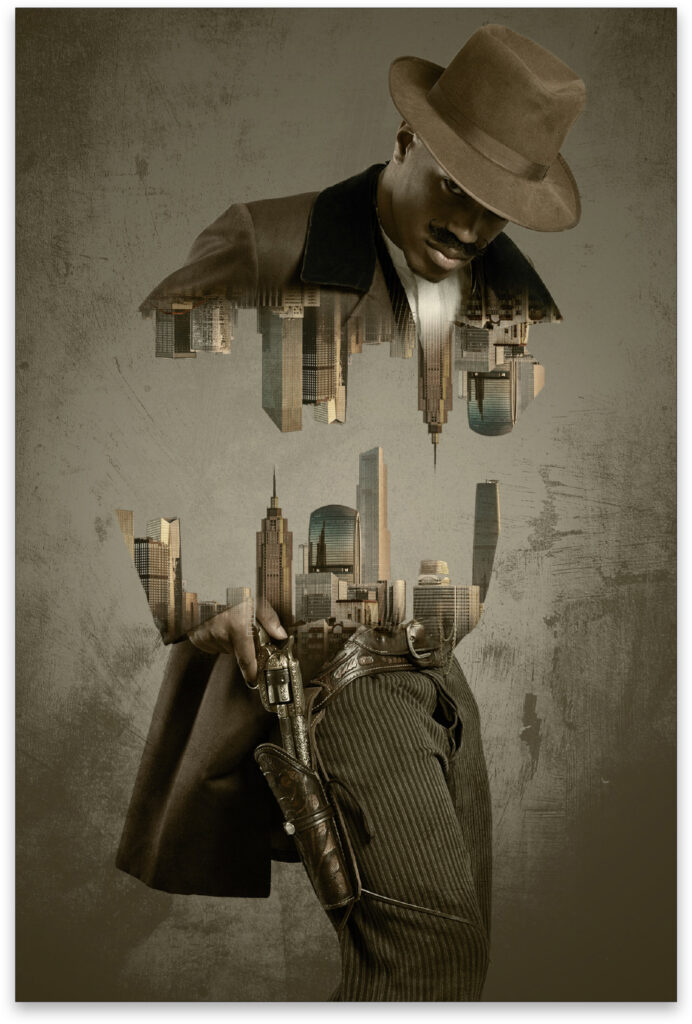
This tutorial was inspired by another image I saw online. It’s a fun way to blend images in a seemingly complicated way using some time-tested layer tricks. Plus, we’ll start with a few selection techniques I often use when doing quick composites like this. Because most of these effects are nondestructive, you can have fun customizing it after it’s created, and then we’ll finish it up with a couple texture and color overlays for a finished composite.
STEP ONE: Here we have a cowboy subject shot on a solid background. I chose this one because I like the pose of the gunfighter and it will work well with this effect. If you’d like to download the low-res watermarked version of this image to follow along, click this link, log in with your Adobe ID, and click the Save to Library button. Double-click the image in the Libraries panel (Window>Libraries) to open it in Photoshop.
To make it easier to work with the image, increase the resolution of the practice file. (We normally don’t recommend enlarging images, but this is only for practice purposes.) Go to Image>Image Size, turn on the Resample checkbox, select Preserve Details 2.0 from the Resample drop-down menu, set the Width to 4,500 pixels, and click OK.
Whatever your subject, we need to first extract him from its background. Normally, I’d go to Select>Subject but I wanted to show you other ways to generate selections. One of my favorites is still the Quick Selection tool (nested with the Object Selection tool [W] in the Toolbar). The trick is to select the background first by simply clicking-and-dragging on it. Each area in which you click-and-drag will be added to the selection (be sure to get the area between his right arm and body). Then inverse the selection onto the subject by going under the Select menu and choosing Inverse. Sometimes the easiest way to ensure something is selected is to make sure everything else isn’t.
STEP TWO: Once the selection is made you can click the Select and Mask button in the Options Bar to check to make sure you have everything selected. Here we’ve set the Edge Detection Radius to 1 px to adjust it slightly. Set the Output To drop-down menu at the bottom of the Properties panel to New Layer and click OK.

STEP THREE: With the subject now on his own layer, use Free Transform (Command-T [PC: Ctrl-T]) to scale and reposition him to fill the frame a bit more. This will help make a more interesting position for the composition. Press Enter when done.
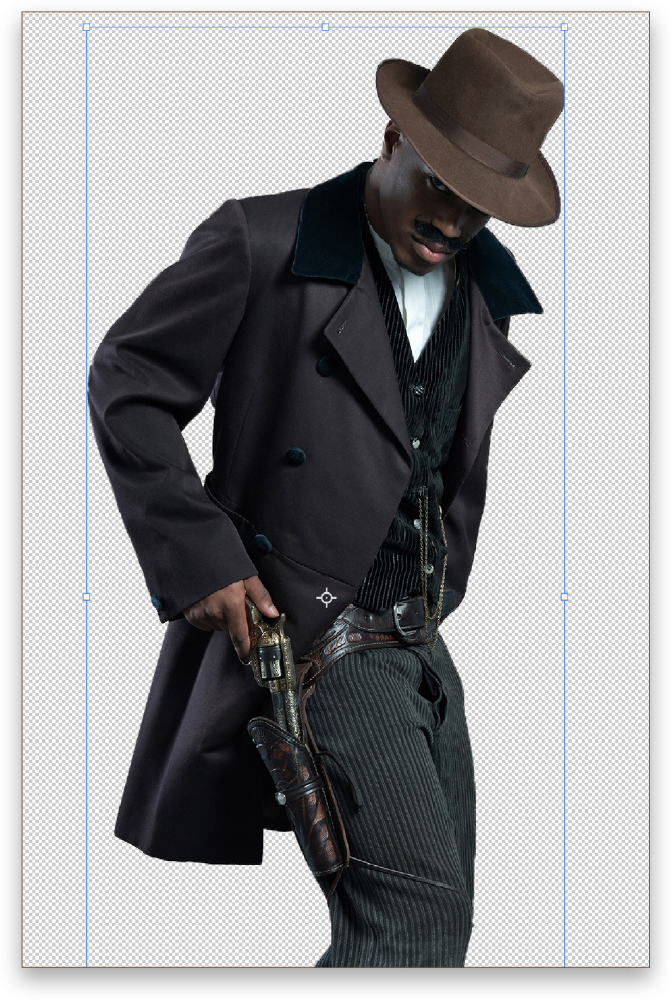
STEP FOUR: For the background, we want a simple gradient using the same color as the original background, so make a duplicate of the Background layer by selecting it in the Layers panel and pressing Command-J (PC: Ctrl-J). Make the duplicate layer visible by clicking where its Eye icon should be in the Layers panel. Double-click the name of the extracted subject layer, rename it “Cowboy Main,” and click its Eye icon to hide it.
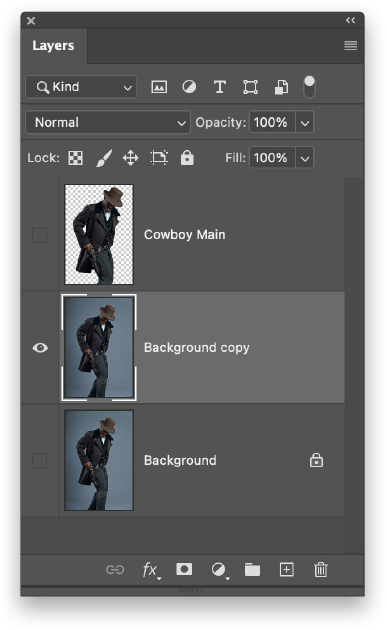
STEP FIVE: With the Background copy layer active, go under the Filter menu, to Blur, and choose Average. This will fill the layer with the dominating color within the image, which is this blue/gray background color. To add a gradient, click on the Add a Layer Style icon (ƒx) at the bottom of the Layers panel and choose Gradient Overlay. The settings shown here will produce a nice radial highlight in the middle of the canvas. For the Gradient, click on the preview thumbnail and, in the Gradient Editor, choose the Black, White preset in the Basics set. Click OK to close the Gradient Editor. Remember, you can manually move the center of the gradient by clicking-and-dragging in the canvas while you have the Layer Style dialog open. Click OK, when done
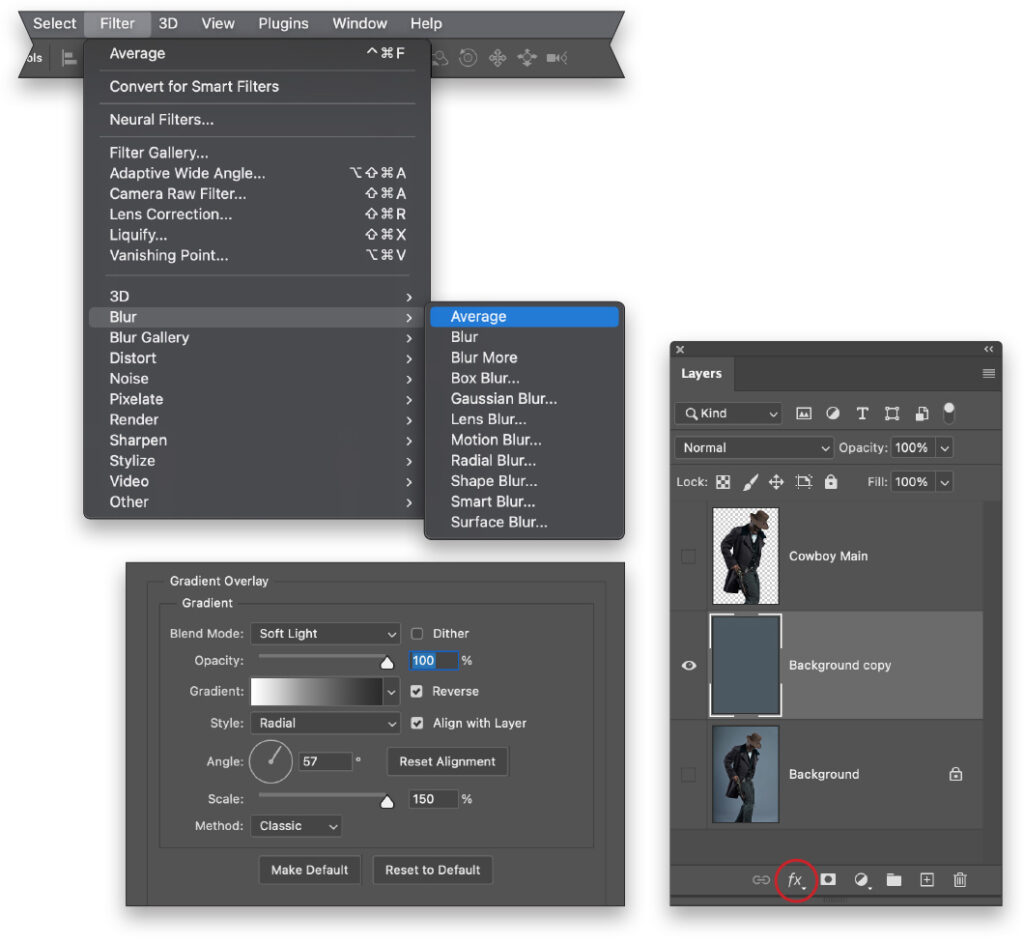
STEP SIX: With the subject set up for now, let’s add the city skyline image; this one has a nice variation of building shapes and heights. When choosing a skyline image for this effect, you want it to look interesting but also easy to extract, so the simpler the sky, the better. Like the main subject, we need to extract this city skyline from its sky background. We’ll explore a different method for this.
If you’d like to download the low-res version of this image from Adobe Stock, click here, and then save it to your Libraries panel, open it, and resize it as we did with the cowboy in Step One.
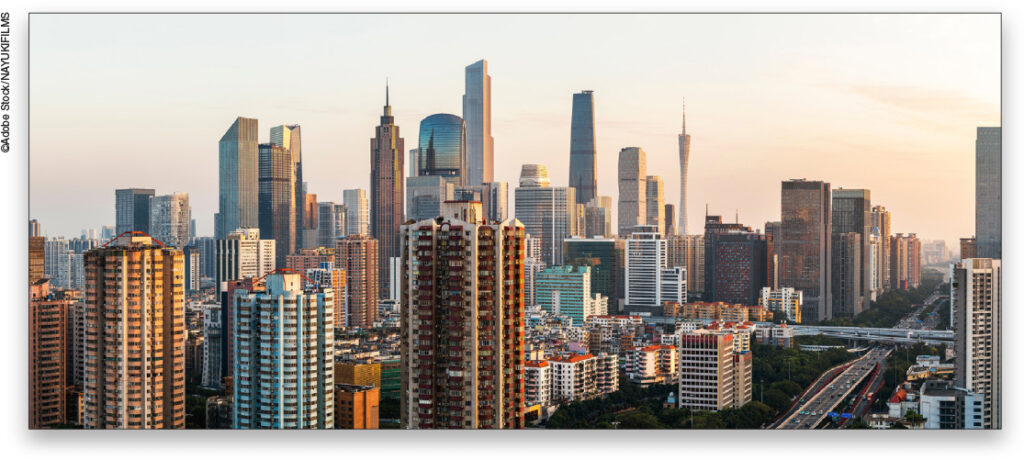
STEP SEVEN: This time we’ll use the Magic Wand tool (also nested with the Object Selection tool in the Toolbar). In the Options Bar, set the Tolerance to 50 and make sure Contiguous is checked on. Click on the sky to initiate the selection. If it doesn’t select everything, instead of changing the Tolerance setting, deactivate the selection by pressing Command-D (PC: Ctrl-D) and then click on a different part of the sky. Clicking on varying tones can determine what’s selected.

STEP EIGHT: Just as before, inverse the selection (Select>Inverse), then press Command-J (PC: Ctrl-J) to copy the selected area to a new layer. Hide the original Background layer so you can see what your extracted skyline looks like.
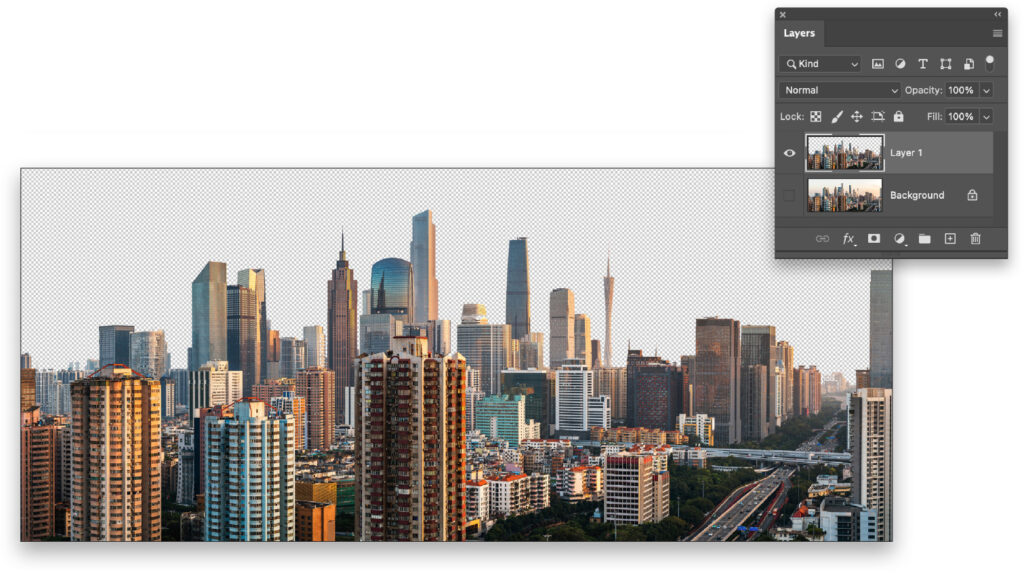
STEP NINE: Next bring this city image into the working subject image by using the Move tool (V) to drag it over. In the Layers panel, make sure the skyline is just above the Cowboy Main layer. Use Free Transform to scale the skyline and position it in a similar way to what’s shown here. Press Enter when done.
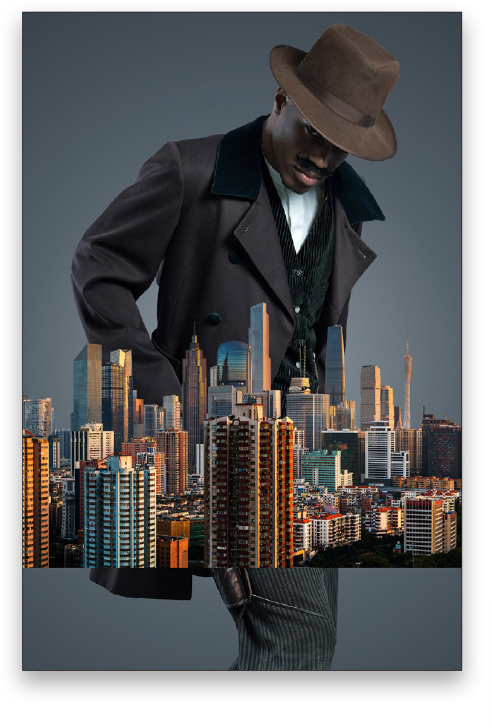
STEP 10: Rename the skyline layer to “City Skyline.” Hold down the Shift key and click on the Cowboy Main layer so both layers are selected. Press Command-G (PC: Ctrl-G) to place the selected layers in a layer group folder. Rename the group folder to “Group A.” You can see it contains the layers that were selected.

STEP 11: With the group layer expanded, hold down the Command (PC: Ctrl) key as you click on the City Skyline layer thumbnail in the Layers panel. This will load the shape of the city as an active selection.
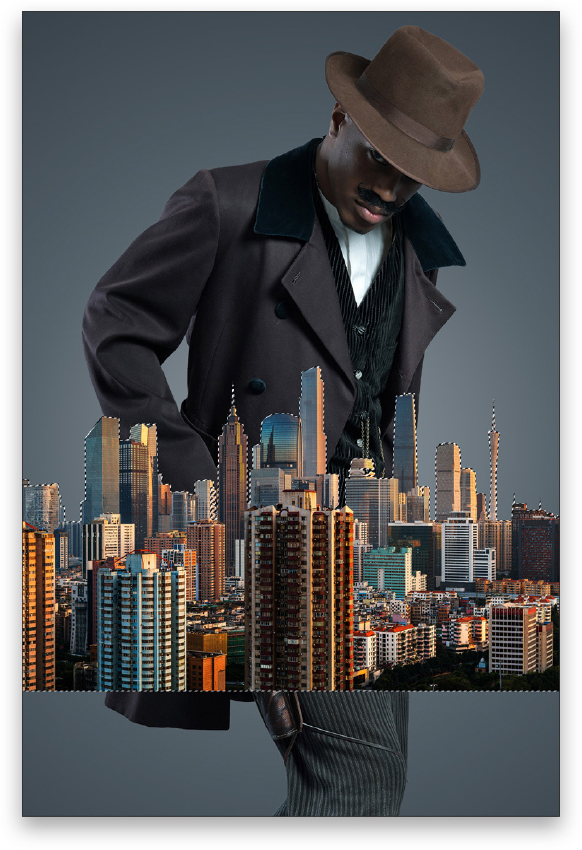
STEP 12: We also want to include everything below the city in the selection. Select the Rectangular Marquee tool (M) in the Toolbar, hold down the Shift key, and draw a selection to encompass everything below the city all the way to the bottom of the image to add it to the existing selection.
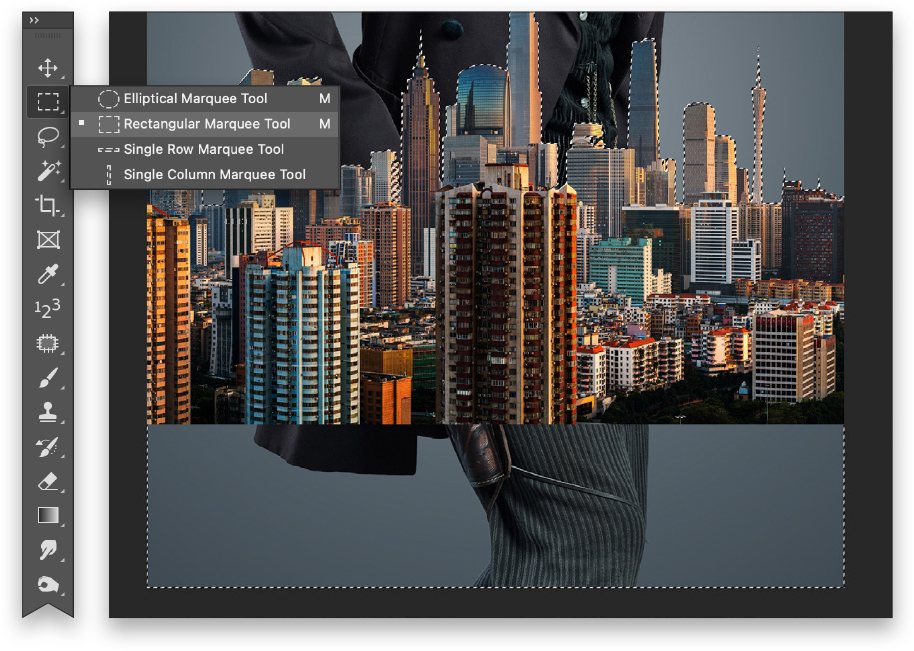
STEP 13: Click on the layer group folder in the Layers panel, and then click the Add Layer Mask icon (circle in a square) at the bottom of the panel. This will hide the subject above the skyline. Select the City Skyline layer in the Layers panel and press Option-Command-G (PC: Alt-Ctrl-G) to create a clipping group that will clip the city layer within the subject layer.

STEP 14: Next add a layer mask to the City Skyline layer and press X until the Foreground color is black. Select the Gradient tool (G) in the Toolbar. In the Options Bar, select the Linear Gradient, and click on the gradient preview thumbnail to open the Gradient Editor. Choose the Foreground to Transparent preset in the Basics set, and click OK to close the Gradient Editor. Then draw a gradient from the middle of the city up just a little to fade out the bottom edge of the city and reveal more of the cowboy below.
With the Gradient tool still active, switch to the Radial Gradient in the Options Bar, and add small gradients around any details of the cowboy you want to reveal. Here we wanted to reveal a little more of the gun and some of the edges of the subject a bit more. You can see how nesting these masking effects can work together.
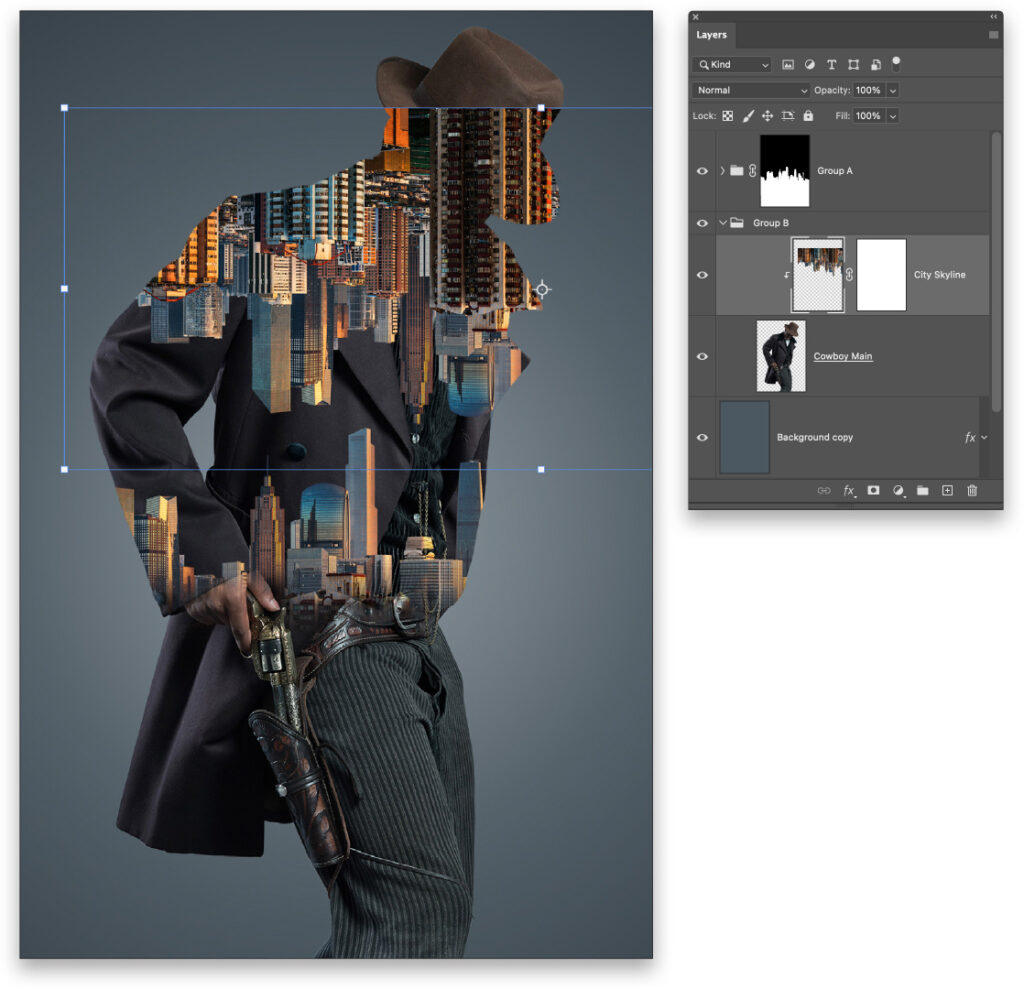
STEP 15: Now for the top section we’re going to pretty much do the same thing but inverse it. Start by collapsing the Group A folder, then make a duplicate of it by pressing Command-J (PC: Ctrl-J). Right-click its layer mask and choose Delete Layer Mask. Double-click the folder name and name it Group B, or whatever naming system you might be using.

STEP 16: Grab the Group A layer folder and move it above the Group B folder. Click the arrow next to the Group B folder icon to reveal its group contents. Select the layer mask thumbnail on the City Skyline layer and press Command-Delete (PC: Ctrl-Backspace) to fill it with white.
Click on the City Skyline layer thumbnail now and go under the Edit menu, to Transform, and choose Flip Vertical. Then use Free Transform to position the inverted city image opposite the bottom one and scale it down just a bit. Press Enter to commit the transformation.
STEP 17: Just as we did in Steps 11 and 12, activate the city shape as a selection, and then add the top area of the image to the selection with the Rectangular Marquee tool.
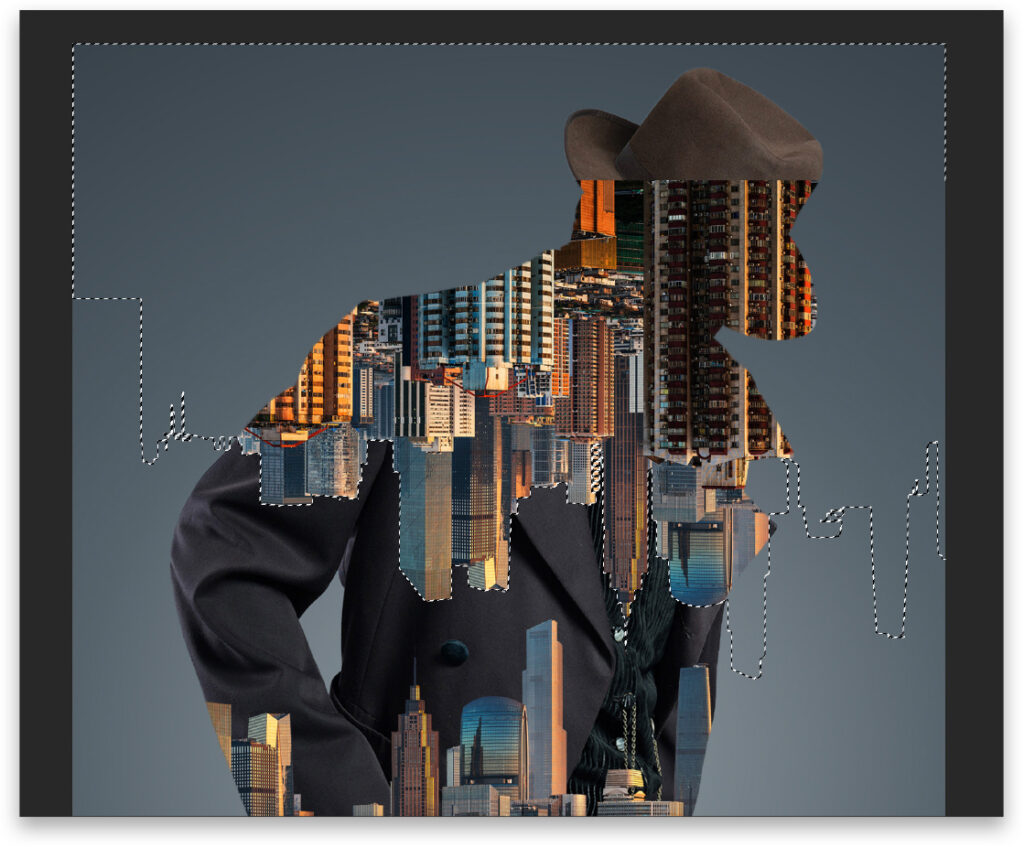
STEP 18: Click on layer Group B to make it active and click the Add Layer Mask icon to hide the bottom area of Group B. Select the layer mask for the inverted city layer within Group B and fade it from the top using the Gradient tool as we did in Step 14. Use the Radial Gradient for any subtle touches as well. With the image pretty much assembled, let’s add a couple finishing effects.

STEP 19: Let’s start with a texture layover. This is one I also found on Adobe Stock and it has a nice variation of random scratches and textures that has a vintage feel. You can click here to find and download the low-res version of this image. Don’t worry about resizing this image. Also, go to Image>Image Rotation>90° Clockwise, then Image>Image Rotation>Flip Canvas Horizontal.
Since we’re only interested in the texture and not the color, press Shift-Command-U (PC: Shift-Ctrl-U) to remove the color.
STEP 20: Next, use the Move tool to drag the texture layer to the main working image. Use Free Transform to scale the texture to fit in the composition. Drag it to the top of the layer stack in the Layers panel, and then change the layer blend mode to Overlay.
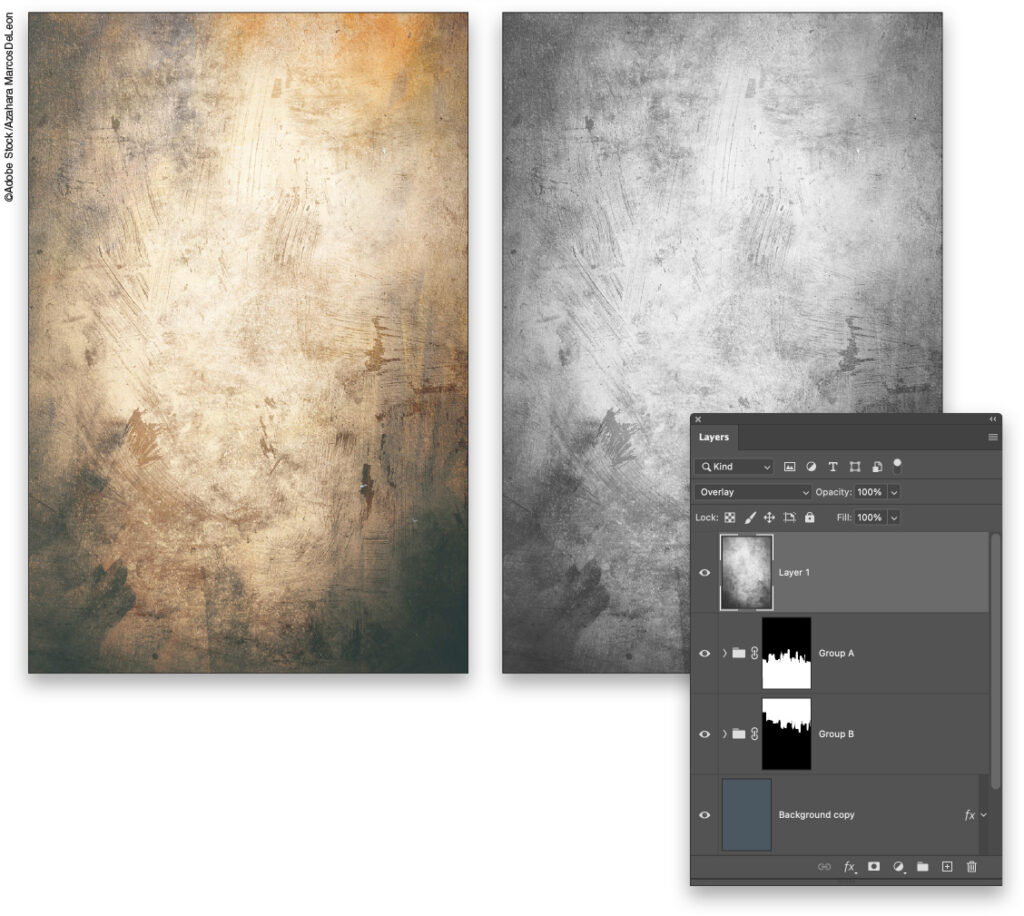
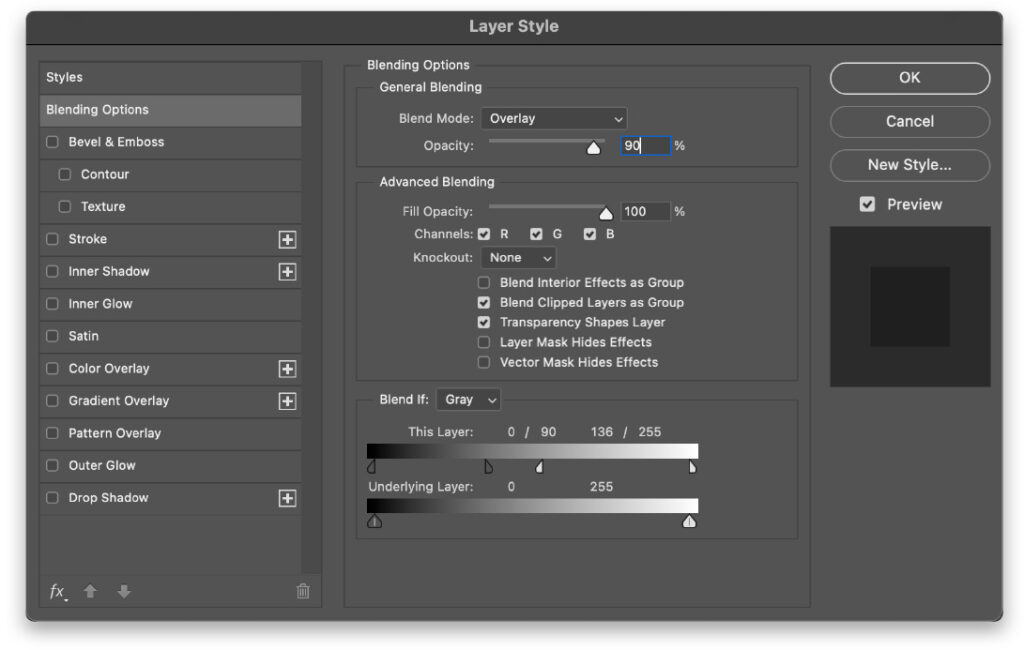
STEP 21: Even in Overlay mode the texture is still a bit harsh. Instead of lowering the layer Opacity, click the Add a Layer Style icon and choose Blending Options. Under the Blend If section, go to This Layer, hold down the Option (PC: Alt) key, and click on the sliders at both ends to split them. Drag the inner halves to change the texture effect as shown here. This lets you selectively blend the layer based on the tonal range. Click OK, when done.
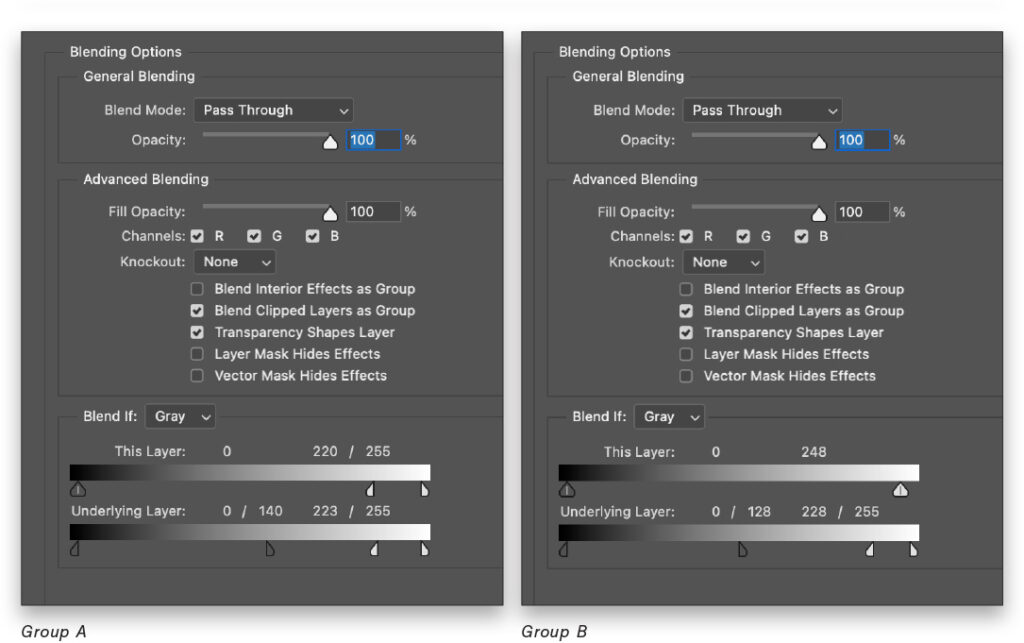
STEP 22: To blend the subject a bit more, do the same thing to both layer group folders. Just double-click the group folder in the Layers panel to access the blending options. You’ll see that modifying either set of sliders can give you some interesting blends.
STEP 23: Click on the topmost layer, click the Create New Adjustment Layer icon (half-black/half-white circle) at the bottom of the Layers panel, choose Black & White, and lower its layer Opacity to 70%. What I like about this feature is that you can fine-tune the various tones based on their original color in the Properties panel (Window>Properties). Start by just playing wildly with the sliders and notice what’s happening in the image. You can determine the lightness and darkness based on the color information. This makes it easier to blend the layers by dialing in the tone using the various colors of each layer.
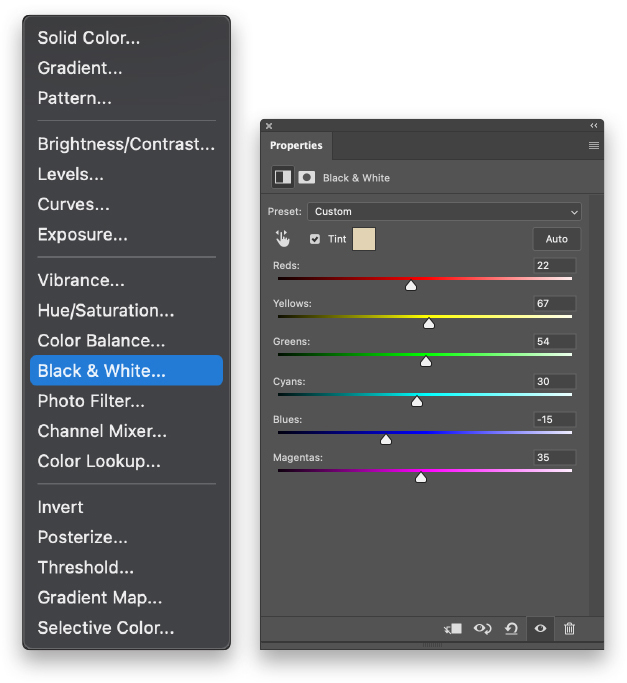
Finally, you can add a color overlay by simply checking on Tint at the top of the Properties panel. Then click on the color swatch to choose a custom color. Once you choose a color, continue to use the sliders below to adjust the tones of the overall image.

This article originally published in the February, 2023 issue of Photoshop User magazine.
About Photoshop User and KelbyOne
Photoshop User magazine comes out digitally 12 times a year and is part of KelbyOne, the leading educational resource for Photoshop, Lightroom, and photography. Pro members have access to more than 900 video courses and 100 back issues of Photoshop User. To learn more about KelbyOne, click here.
