
One of the creative things we can do to make our subjects stand out and separate them from the background is to add a light around the edges of the subject. This alone, however, isn’t enough. In the real physical world (outside Photoshop), the only way to create a rim light is to add a light behind the subject. Therefore, in order for our effect to be convincing and realistic, we need to add a bright light behind the subject in Photoshop as well. In the end, it all starts with a selection. So, without any further ado, let’s get started.
Step One: Open the Image
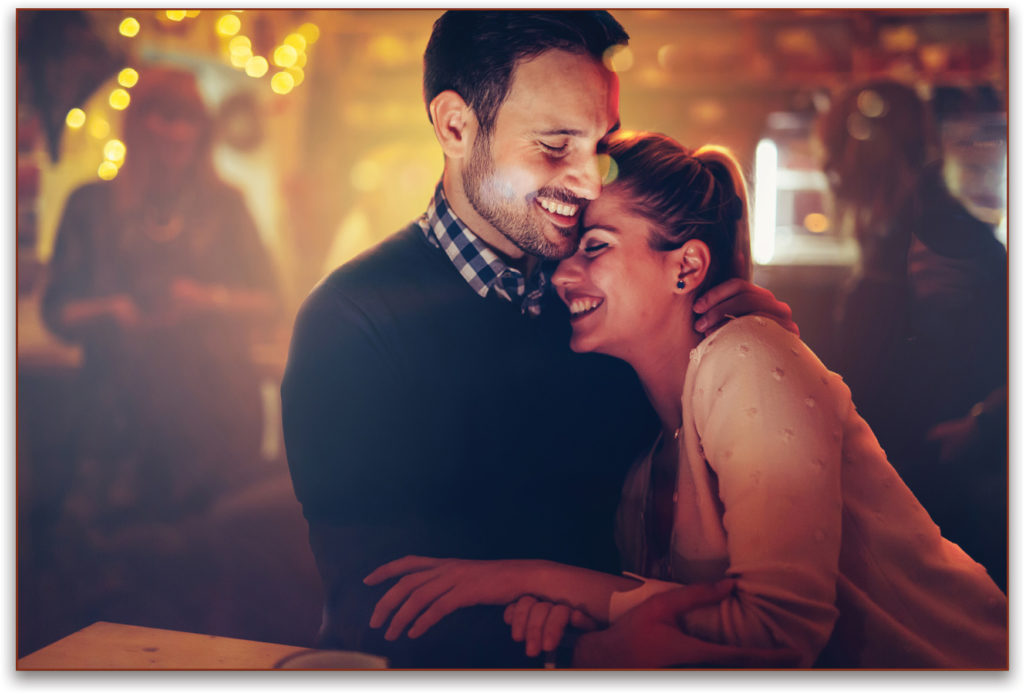
Let’s open our image in Photoshop. I encourage you to try this with your own images, but if you wish to follow along with the image used here, you may download the watermarked JPEG preview for free or license the full-resolution version from Adobe Stock by clicking this link.
Go to File>Open, locate your image, and click Open. Or, while Photoshop is open, go to the Finder (PC: Explorer), locate your image, and drag-and-drop it into Photoshop (if you’re in Application Frame mode). Note: You can also choose to load your image from the Libraries panel (Windows>Libraries) if you saved it there from Adobe Stock.
Step Two: Duplicate the Layer
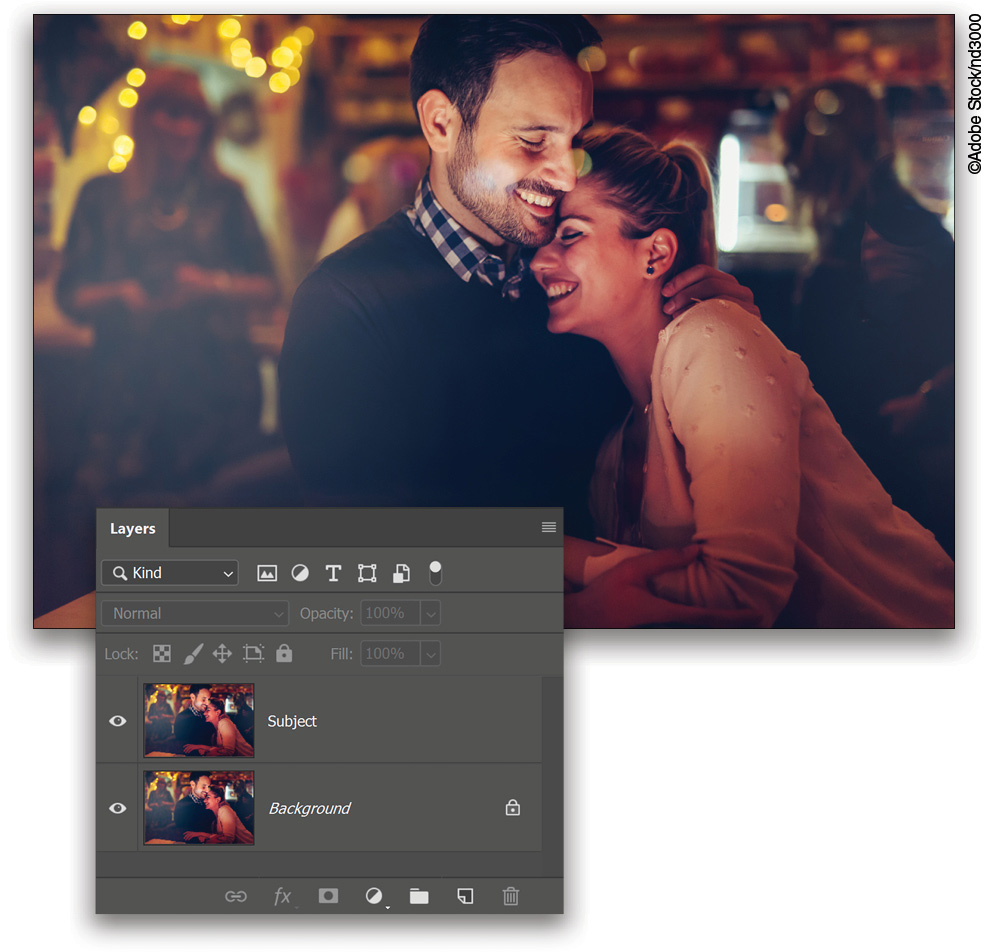
With the Background layer active, press Command-J (PC: Ctrl- J) to make a copy of it. Double-click on the name of the copied layer and rename it to “Subject.”
Step Three: Enter the Select and Mask Workspace
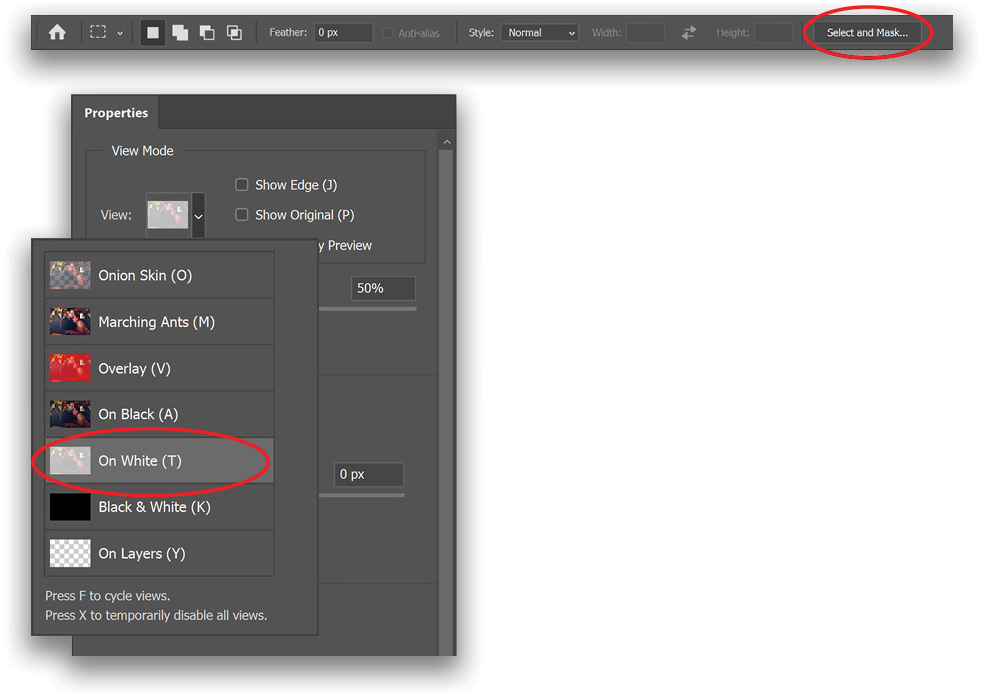
First, make sure that the Subject layer is active in the Layers panel. Now, choose any selection tool (for instance, the Rectangular Marquee tool [M]). If you’re using Photoshop CC 2015.5 or later, at the top in the Options Bar, you’ll see the Select and Mask button. Click that button.
Step Four: Set View to On White
Once inside the Select and Mask workspace, in the View Mode section, change the View to On White. Since this is a dark image, we’ll be able to see the edges more clearly with a white background.
Note: At this point, of course, you can use the brand-new Select Subject feature to make a starting selection. I personally prefer to paint manually with the Quick Selection tool so I have better control from the beginning.
Step Five: Use the Quick Selection Tool
Change the Opacity in the View Mode section to about 35%. Choose the Quick Selection tool (W) and start painting on the subjects. You’ll notice that the areas you paint return to their original colors. So, the areas with a white tint are the areas that aren’t selected, and the areas with original color are the areas that are selected.
If the Quick Selection tool selects areas that you don’t want included, hold the Option (PC: Alt) key and paint to subtract those areas from the selection.
Step Six: Set View Opacity to 100%
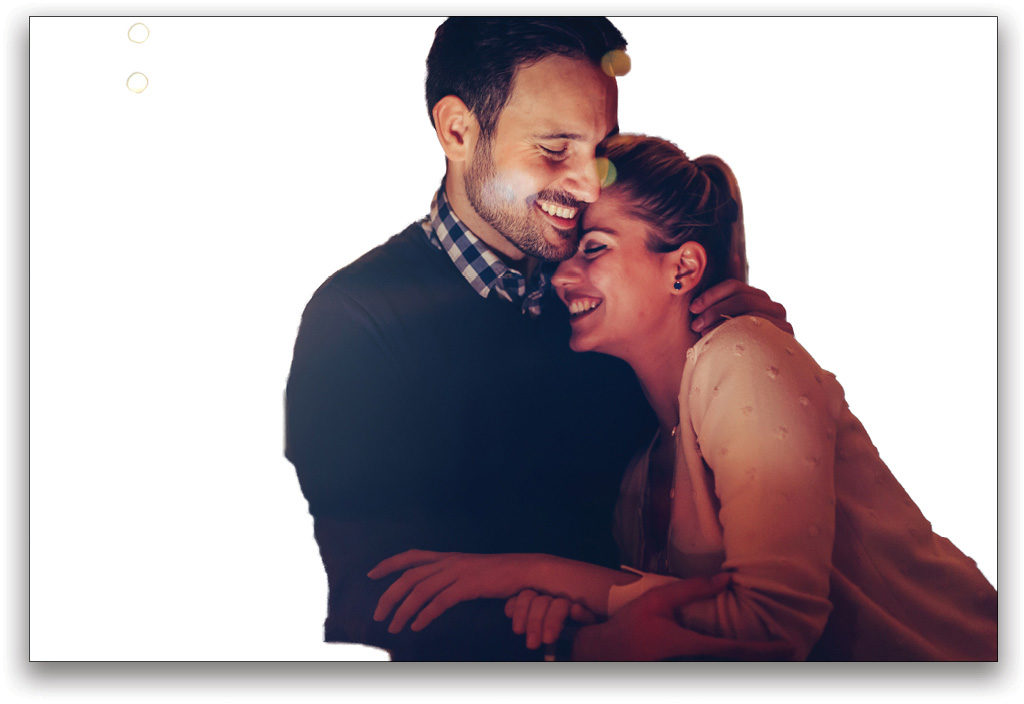
Once you’ve made your rough selection, take the View Opacity to 100%; you’ll now only see the selected areas, and everything else will turn white. This helps you to analyze which areas of the selection require improvement.
Step Seven: Use Brush Tools to Refine Selection
Now, take the Refine Edge Brush tool (R), and paint on the areas where the selection is messy. For this image, we only need to paint a little around the edge of the woman’s hair; other areas are just fine.
We can also use the Brush tool (B), and simply paint to add the missing areas, or remove the excess by holding the Option (PC: Alt) key while painting. (Don’t forget to play with the Opacity during the process.)
Step Eight: Smooth Edges and Output to Layer Mask
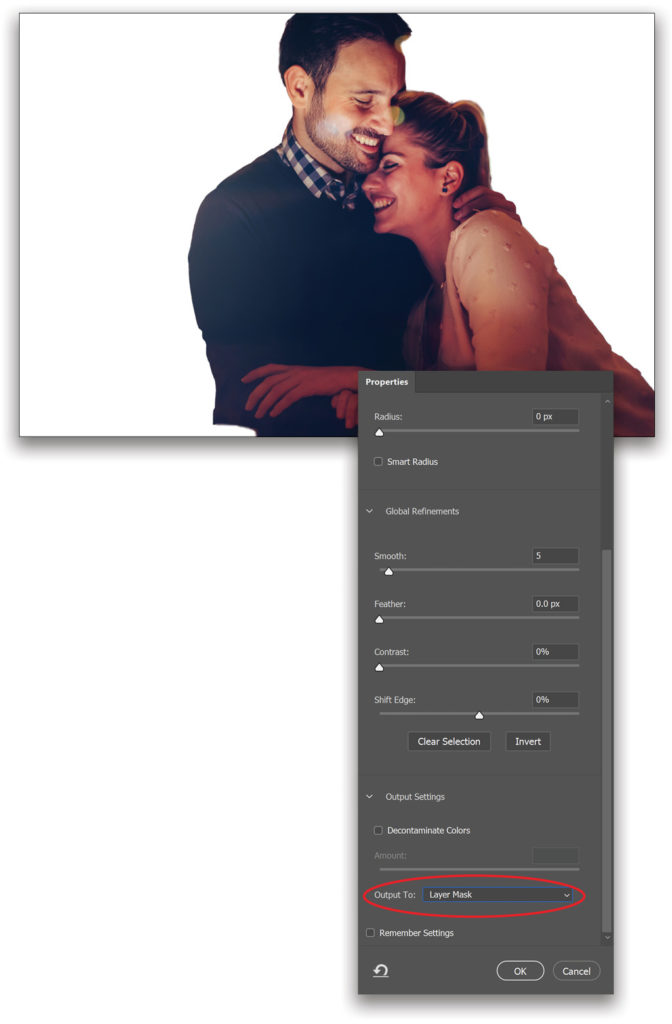
Under Global Refinements, increase Smooth to about 5 to get rid of the rough edges. Once the selection looks okay, scroll down on the right-hand side in the Properties panel to Output Settings. Set the Output To drop-down menu to Layer Mask, and click OK.
Step Nine: Add Curves Adjustment Layer
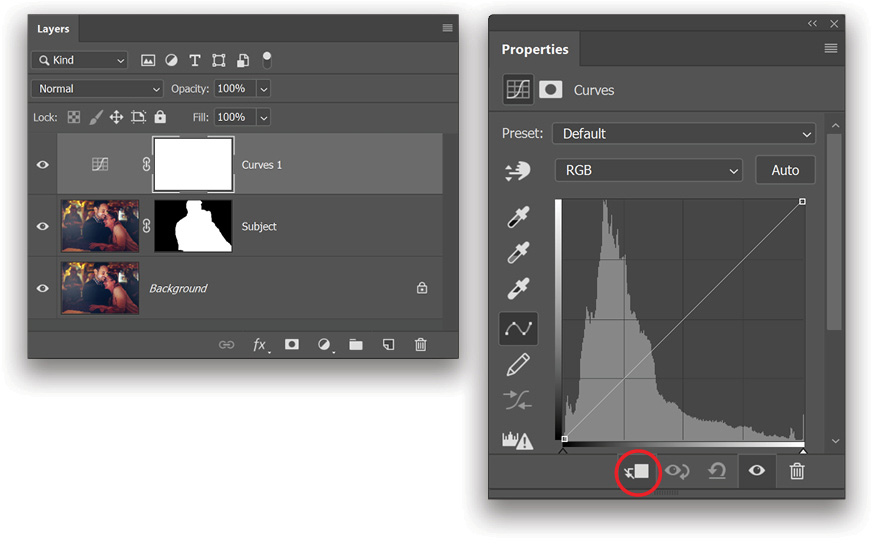
Create a Curves adjustment layer by clicking on the Create New Adjustment Layer icon (half-black, half-white circle) at the bottom of the Layers panel and choosing Curves. To limit the Curves to just the Subject layer, click on the clipping mask icon (square with a bent arrow) at the bottom of the Properties panel (Window>Properties).
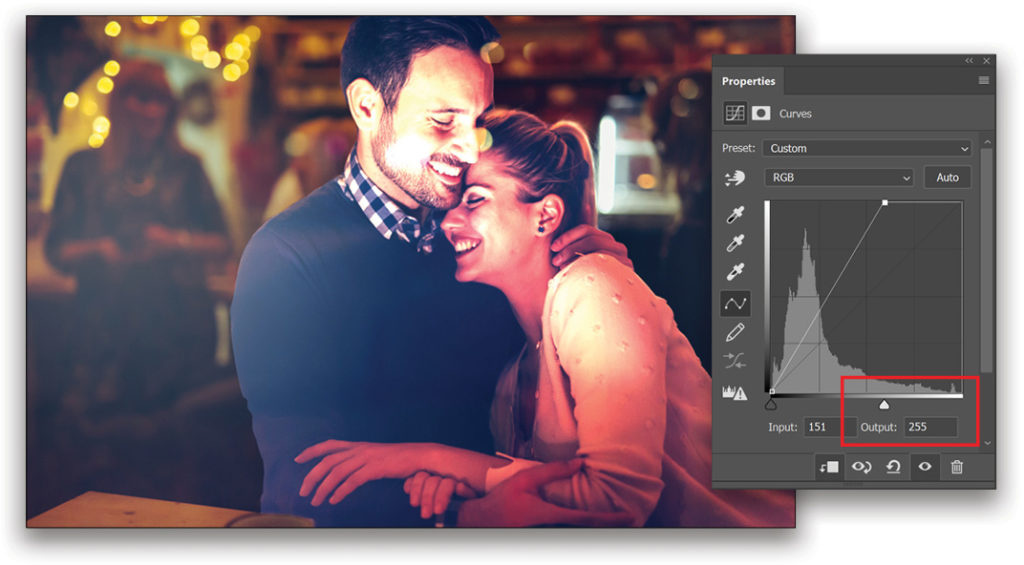
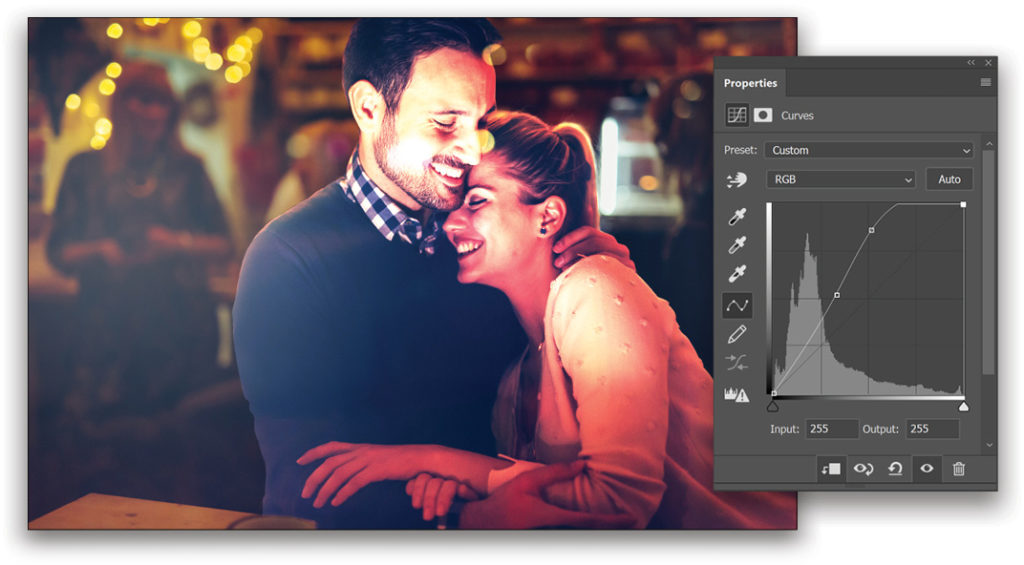
Step 10: Brighten the Subjects
Now take the slider below the right side of the histogram and drag it to the left to a point where the subjects get brighter. Keep in mind that we can adjust this anytime later!
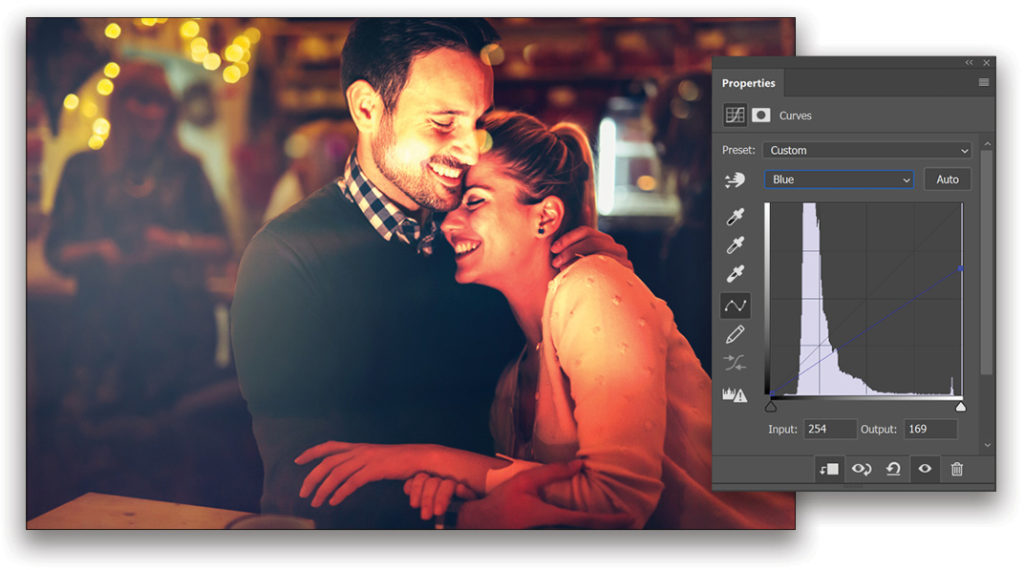
Step 11: Decrease the Blue in the Highlights
Now, let’s go to the Blue channel using the drop-down menu near the top of the Properties panel, and decrease the blue in the highlights by dragging down the far-right point on the curve. Why? Because yellow is the opposite of blue, and we want warm yellow in the highlights.
Step 12: Decrease the Green in the Highlights
In the Green channel, reduce the green a bit to add magenta (green is the opposite of magenta).

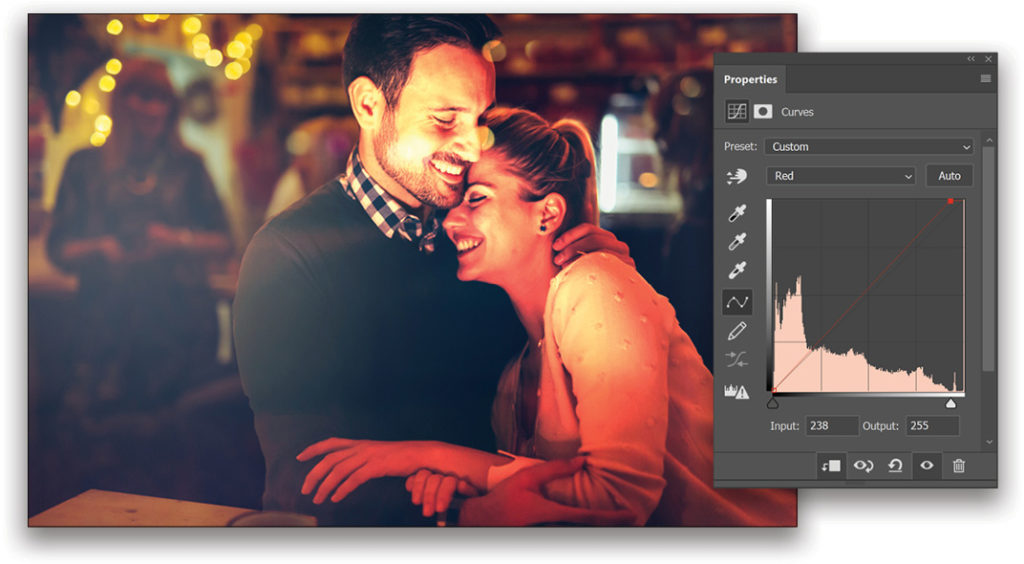
Step 13: Increase the Reds in the Highlights
Also, we can go to the Red channel and increase the reds in the highlights.
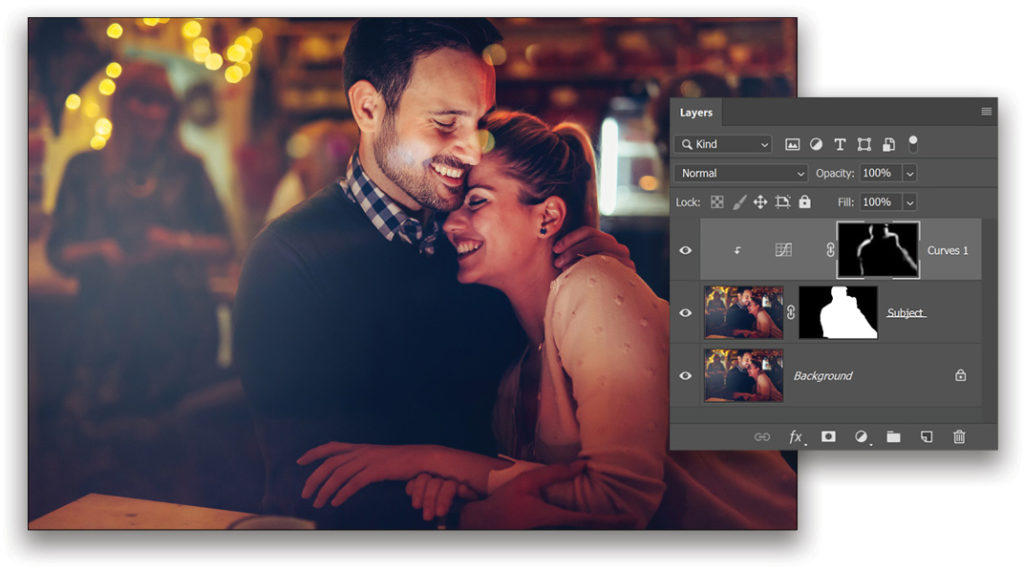
Step 14: Invert the Curves’ Layer Mask
Click on the mask thumbnail of the Curves adjustment layer, and then press Command-I (PC: Ctrl-I) to invert the mask. This turns the mask black, which hides the effect of the Curves adjustment layer.
Step 15: Brush in the Rim Light
Select the Brush tool (B), and set it to a soft round brush. Press D to set the Foreground color to white, and set the Opacity to 100% and Flow to around 5–10% in the Options Bar. Start painting around the edges of the subjects as if light was falling from the back. As you can see in the attached screenshot, we’ve created a soft light around the edges of the subjects.
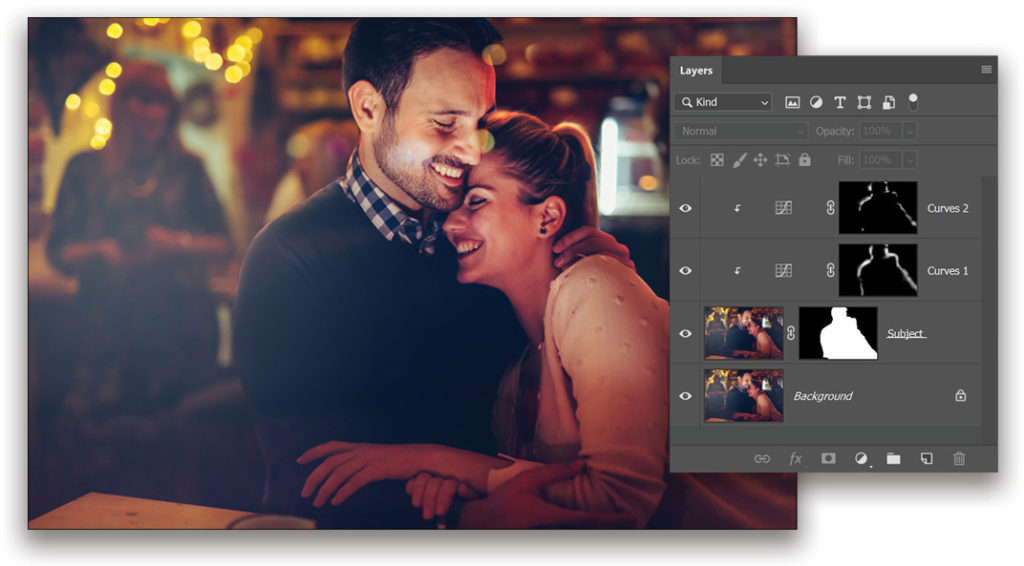
Step 16: Create Highlights Using Curves
Create one more Curves adjustment layer at the top of the layer stack. As we did in Step Nine, click on the clipping mask icon in the Properties panel (double-click on the Curves adjustment layer thumbnail to open the Properties panel if you don’t see it) to limit the Curves to the Subject layer. Click to add a point on the right side of the curve and drag it up. This point represents the highlights. Then, create a point near the middle of the curve and drag it down. This represents the shadows, which we don’t want to brighten.
Step 17: Paint in the Highlights
Select the mask thumbnail of this new Curves adjustment layer and press Command-I (PC: Ctrl-I) to invert it to black. As we did in Step 15, select the Brush tool, take a soft round brush, set the Foreground color to white, the Opacity to 100%, and Flow to 5%. Start painting on the edges where you want to add the highlights.
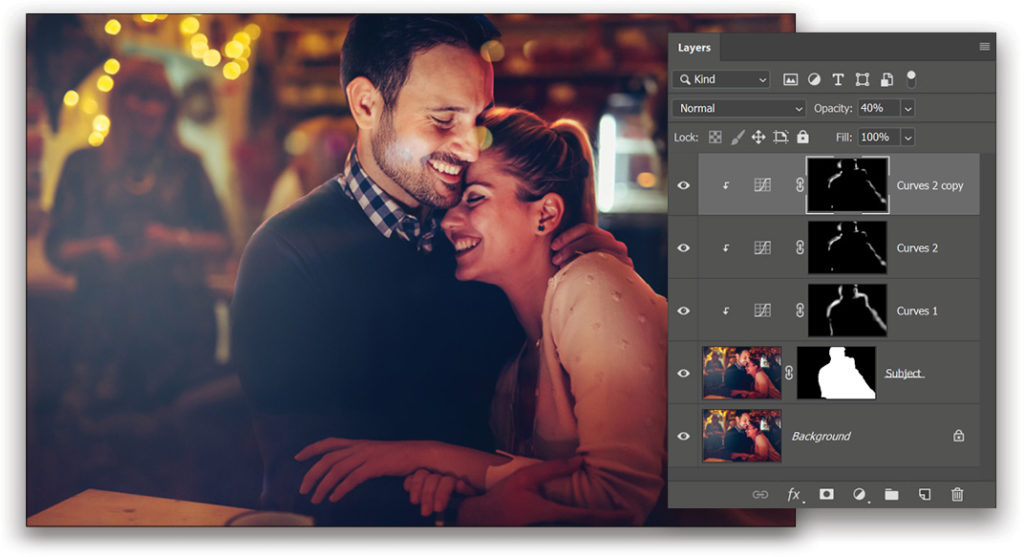
Step 18: Increase the Intensity of the Highlights
To double the intensity of the highlights we just added, with the topmost Curves adjustment layer active in the Layers panel, press Command-J (PC: Ctrl-J) to make a copy of it. Right-click on the new layer and choose Create Clipping Mask to limit it to the Subject layer. If you feel the intensity is too high, reduce the Opacity in the Layers panel. For this image, we’ll reduce it to 40%.
Step 19: Create a Gradient Fill Layer for the Backlight
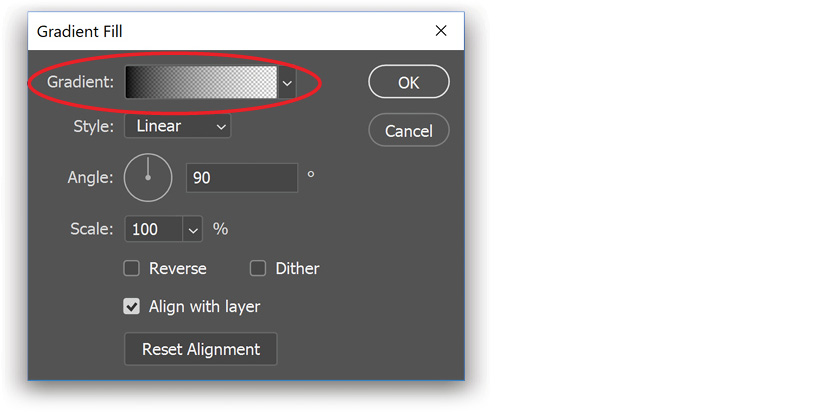
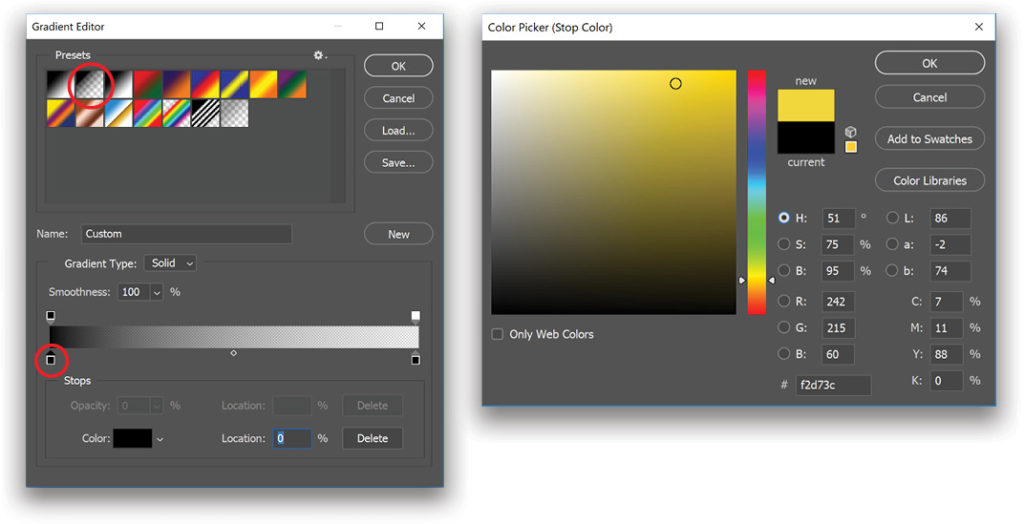
Select the Background layer, click on the Create New Adjustment Layer icon, and choose Gradient. This creates a Gradient Fill layer above the Background layer and below the Subject layer. In the Gradient Fill dialog that appears, click inside the Gradient bar preview to edit the gradient. You should see the Gradient Editor dialog appear.
Step 20: Edit the Colors of the Gradient
Choose the Foreground to Transparent preset (or create any gradient with one side at 100% Opacity and the other side at 0% Opacity). Double-click on the bottom-left color stop (Opacity 100%), and change the color to a bright yellow in the Color Picker. Click OK. Double-click on the bottom-right color stop (Opacity 0%), and change the color to a bright red. Click OK to close the Color Picker. Click OK again in the Gradient Editor dialog.
Step 21: Edit the Position and Scale of the Gradient
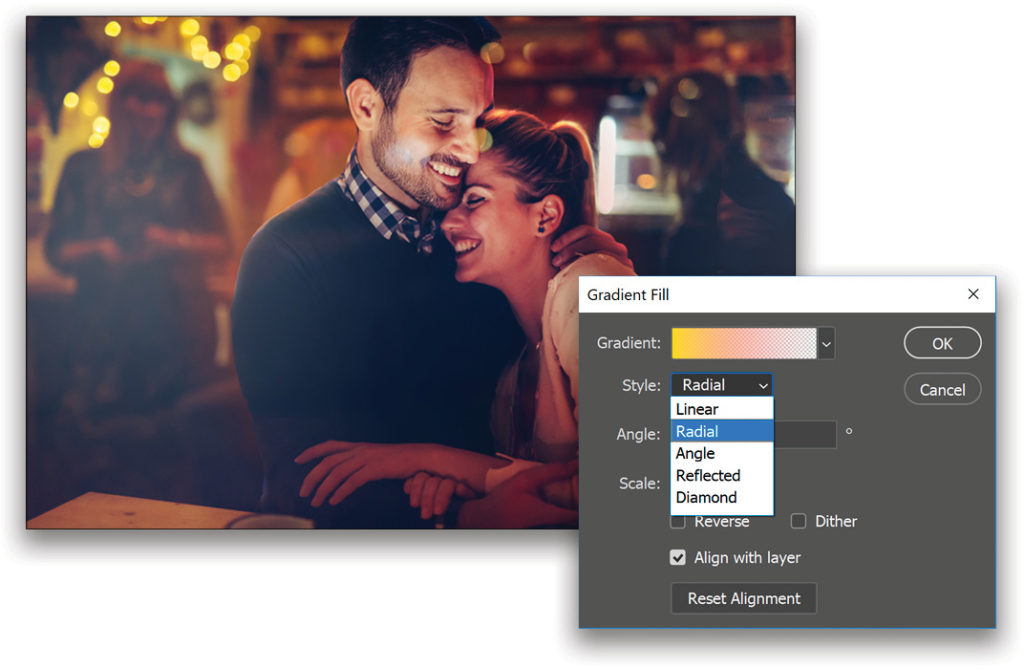
Back in the Gradient Fill dialog, change the Style drop-down menu to Radial. While the Gradient Fill dialog is still open, using the cursor, you can drag the gradient directly in the image to any position you like. In this case, we’ll move it just behind the gentleman’s neck.
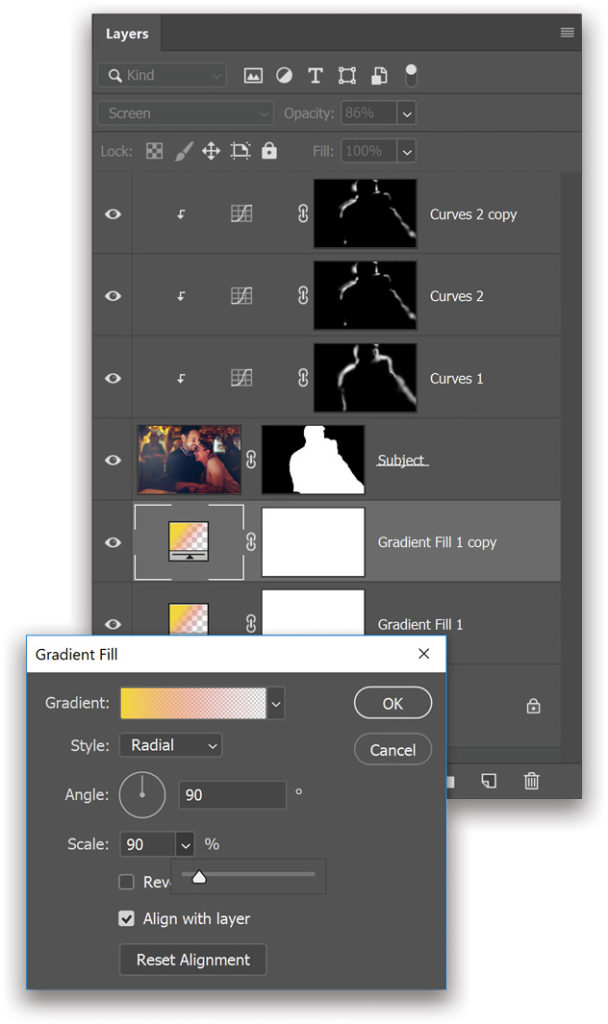
We can also change the size of the light by changing the Scale. For this image, we’ll choose a Scale of 130%. Click OK to close the Gradient Fill dialog. Change the blend mode of Gradient Fill 1 layer from Normal to Screen near the top left of the Layers panel.
Step 22: Duplicate the Gradient Fill
Duplicate the Gradient Fill 1 adjustment layer to increase the intensity, and decrease the Opacity of the copy to 86%. Everything we’re doing is nondestructive, and we can still change the color and the size of the gradients. Double-click on the adjustment layer thumbnail of the Gradient Fill 1 copy layer to open the Gradient Fill dialog. Change the Scale to about 90% and click OK.
You can absolutely experiment more with the Curves adjustment layers, and play with the gradients to create interesting light effects. You just need to be careful of two things: the selection, which should be accurate; and the position of the backlight and the rim light must be in coordination.
This article originally published in the November/December 2018 issue of Photoshop User magazine.


