
If you have both Lightroom and Photoshop, you hold heaps of photo management and manipulation power in your hands. Although these two powerhouses share some common ground, they’re vastly different programs. Each one was designed for specific tasks, but they were built to work together to speed your workflow. In this column, you’ll learn which program to use when.
Where Lightroom Excels
Lightroom’s database nature enables it to shine at many essential, yet yawn-worthy, management chores. It’s also a powerful editor: You can use it to apply edits to an entire photo or to certain parts of it, you can sync or copy edits between one or more photos, and you can easily output those photos in myriad ways. Here’s a short list of when to choose to use it over Photoshop:
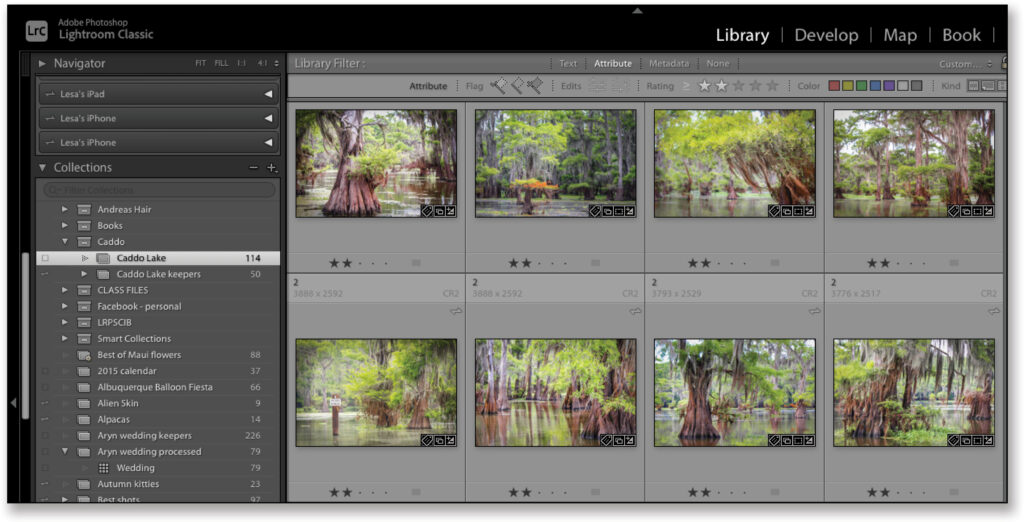
Photo & VIDEO MANAGEMENT: Lightroom’s Library module (shown below) is the perfect place to assess, compare, rate, and cull your images, as well as to apply descriptive keywords and other markers such as colored labels and flags. It also sports several filters you can use to view a subset of your images, plus you can easily organize images into collections. Photoshop can’t do any of that. Although you could use Adobe Bridge to pick up some of the organizational slack; it’s a file browser not a database.
RAW PROCESSING: You can edit many file formats in Lightroom’s Develop module (TIFF, PSD, JPEG, PNG), but it excels at processing and translating RAW files, the unprocessed sensor data that some cameras—and even some smartphones—can record.
Lightroom automatically maintains the large range of colors (color space) and high bit depth that a RAW file includes. That’s why you want to do as much processing to a RAW file in Lightroom as you can, and only pass the file over to Photoshop when you need to do something Lightroom can’t. (Note: Photoshop’s RAW processor, Adobe Camera Raw, uses the same underlying engine as Lightroom but that’s a separate application.)
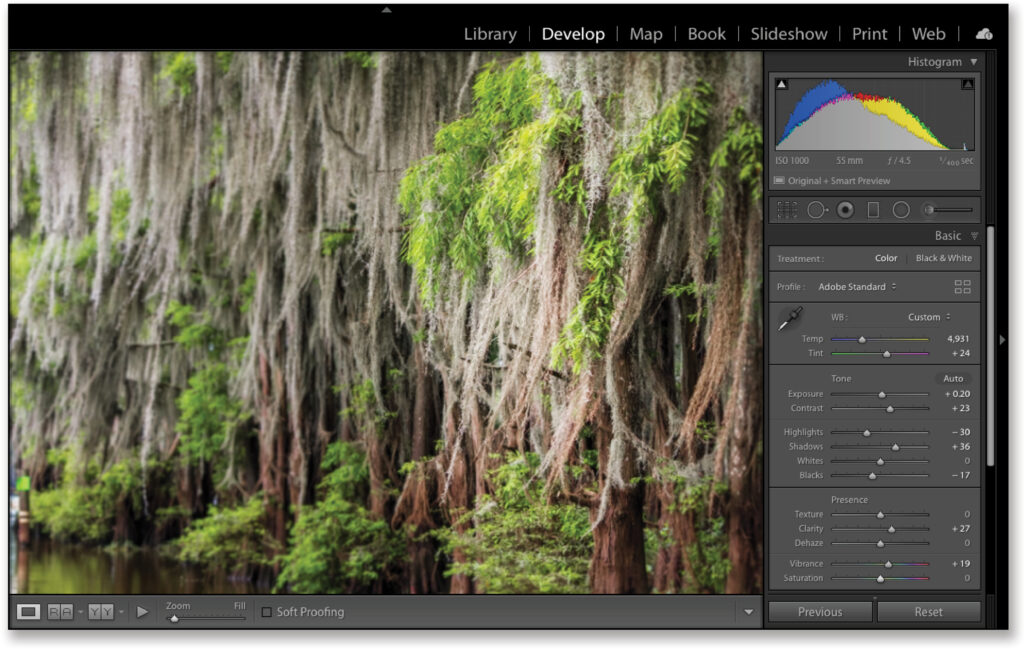
GLOBAL PHOTO ADJUSTMENTS: Common global photo adjustments—cropping, straightening, fixing perspective and lens distortion, sharpening, adjusting tone and color, reducing noise, and adding edge vignettes—are incredibly easy to perform in Lightroom. Most of the controls are slider-based, highly discoverable, and logically arranged (shown above). Photoshop is far less intuitive, due in part to its more than 30 years of development. Although Photoshop includes many powerful ways to adjust your photos—Levels, Curves, and so on—these controls are scattered throughout the interface and are harder to use. (That said, you can access the same sliders and local adjustment tools in Camera Raw or the Camera Raw Filter, though that requires additional steps.)
LOCAL ADJUSTMENTS: Lightroom’s local adjustment tools—those that affect part of the image rather than the whole thing—use sliders, too. Changes made with the Adjustment Brush, Graduated Filter, and Radial Filter occur only in areas you mark by dragging a cursor or brush atop the image. These local tools make it easy to fix overexposed skies, add digital makeup, smooth skin, lighten teeth and wrinkles, enhance eyes, darken shiny areas, add extra sharpening to specific areas, and more. You can even add negative sharpening to an area in order to blur it!
In addition, Lightroom’s Spot Removal brush can be set to either Healing (blend surrounding pixels) or Cloning (copy pixels with no blending) mode, enabling you to click or drag to remove blemishes, wrinkles, power lines, stray hairs, lipstick smudges, sensor spots—anything that’s fairly small. You even get Opacity control so you can dial back the strength of the change.
You can do all of that in Photoshop, but it can take longer because of the additional steps required to do it nondestructively (say, on separate layers).
Creative color effects: You can use Lightroom to make beautiful black-and-white images and partial color effects. You can also add sophisticated color tinting to the whole photo, or you can hand-paint certain areas with whatever color you want.
HDR & PANORAMA STITCHING: Lightroom offers a merge feature for combining multiple exposures into a single high-dynamic range (HDR) image, as well as for stitching multiple images into a panorama. Once the images are combined, or stitched, you can adjust tone and color using the global or local adjustment tools described earlier. Photoshop includes the same auto-merge features for both HDR and panoramas; however, it’s simpler to merge in Lightroom because of the easy-to-use controls for adjusting tone and color afterward. Plus, Lightroom includes a slick feature, named Boundary Warp, for filling in the edges of a panorama.
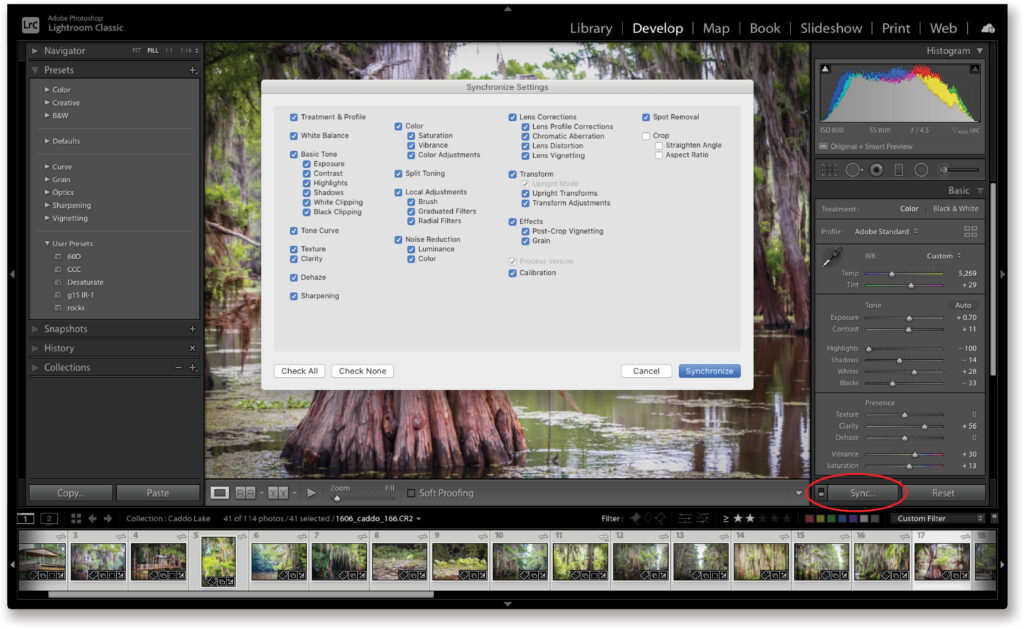
PROCESSING MULTIPLE PHOTOS: Lightroom was built for high-volume photographers: You can use it to synchronize changes across an unlimited number of photos or you can copy-and-paste edits instead. You can sync (shown above) or copy/paste global and local adjustments; the latter is great for removing sensor spots from a slew of images. And you get to choose exactly which edits are synced or copy/pasted.
You can also save a preset for almost anything you do in Lightroom, which can dramatically speed your workflow. Presets can be applied during the import process, manually whenever you want, or when you export images. Preset opportunities include, but aren’t limited to: adding copyright information; file-naming schemes; any settings in the Develop module; settings for all the local adjustment tools; template customizations for books, slide shows, print, and web projects; identity plates (the branding that appears at the top left of the interface); watermarks; exporting at certain sizes and in a specific file format; and uploading online. Processing multiple photographs in Photoshop requires scripts, complex actions, or the use of Adobe Bridge. Further, Photoshop presets are mostly limited to tool setup.
SHARING, RESIZING, OUTPUTTING, & WATERMARKING: If you regularly prepare images for other destinations—say, to feature on a website, to email, to submit to a stock service, or to post on social media sites—you can automate the process using Lightroom export presets (they’re called publish services). Here’s the gist: Drag the image(s) onto your preset, and click the Publish button; Lightroom exports the image with the filename and with your choice of dimensions (you can specify longest edge, file size maximum, and so on), quality, and file format, complete with metadata, additional sharpening, and a watermark (text or graphical). If you change a published image, Lightroom politely asks if you’d like to republish the modified version. To do this in Photoshop, you’d have to create a watermark action and then use the Image Processor script, which has far fewer options and can’t keep track of modified versions. You can’t automatically share images from Photoshop, either.
PHOTO BOOKS, SLIDE SHOWS, PRINT TEMPLATES, & SIMPLE WEB GALLERIES: Lightroom includes several ways to show off your best work, whether it’s for use in your portfolio or to sell to a client. The books, slide shows, and print templates are highly customizable; web galleries are less so, but they’re still useful in a pinch. With enough patience and Photoshop skill, you could manually create a fine-art or picture-package-style print, or you could create a simplistic slide show using the PDF Presentation command, but that’s it.
Now, is Lightroom better at everything than Photoshop? No. In the next section, you’ll learn when to send the image over to Photoshop for its special brand of pixel-pushing magic.
Where Photoshop Excels
Photoshop is unmatched when it comes to creative editing and precise corrections. Although there’s no need to open every photograph in Photoshop, a round-trip, Lightroom-to-Photoshop workflow is necessary in the following situations.
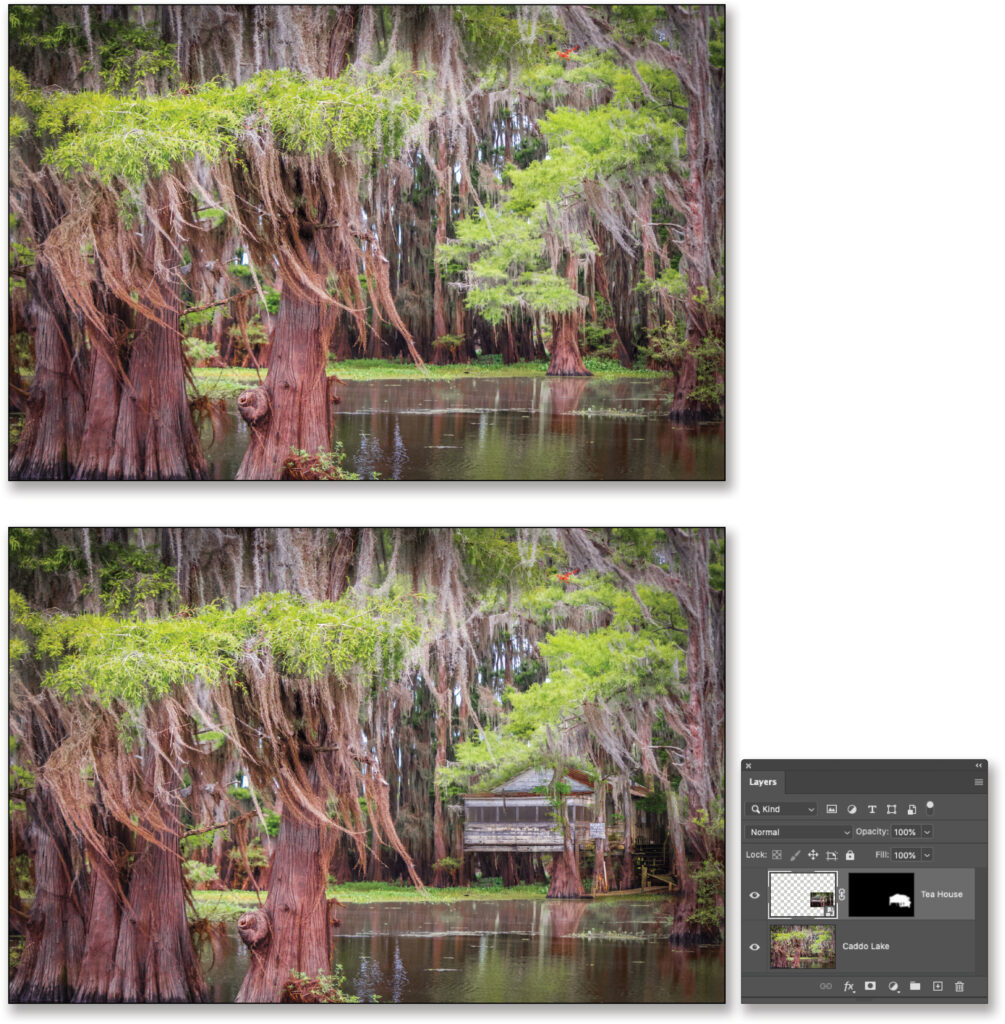
COMBINING PHOTOS: Aside from merging multiple exposures into an HDR or stitching images into a panorama, Lightroom can’t combine photos, because it doesn’t support the concept of layers. So, if you want to do any kind of compositing, whether it’s to add texture or to create a collage (as shown below), you need Photoshop. Same goes for swapping heads and eyes, say, to create a group photo where everyone is smiling or to fix eyeglass glare. And if you want to manually merge images into an HDR, which can often greatly improve results, there are a couple of ways to do that in Photoshop. If you’ve stitched images into a panorama in Lightroom and you end up with a curved horizon, you can use Photoshop’s Adaptive Wide Angle filter to straighten it.
MAKING PRECISE SELECTIONS & TARGETED ADJUSTMENTS: Although you can perform many local adjustments in Lightroom, you can’t precisely mark the area you want to change, at least not down to the pixel level. In Photoshop, this is called creating a selection, and the program includes several advanced methods for selecting an object in your photo, including tough stuff such as hair and fur.
And once you’ve made a selection, you can hide those pixels using a layer mask (think of it as digital masking tape)—hiding pixels instead of deleting them increases your editing flexibility. Selecting and masking are crucial when you want to swap out a background in a portrait, substitute a dull sky for a more exciting one, create a transparent background in a commercial product shot, or change the tone or color of a selected area.
HIGH-END PORTRAIT RETOUCHING, BODY SCULPTING, & PHOTO RESTORATION: As you learned in the previous section, you can perform a lot of retouching in Lightroom. If, however, your subject wants flawless skin, nips and tucks, or if you’re restoring a damaged, scratched, old photo, you need Photoshop.
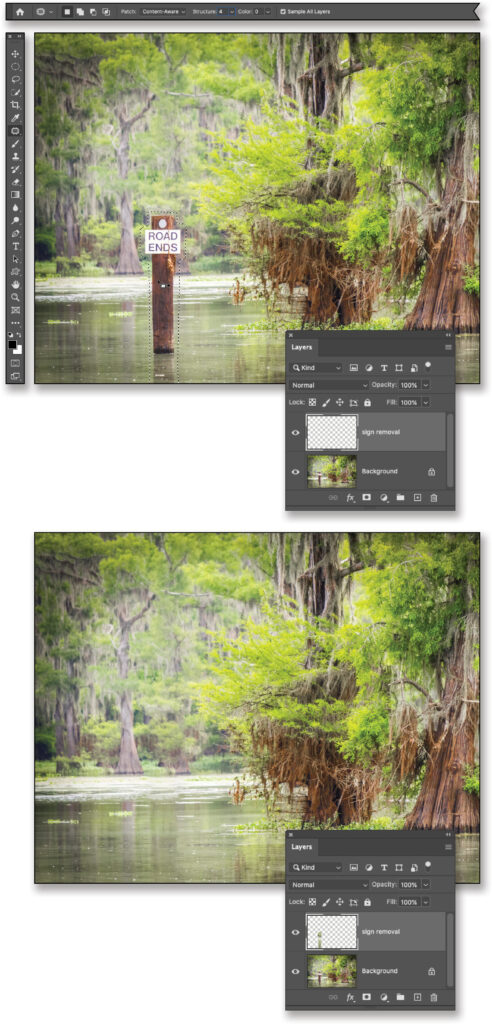
REMOVING AND COMPOSITING OBJECTS: Although Lightroom can make short work of zapping a blemish or a bird in a big blue sky, Photoshop’s Content-Aware tools let you remove bigger objects (the Patch tool was used in the image shown here to remove the sign), or reposition something in the photo. When you use these incredible tools, Photoshop intelligently analyzes surrounding pixels, or another area you designate, in order to make the removal or repositioning as realistic as possible.
FILLING IN THE CORNERS OF A PHOTO AFTER STRAIGHTENING OR A PERSPECTIVE CORRECTION: Lightroom includes a powerful Crop tool that you can use to straighten an image, and the Transform panel’s Upright feature can correct perspective problems in a snap. Both of these fixes, though, can result in empty corners due to image rotation, which may cause you to crop the image more aggressively than you’d like. In these cases, you can send the file to Photoshop to fill in the corners: Photoshop’s Crop tool has a Content-Aware option that can automatically fill in the corners for you after you straighten a photo.
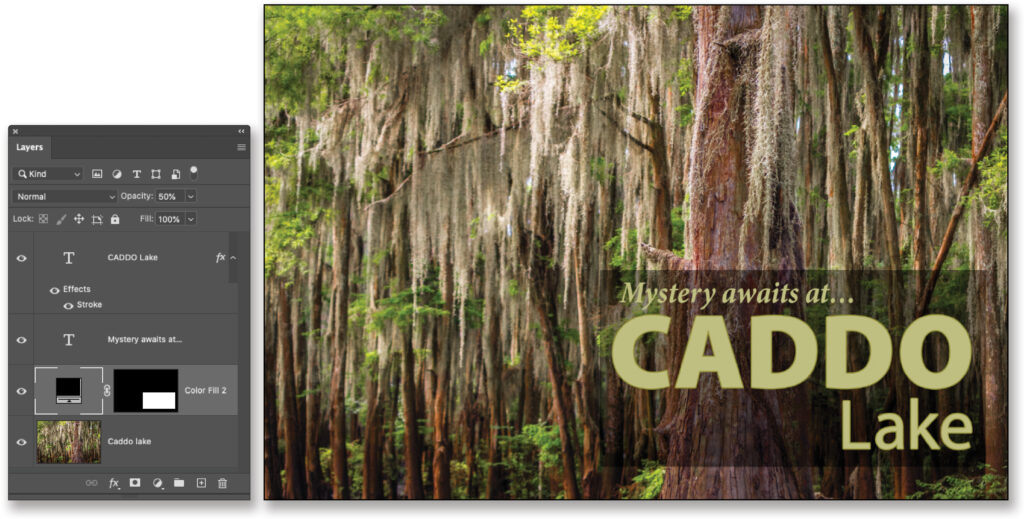
TEXT, DESIGN, ILLUSTRATION, 3D WORK, & VIDEO WORK: Embellishing photos with text (as shown here) or other non-photographic artwork for use in graphic or web design is best done in Photoshop. Photoshop also includes several tools for creating custom illustrations, 3D text, and objects, and it sports a fairly impressive arsenal of video-editing tools. So, if you want to incorporate one or more photos into a business card, postcard, or social media cover image that includes text, you need to send that imagery over to Photoshop. And if you want to push a photo through text or any other shape, that’s a job for Photoshop too.
SPECIAL EFFECTS: Photoshop includes a wide variety of filters and layer styles, so there’s no end to the special effects you can create. For example, you can map one photo to the contours and curves of another (lizard skin, anyone?), and you can change the lighting in a scene, create highly specialized blur effects, turn a photo into a pencil sketch or a realistic painting, and a whole lot more.
Of course, there are more scenarios in which Photoshop excels over Lightroom, but these are the ones you’re most likely to encounter. Until next time, may the creative force be with you all!
This article originally published in the November, 2020 issue of Photoshop User magazine.
About Photoshop User and KelbyOne
Photoshop User magazine comes out digitally 12 times a year and is part of KelbyOne, the leading educational resource for Photoshop, Lightroom, and photography. Pro members have access to more than 900 video courses and 100 back issues of Photoshop User. To learn more about KelbyOne, click here.


Very useful tips Jassica. Clear and to the point.