The DNG file format has been an option in the Lightroom workflow for nearly 14 years now, but there’s still a lot of questions about when, if, and why to use it. Originally developed by Adobe as an answer to the growing volume of proprietary RAW formats put out by each camera manufacturer, we’ve yet to see the major camera brands provide a native DNG option for their customers (Leica, Pentax, and a few others excepted).
The discussion used to be, “Should I convert to DNG or not?” but I think the situation has evolved since then, as the DNG file format has matured. I’m neither for nor against converting original RAW photos to DNG, so I’m not here to change your mind on that front; however, there’s more to the DNG discussion than whether to convert or not.
In case you’re unsure, DNG is an openly documented file format for holding RAW data. Because it’s openly documented (unlike the proprietary RAW file formats), it’s possible for any third-party software developer to support the format (some do, some don’t). The openly documented aspect is also valuable for those looking for an archival solution that lasts decades into the future. DNG also creates an internal checksum value that can be used to validate the integrity of the image data, which is another key benefit. I’ve mentioned some of the advantages, so let’s get the main disadvantages to converting to DNG out of the way. If you convert to DNG:
- You may not be able to open DNG files in some non-Adobe image-editing software (now or in the future).
- You may have problems with certain photo competitions if your camera doesn’t have native DNG creation (always read the fine print before submitting to contests and competitions).
- You may feel it’s not worth the time it takes to convert (there’s no free lunch).
There are tradeoffs involved in every decision we make in photography, and this is just one more of those decisions that we each must evaluate against our own needs and circumstances. There’s no one right answer, but even if you decide against converting all your RAW photos to DNG, there may still be ways you can use DNG (and probably already are) in your workflow without going all in. For example, if you take advantage of smart previews for offline editing or syncing your Lightroom Classic catalog to Lightroom CC, then you’re leveraging DNG technology to make that possible.
Smart Previews
Smart previews appeared back in Lightroom 5 as a way to create smaller versions of our RAW (and non-RAW) photos that get stored in a special cache alongside the Classic catalog to allow us to continue editing those photos even if the originals are on a disconnected drive. These smart previews are considered “lossy” DNG files because they lose some of the data (reduced pixel dimensions and JPEG compression) as a compromise for smaller file size.
We can create smart previews as part of the Import process, or after import by selecting photos in Grid view and going to Library>Previews>Build Smart Previews (there’s also an option to discard them). I store my source photos on an external drive and keep the catalog on the internal drive, so
I regularly create smart previews after the initial culling so that I don’t need to keep the external drive connected all of the time. If the drive where your photos live is always online, this isn’t as useful to you.
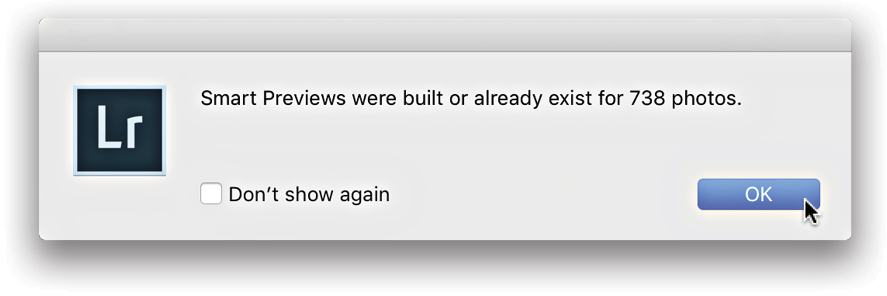
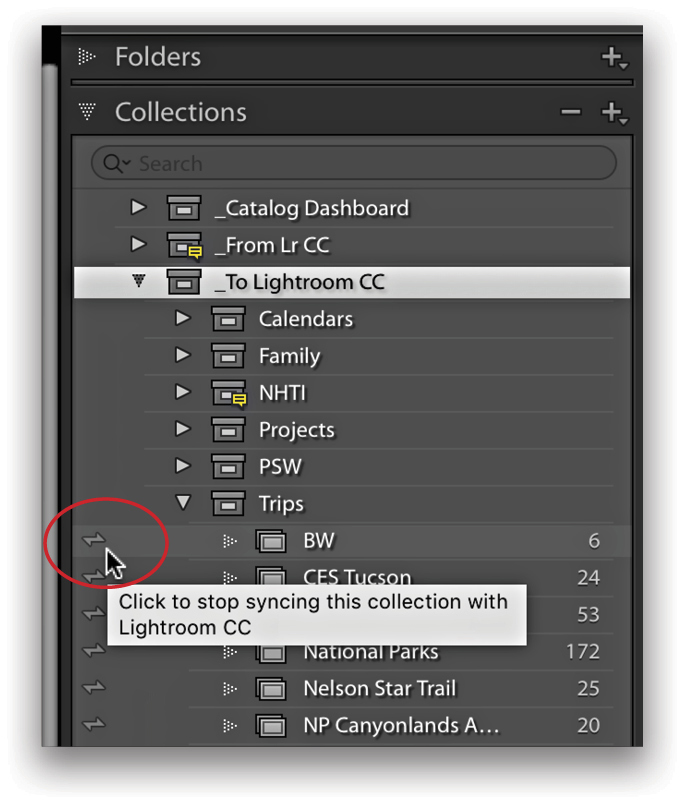
The other under-the-hood way you may be using DNG files through smart previews is if you sync your Classic catalog to Lightroom CC. As soon as you mark a collection to sync with Lightroom CC, a smart preview is rendered (if there isn’t one), and that smart preview is what gets uploaded to the cloud from Classic. That smart preview is the perfect vehicle for keeping your edits synced, displaying on mobile, and even sharing to social media.
Merging
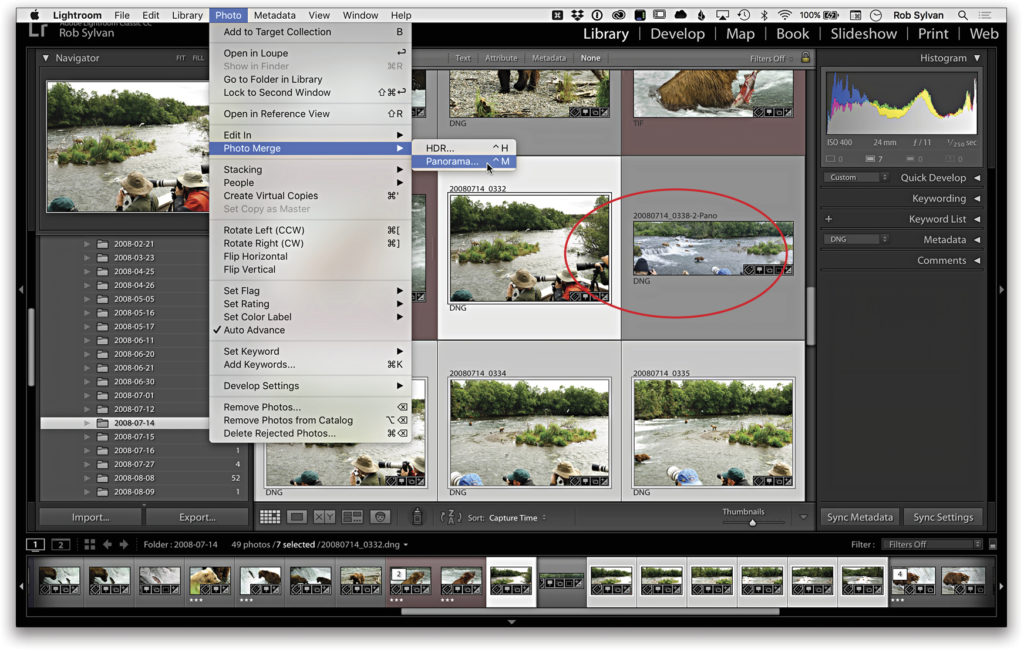
Further leveraging DNG technology, when Adobe introduced HDR and Panorama merging in Lightroom (and Camera Raw), we saw that the merged result is saved as a DNG file (see above). Assuming your originals are in RAW, this means you end up with a fully RAW merged result. This completely changed my workflow in regard to HDR and panoramas, as I rarely use third-party software for those tasks anymore.
Mobile
Another surprising use of DNG arrived when our mobile devices gained the ability to shoot in RAW mode. Older devices (due to hardware and operating system) may not support RAW capture, but newer devices on both iOS and Android are able to shoot in RAW in a number of different apps (not just Adobe’s), and the format of choice so far is DNG.

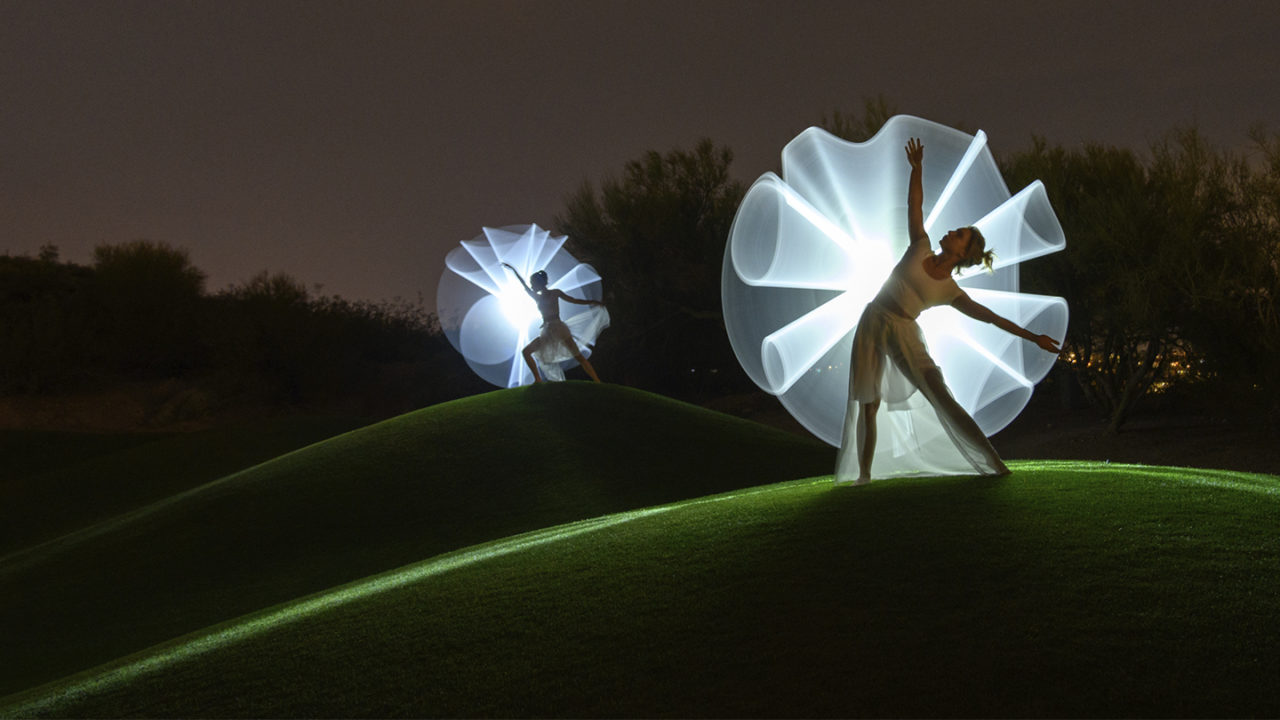
Lightroom CC on mobile is my go-to camera app, and while it won’t replace my DSLR, I love being able to capture in HDR mode where three RAW captures are merged into a single DNG file. I’ve been consistently amazed at what I’m able to photograph thanks to that functionality (below is an iPhone example of backlit subjects on snow with a moving object without blur or loss of detail in highlights or shadows). It looks to me that DNG is here to stay, and I’m sure it will continue to evolve and adapt in the future.
Export
Even if you never convert your originals to DNG, there’s always the option to convert to DNG on export. This can be useful if you need to share copies with an assistant, a retoucher, another photographer, and so on. As a teacher, I find this to be a very useful way to share RAW photos with my students so they can follow along as I edit. The option is found in the File Settings panel of the Export dialog.
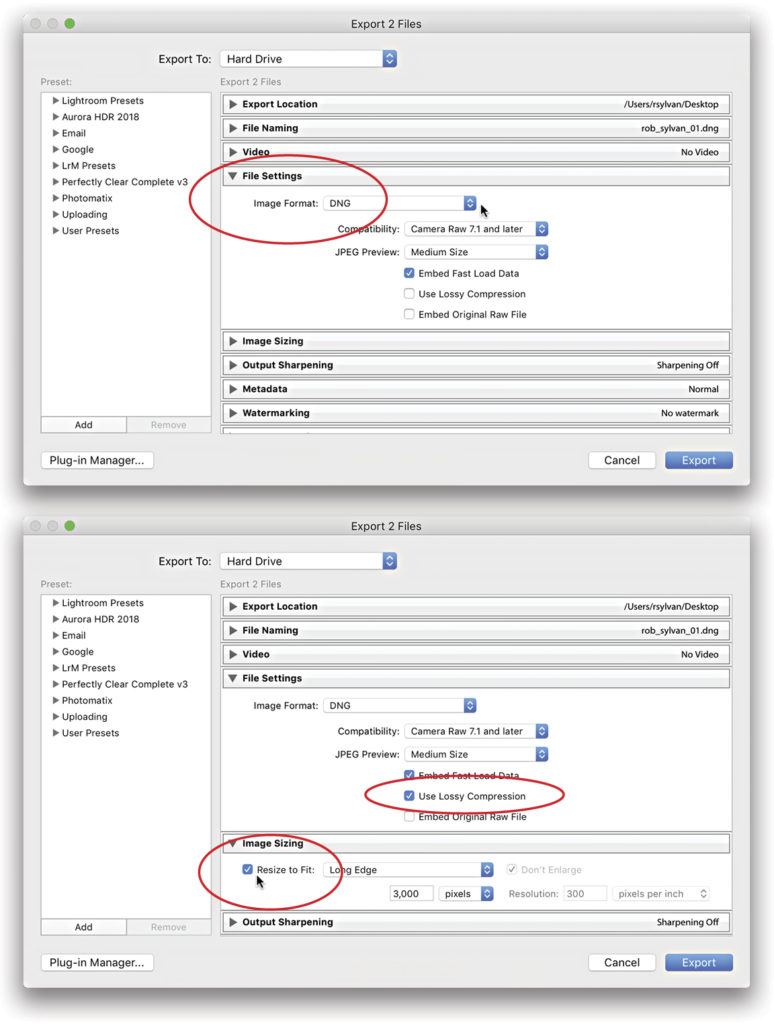
After choosing DNG from the Image Format drop-down menu, you’ll see the familiar DNG options we’ve seen before. One important difference here is that if you check the Use Lossy Compression box, the Resize to Fit checkbox in the Image Sizing section becomes enabled. While not required, this allows you to use both the lossy JPEG compression and resize the pixel dimensions to a smaller size. This can really reduce that file size, which can be helpful if you’re emailing the photos to someone, or even just uploading to Dropbox or some similar sharing service.
Convert Now or Later
As you can see, DNG has popped up all over the Lightroom ecosystem, and we haven’t even gotten to the actual conversion of originals yet. One of the DNG benefits that has been of the greatest value to me over the years is its ability to compress RAW data without any loss. This was the original flavor of DNG that was rolled out 14 years ago. I’ve leveraged the lossless DNG conversion to convert older RAW photos simply to reduce file size (in bytes) and gain more space on my drives, without losing any RAW data. Yes, storage is (relatively) cheap, but I have a long list of other things on which I’d rather spend money, and I can’t tell you how many Help Desk problems I see every year related to managing multiple drive issues. Here’s what I do:
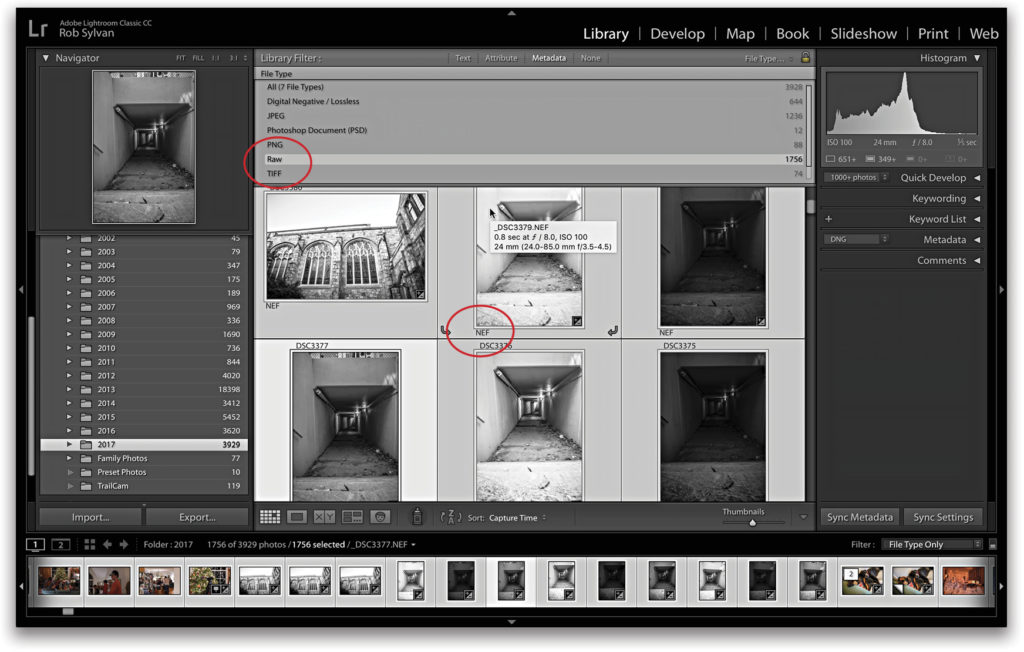
Step One: Select the source of the photos you want to convert to DNG in Grid view of the Library module. In my case, I selected a folder, but it could be a collection.
Step Two: Click the Metadata tab of the Library Filter bar and configure a column to display File Type. Click on Raw to filter by only the RAW photos in your source (see next page). You can skip this step if you know you only have RAW photos in your source. Select all the RAW photos.
Step Three: Go to Library>Convert Photos to DNG to open the Convert Photos to DNG dialog.
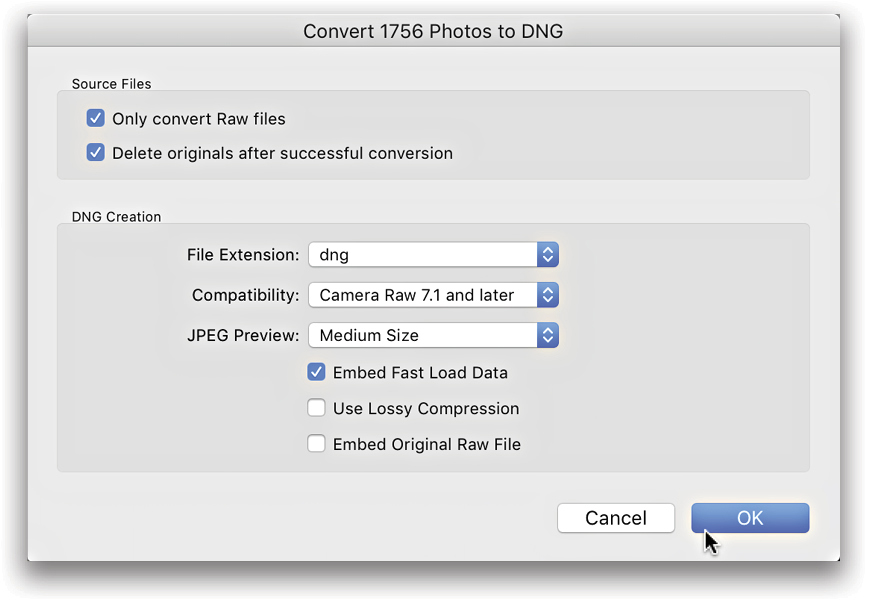
Step Four: Check the box to Only Convert RAW Files. Why bother with the Library Filter if the dialog has this checkbox? Because I want to be in the driver’s seat for what happens, and I want to know how many files will be affected before I start. Plus, now you know you can use the Library Filter that way.
Step Five: Decide if you want to check the box to Delete Originals After Successful Conversion. This is scary. I understand. Make sure you have a good backup in place before you do this. My reason for conversion in this instance is to reduce file size, so I’m opting for deletion of originals after successful conversion so that I’m only left with the DNG versions. We each have to make the best decision for our own needs. This isn’t one size fits all.
Step Six: Check the box to Embed Fast Load Data. This embeds a small preview into the DNG file that’s read first by Lightroom to speed up slider activation in Develop. This essentially acts like the Camera Raw cache, but it’s always with the source photo.
Step Seven: Choose your desired File Extension, Compatibility Level (with older versions of Camera Raw), and JPEG Preview (Medium Size is a good compromise). I leave Use Lossy Compression unchecked, because for this purpose, I only want to leverage the lossless compression and retain all my data. I opt to leave Embed Original Raw File unchecked because I’m trying to reduce file size and move away from the proprietary RAW to DNG as my archival format.
Step Eight: Double-check your settings and click OK. As that runs, you’ll see your proprietary RAW files replaced with a DNG version. I usually set this to run, and then walk away to do other things until it’s finished.
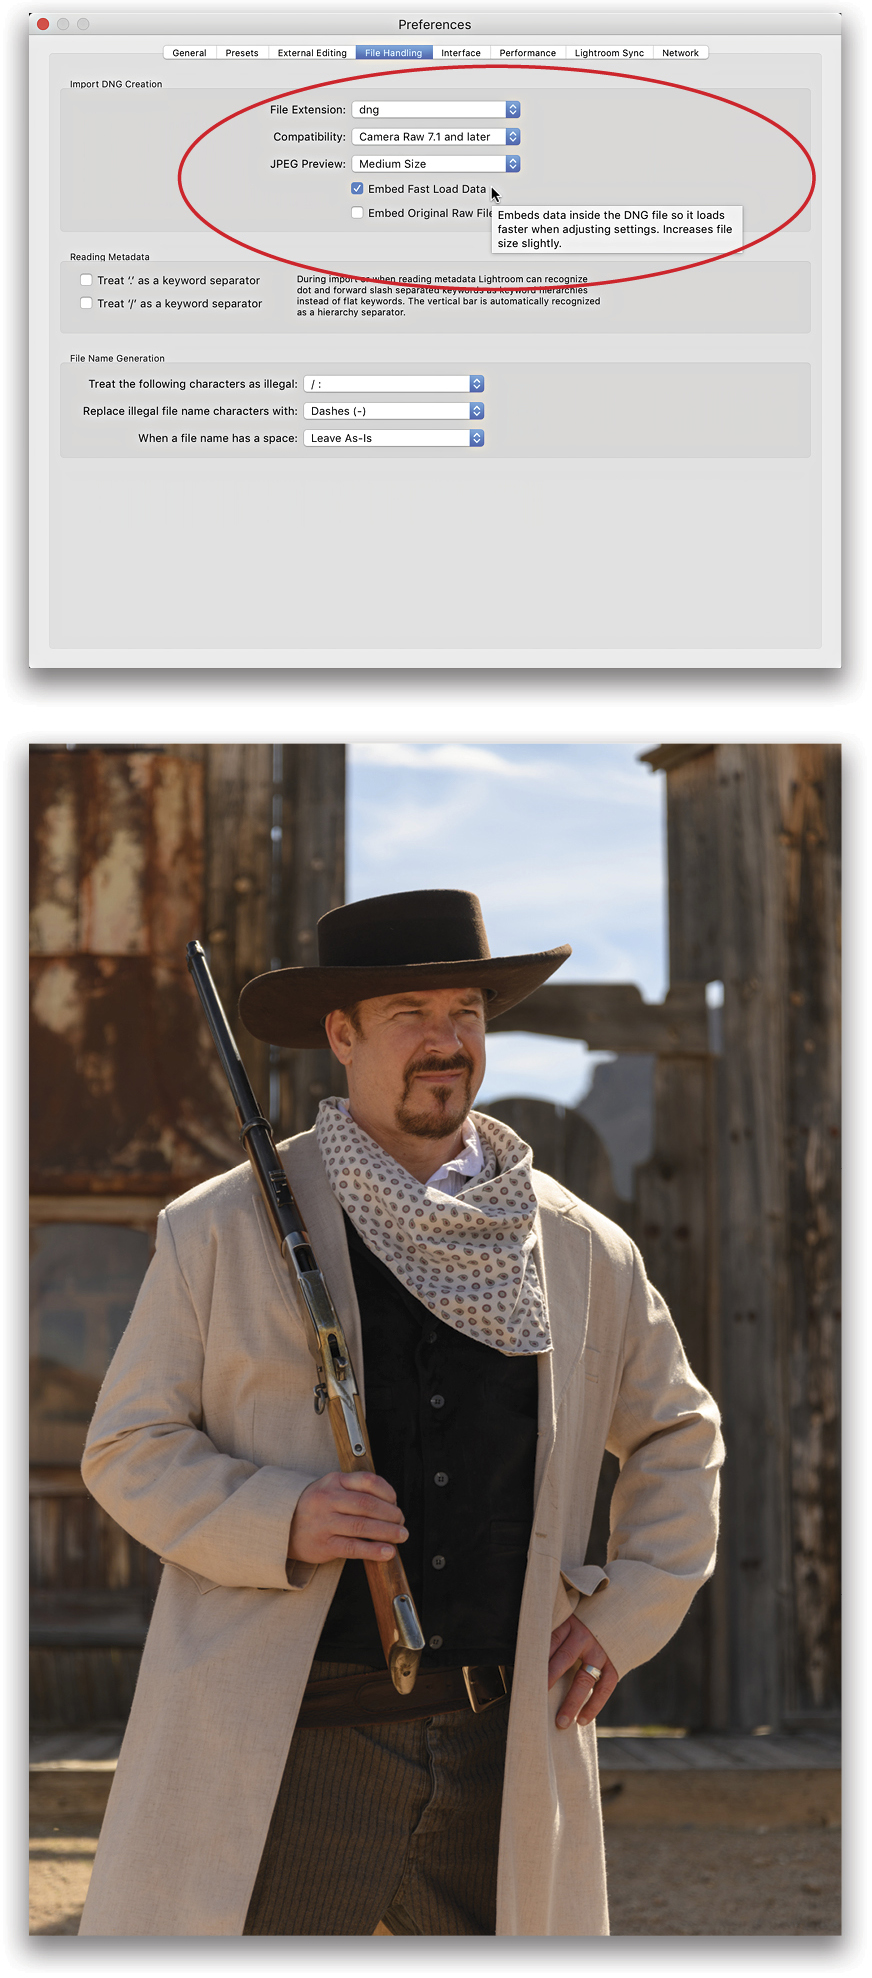
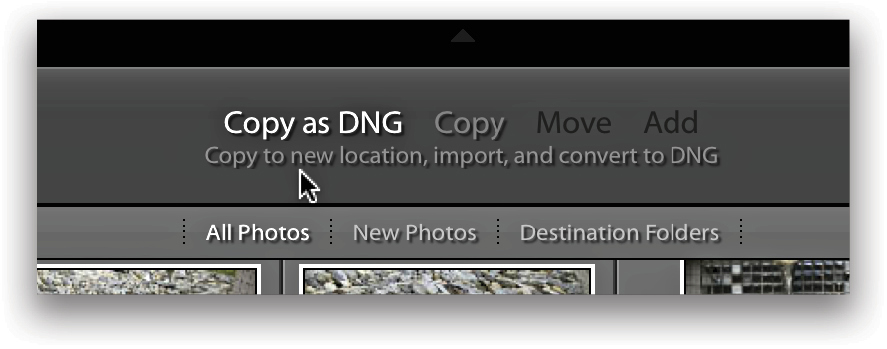
If you’re interested in converting to DNG from the moment of import, then you can choose the Copy as DNG option on the Import screen. This works just like the neighboring Copy option, except that once the photos have been copied to the destination (and imported into the catalog) the conversion to DNG begins automatically. The options to control what happens during that DNG conversion can be found in the Lightroom (PC: Edit)>Preferences in the File Handling tab. There are fewer options on this screen because this only applies to RAW files, and you wouldn’t want to choose the lossy DNG option at this stage, so it isn’t an option.
Wrapping Up
One way that’s helped me manage all my files, and DNG files specifically because there are now a few different kinds of DNGs (lossless, lossy, and reduced file size lossy), is to create what I call my “Catalog Dashboard.” I’ve written about this before, and you can find that article over at LightroomKillerTips.com.
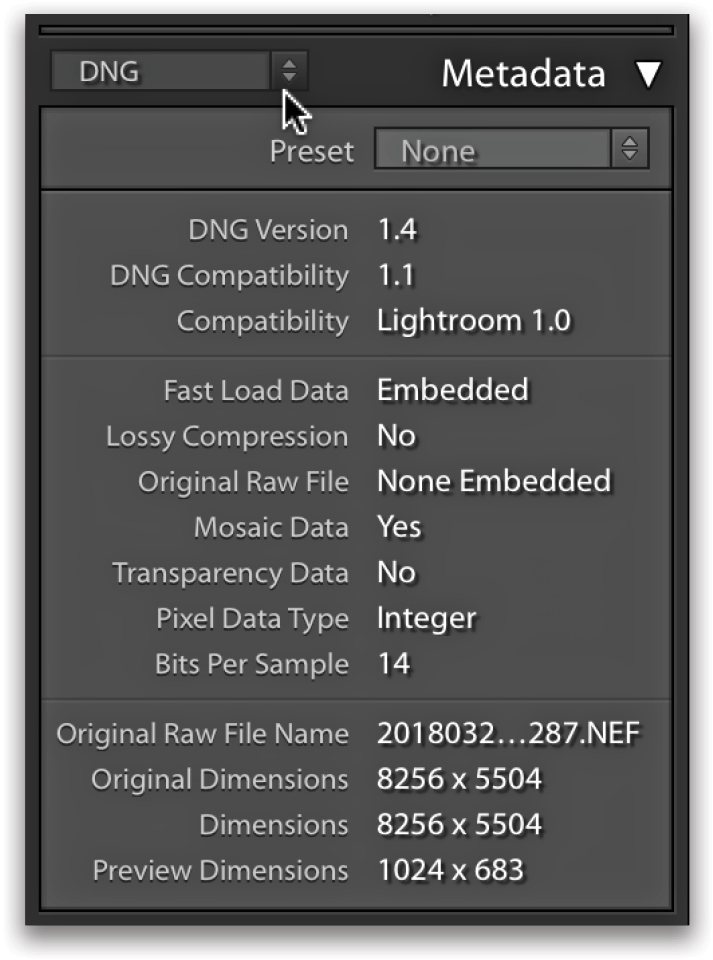
There’s also the DNG view in the Metadata panel that can show you a lot of useful info about your DNG files. Just select an image, expand the Metadata panel, and set the view to DNG. This is the only real way to distinguish between a lossless DNG and the newer lossy type of DNG (since they both have the same file extension), so if you should decide to somehow use the lossy type in your workflow, you should consider a unique naming convention for those types of files to help you manage them.


