In this article, we’ll discuss features that are lesser known in Photoshop. Thanks to Dave Williams, our resident travel photography guru, for pointing out that I haven’t shown Calculations for making Selections up to this point. Calculations have been around for a really long time and were
a well-kept secret by professional editors for many years.
Like so many selection techniques in Photoshop, Calculations is a way to build a selection or mask through a focus on channels. Found under Image>Calculations, it allows you to choose how to blend together multiple channels, while using blend modes to influence the result of the blend. Let’s break down the dialog to help you get started.
In the dialog, you can see there are two sources to blend with. If you want to reference another document as the source, it must be the same pixel dimensions as the file in which you’re applying Calculations or it won’t be available as an option. But if you’re only referencing your working document, you can choose different layers as your source, or the same layer, and at the bottom, you can choose a blend mode to help process the blending result.
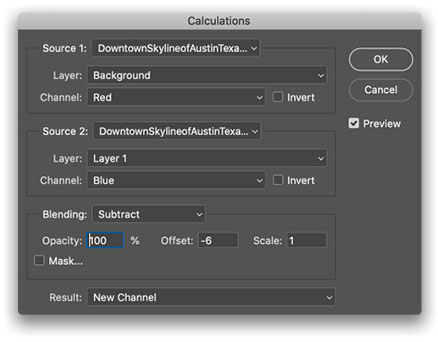
In the screenshot here, we’re showing the Subtract blend mode. Unique to Calculations, we have access to two additional, less common blend modes in Photoshop: Add and Subtract. These are the powerful hidden gems of this technique because, when you choose one of them, you can refine the result by adjusting the Offset and Scale values (more about this later in the article). These options aren’t visible in the dialog unless you’re using these two blend modes. You don’t have to use these two options and can rely on more common blend modes, such as Multiply, Color Burn, Screen, or Overlay, but you should definitely try Subtract or Add as an option because of the extra refinement options.
Another important detail is that you can choose to invert the source from a specific channel (Gray, Red, Green, or Blue) of the layer from which you’re sourcing. If you’re familiar with loading a channel as a selection, this means you could use a positive source selection from a layer’s Red channel and also have an inverted reference from its Blue channel to help produce the selection. Flipping these choices, inverting them, and adding a blend mode or Opacity value gives you a wide range of options to try to generate a good starting point for a high-contrast mask that captures an area you want to select.
An Example
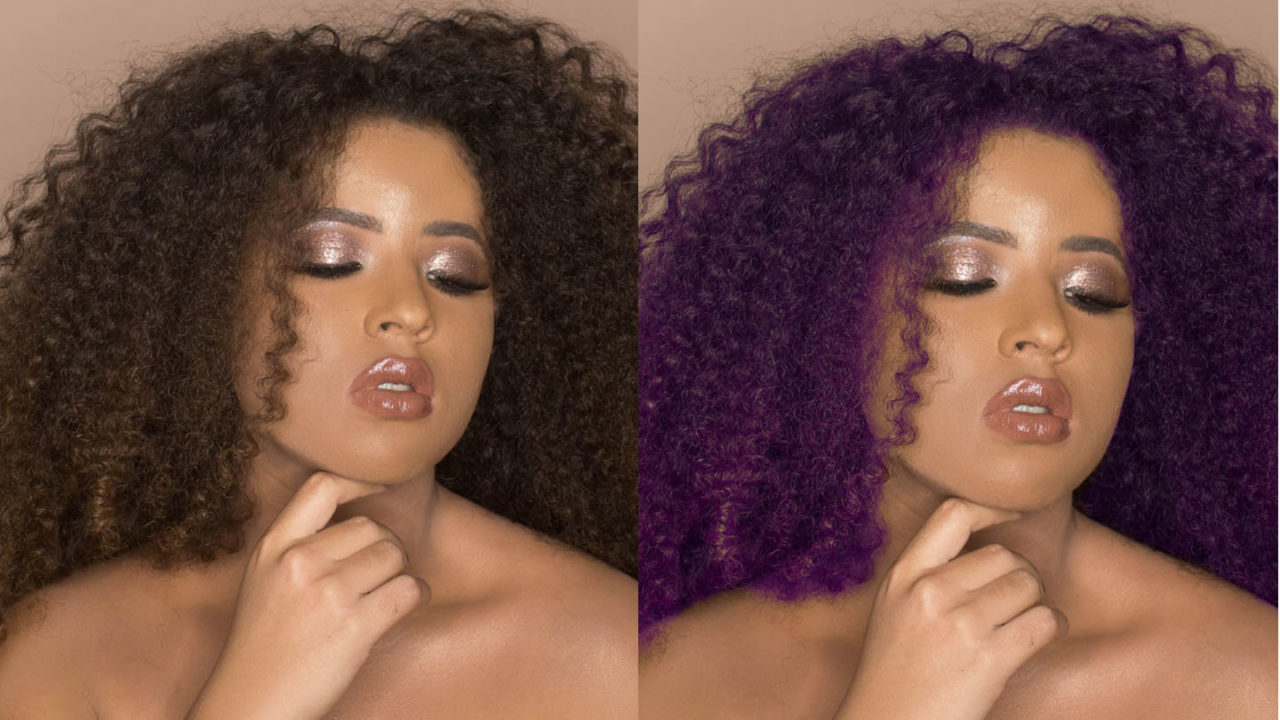
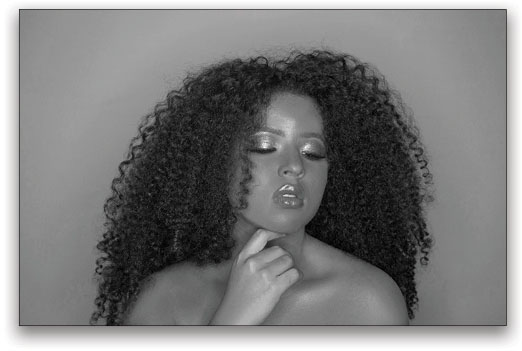
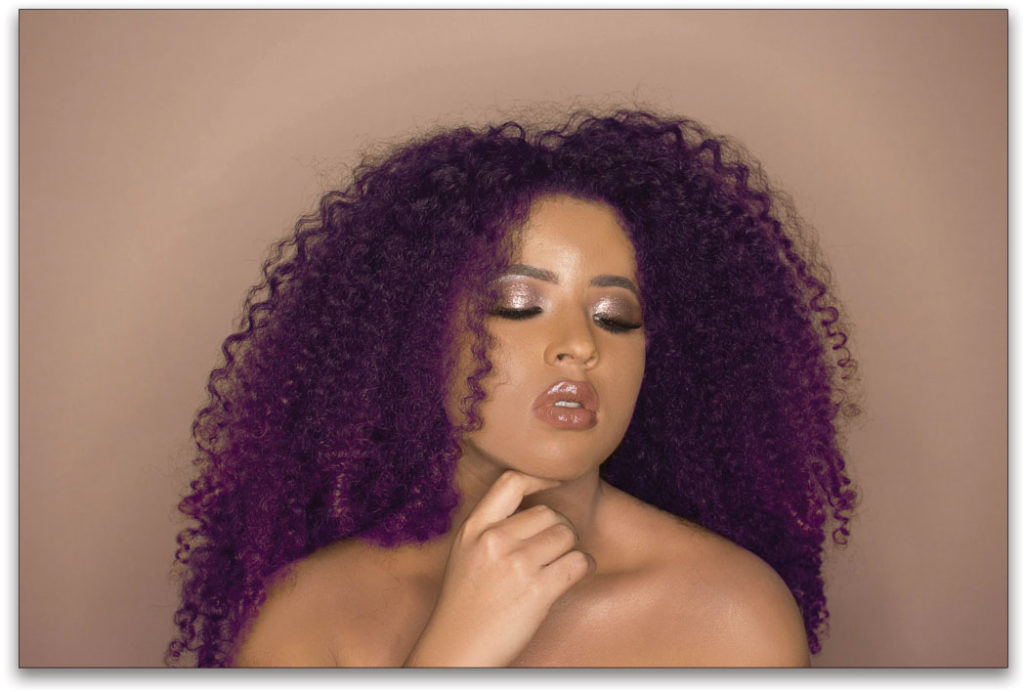
For our example, let’s select and dye our subject’s hair. (If you’d like to follow along with the image here, click this link to download it for free.) This image has a lot of very similar hues in the picture. Although the Quick Selection tool, mixed with the Select and Mask controls, such as the Refine Edge Brush, could do a decent job with this, it might not actually be the fastest way, because it would involve a lot of back-and-forth refinement.
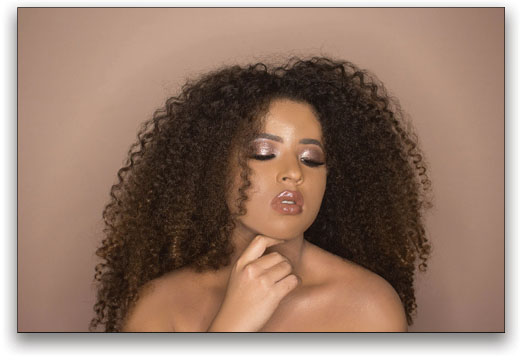
Our goal with any starting selection is to get 80% of the way to a good mask as fast as possible. If we review the channels (Window>Channels) for this image, we can see that tonally, there’s a good difference between the Red and the Blue channel. Clicking on the Red channel will show you a light grayscale version of the image, as shown here.
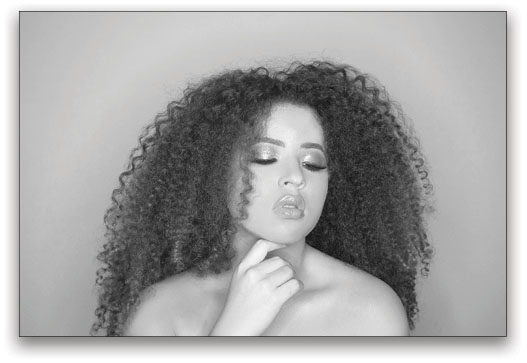
This is because there are so many warm tones in the image. So, the brighter the channel is, the more of that color frequency is used in the mix of those pixels. Because this image is mostly warm sienna hues, it makes sense that the Red channel would be very light. There are lots of red values in there. (Shameless plug here: If you want to learn more about channels, check out my new course on KelbyOne, A Guide to Commanding Color.) This means that the Blue channel shouldn’t be as bright, because there isn’t much data from that color frequency in the mix of these pixels. You can see the Blue channel for this image here, and you’ll notice how much darker the shades are.
Neither of these channels on their own give us a great starting point for a mask without doing a lot of work to adjust the contrast and then converting it into a mask. But, if we use Calculations, we can experiment with those two channels as a source, and explore the options available to produce a good, 80% done, starting mask. One major advantage is that it previews the mask while you make adjustments, giving a clear indicator of the quality of the mask.
The Settings
We’re using the same layer for both sources from our image file, but we’re choosing the Red channel for Source 1 and the Blue channel for Source 2. The nuance here is that we’re using the Invert option on the Blue channel.
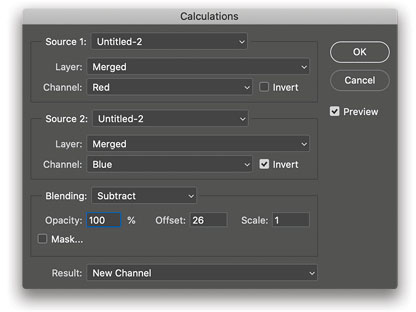
This, mixed with the Subtract Blending mode gives us a negative effect from the two channels that also carries a high degree of contrast. We can then modify or adapt this by adjusting the Offset and Scale settings to increase or reduce the contrast and blending.
Note: The Offset value lets you lighten or darken the pixels in the destination channel by any brightness value between +255 and –255. Negative values darken the image; positive values lighten the image. The Scale factor may be any number between 1.000 and 2.000. Entering a higher Scale value darkens the image. Learn more about the math of this here.
The choices for the Result option at the bottom of the Calculations dialog are to make this a new document, new channel, or a selection. We’ll choose New Channel and click OK, which means that Photoshop will make it an Alpha channel, a saved selection that you can find in the Channels panel (shown here).
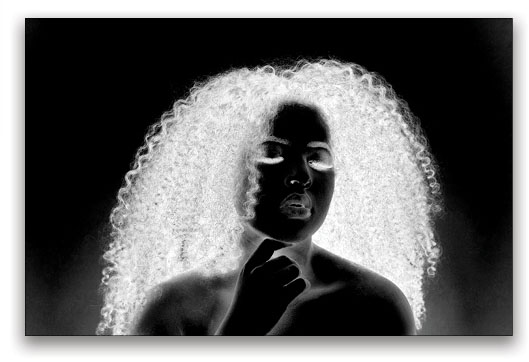
This is already a really good starting point for our image. We can now take a couple of different approaches to modify the channel and add or remove unwanted elements. First, we’ll use Levels to get rid of all that extra “glow” around the base of the subject. With the Alpha channel selected, go to Image>Adjustments>Levels.
Grab the dark-gray (shadows) slider, beneath the left side of the Input Levels histogram, and move it to the right. Using this slider increases the contrast in the dark side of the tonal spectrum. For this example, we set it to 90, but you can adjust it to your preference. You should see all of the glowing elements in the background disappear as the contrast makes them black. If you’re working with a different image, consider adjusting the white (highlights) slider on the right side to increase the contrast of the bright tones of your image. Click OK when it looks good to you.
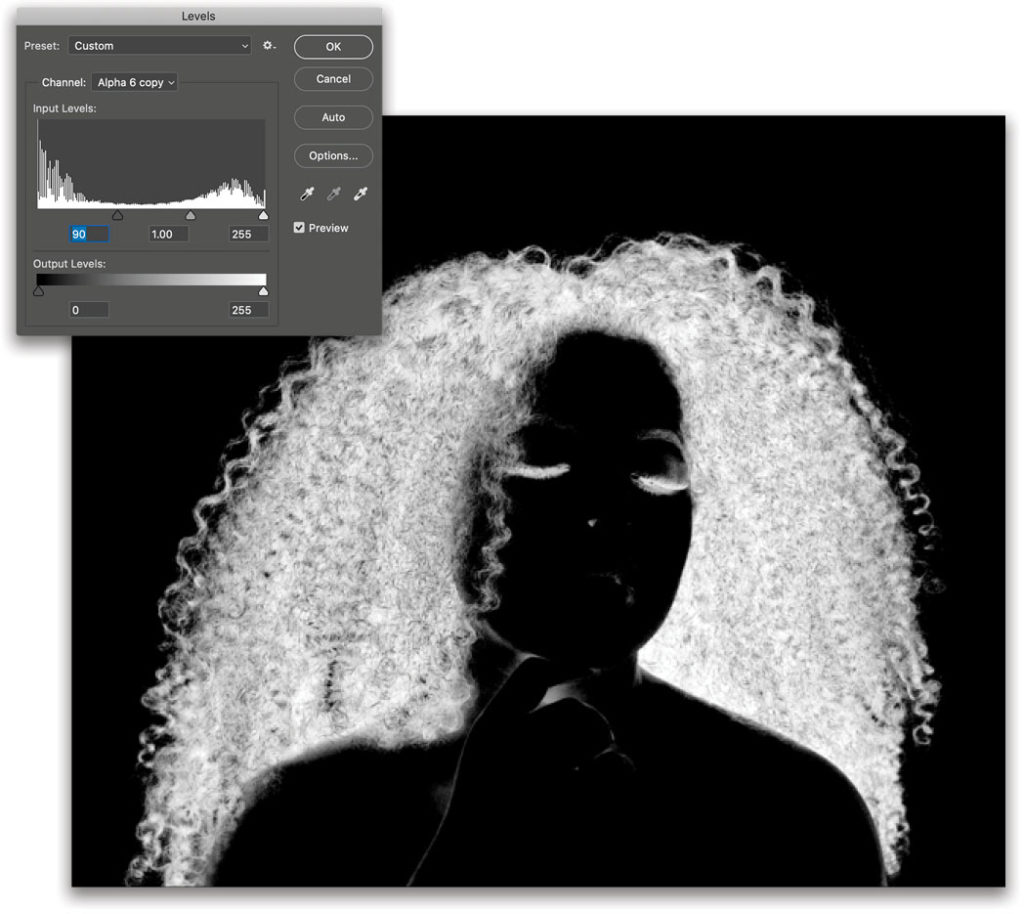
Now, there are elements like the eyelashes and eyebrows that you might not want in the selection. A few quick dabs using a soft Brush (B) and black as the Foreground color allows you to remove them easily. This image on the next page shows where we removed details from the face and hands.
Hair Mask Success!
To load this Alpha channel as a selection, just go to Selection>Load Selection, or hold down the Command (PC: Ctrl) key and click on the Alpha channel thumbnail in the Channels panel. Either way, you’ll get an active selection. Then, make sure you click back on the RGB Composite channel so you can actually edit pixel values.

Now, switch back to the Layers panel and, with this selection active, click on the Create New Adjustment Layer icon (half-black/half-white circle) at the bottom of the panel and choose Hue/Saturation to change the color of her hair. A quick adjustment with the Hue and Saturation sliders (as shown here), and now she has some rocking purple-tinted locks! You can also try clicking the Colorize checkbox to completely change the color of her hair.
Try experimenting with Calculations and you might find some quick starts to making great masks and selections. This is definitely not an entry level Photoshop user technique, but if you’ve been reading this article each issue and practicing, I bet you’ll get it in a snap. Special thanks again to Dave Williams for bringing this topic to my attention for the article.
This article originally published in the April, 2020 issue of Photoshop User magazine.


