An excerpt from Corey Barker’s Photoshop Down & Dirty Tricks for Designers.
I’m a big fan of textures. I keep a folder of nothing but textures for any occasion. Whether they’re from iStockphoto, Fotolia, my own camera, or even my phone, I always like to have a variety on hand. In this project, we’ll use a simple texture file to add an element of grit and ruggedness to a photo. Textures can have so many uses beyond their face value; you just have to look at them a little differently.
STEP ONE:
Open the file of the rugged cowboy or any other photo you might like to apply this effect to.
STEP TWO:
Next, open the texture file. Again, I like to keep a folder of nothing but textures in the event that I need them for whatever reason. Get the Move tool (V) from the Toolbox and drag this texture into the cowboy image file. Center it over the cowboy image and, if needed, go into Free Transform (Command-T [PC: Ctrl-T]), adjust the size of it, and then press Return (PC: Enter).
STEP THREE:
Now, first we need to remove the color from the texture image by pressing Command-Shift-U (PC: Ctrl-Shift-U). Since the cowboy is on the left side of the image, we also need to flip the texture around, so the lighter side of it is on the left side, as well. So, go under the Edit menu, under Transform, and choose Flip Horizontal.
STEP FOUR:
Next, go under the Image menu, under Adjustments, and choose Invert to flip the image values. Change the layer’s blend mode to Screen, making the black areas invisible and revealing the cowboy image below.
STEP FIVE:
Now, if the texture seems a little overbearing, then you can go under the Image menu, again under Adjustments, and this time choose Levels. Run a simple Levels adjustment, like you see below, to darken the black areas.
STEP SIX:
To add an extra element of grit to the cowboy image, click on the Background layer to make it active. Then, go under the Filter menu, under Sharpen, and choose Smart Sharpen. Set the Amount to 100%, the Radius to 1 px, and the Remove pop-up menu to Gaussian Blur. Click OK when you’re done.
STEP SEVEN:
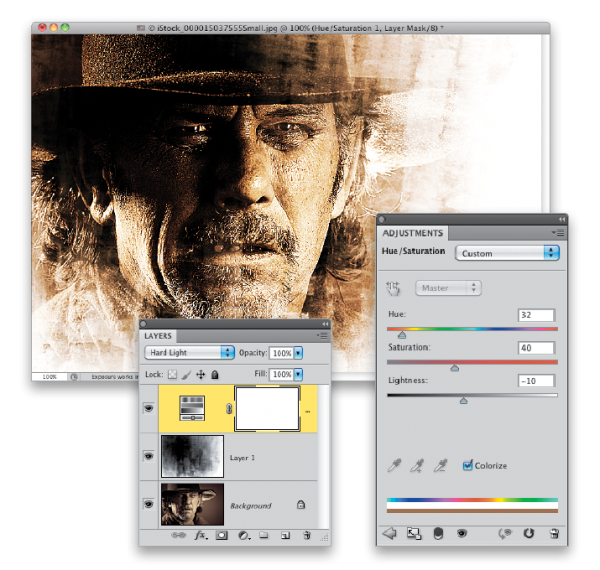
To finish this effect, click back on the texture layer in the Layers panel to make it active, then click on the Create New Adjustment Layer icon at the bottom of the panel and choose Hue/Saturation. In the Adjustments panel, turn on the Colorize checkbox, then set the Hue to 32, the Saturation to 40, and the Lightness to –10. This will give the image a vintage sepia look. Finally, change the adjustment layer’s blend mode to Hard Light and, if needed, get the Crop tool (C) and crop the image slightly to remove some of the white background on the right (as you’ll see I did in the Final Image).
That’s pretty much it. As you play with this technique, be sure to try different textures and colors to get a variety of different looks.
TIP: Photograph Textures
Since textures are often very abstract images, you can use things like the camera on your phone to take pictures of textures when you’re out and about. These days, camera phones take pretty decent pictures that you can work with.
In this alternate version, I used two copies of the texture file in different positions, and masked out part of each to cover the area I wanted to show. Then I merged all the layers into a new layer, changed the blend mode to Multiply, and added a new colored texture image below the merged layer.
For more Photoshop tricks, see Corey’s book, Photoshop Down & Dirty Tricks for Designers, or his online classes on KelbyOne.com.


