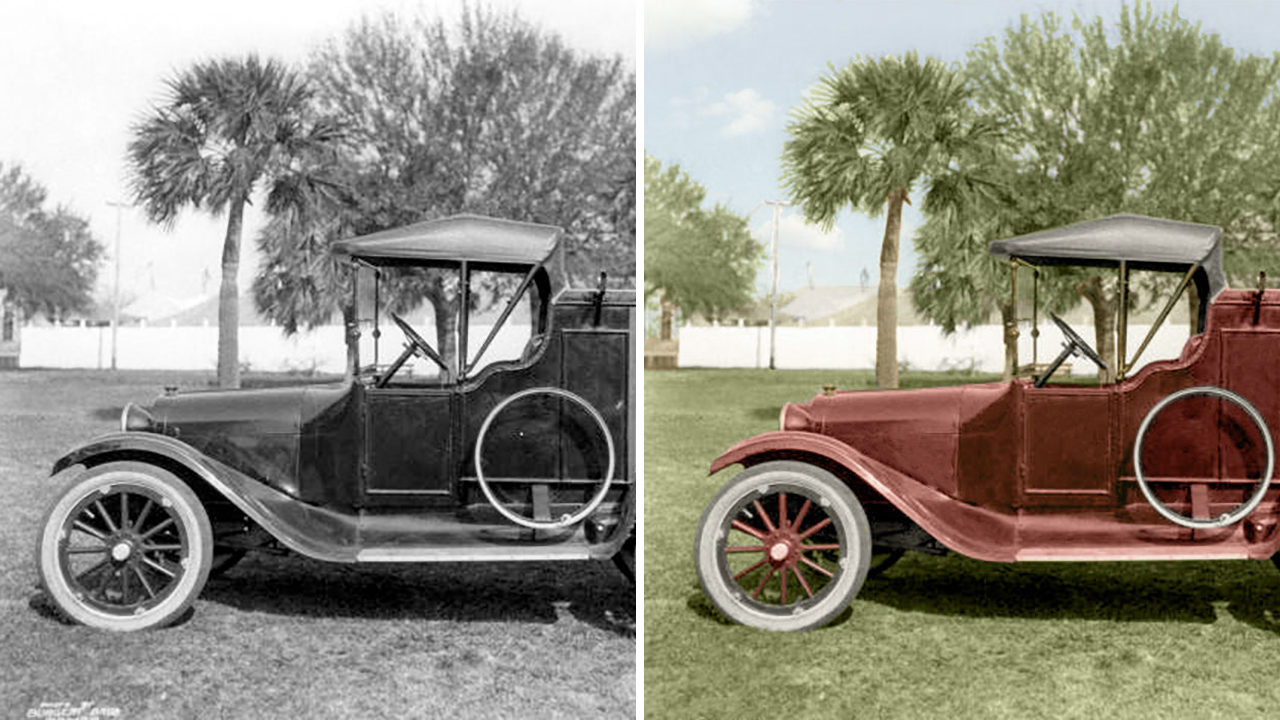
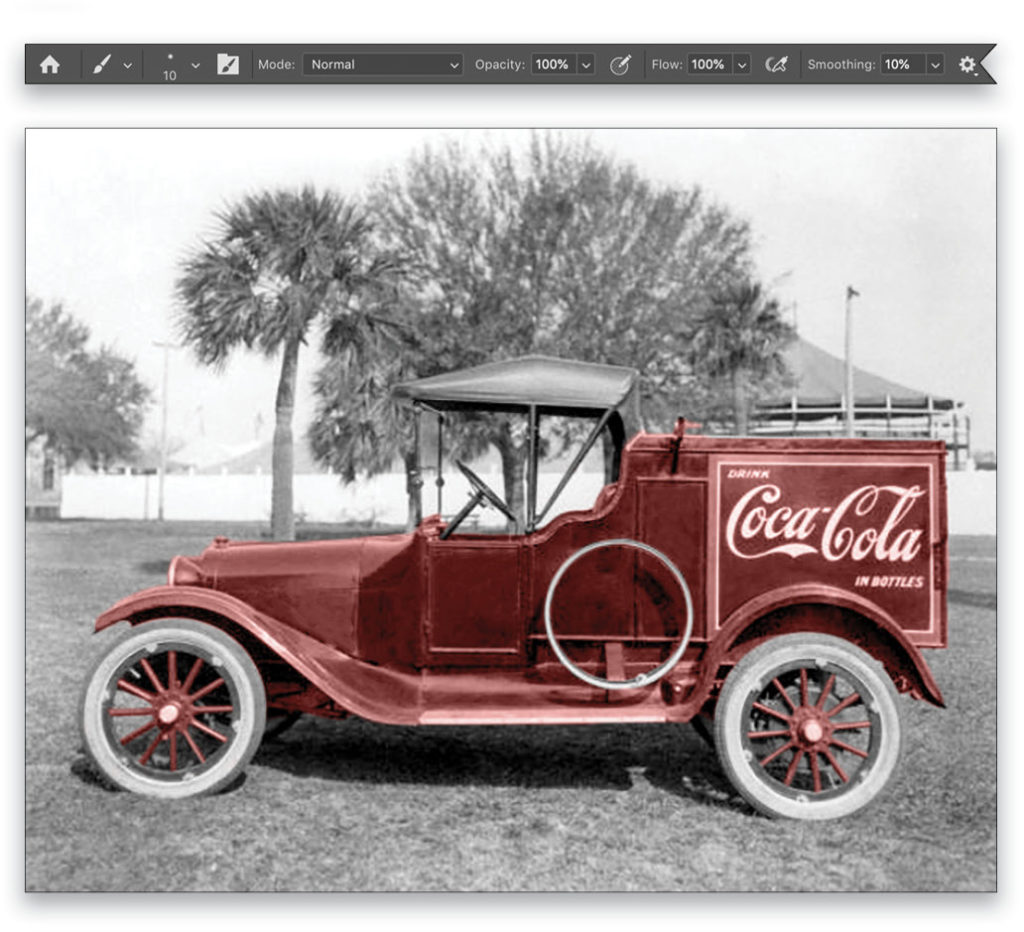
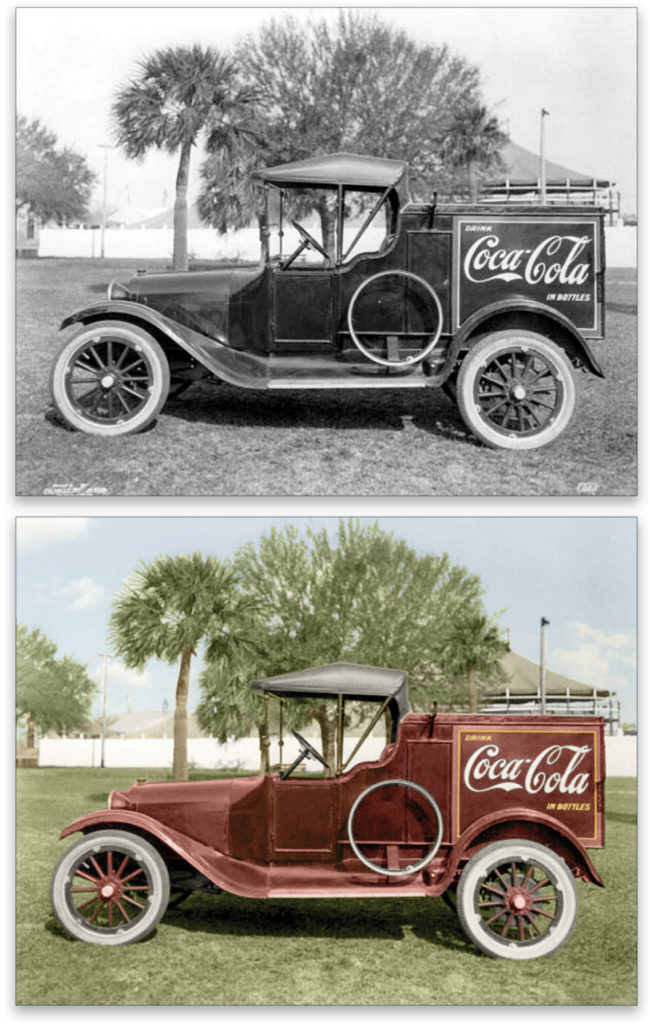
In this tutorial, we’re going to colorize a black-and-white photo of an old Coca-Cola delivery truck. First, I needed to find some reference images for the original colors on the truck, so I searched online for images of Coca-Cola delivery trucks from 1920, the year of the marking on the photo. I was unable to find the exact truck, but I did discover that the majority of them were red at that time. I’m going to colorize the truck based on the two trucks shown here and here, as they’re the closest in shape and resemblance to the one in the photo with which we’ll be working.
Step One: You can find the image that we’re using in this tutorial by clicking here. After opening it in Photoshop, we need to make sure the image is in RGB Color mode or else it won’t colorize, so go to Image>Mode>RGB Color. Drag the Background layer to the Create a New Layer icon (+) at the bottom of the Layers panel to duplicate it, and then add a new blank layer.
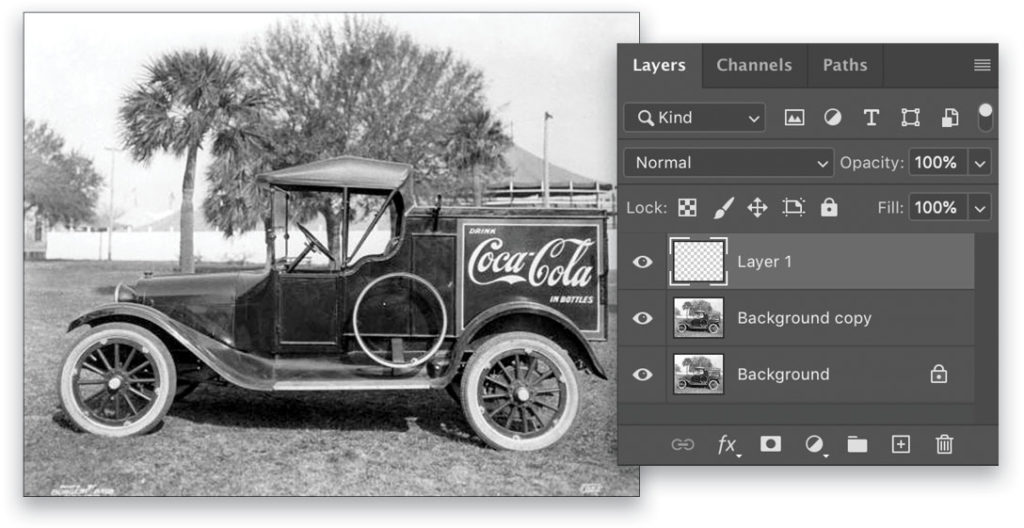
Step Two: With the Spot Healing Brush tool (J) selected, begin removing dust and scratches on the new layer. Note the writing at the bottom of the image. Unless a client specifically requests it be left intact, I’d remove it as well. In the Options Bar, set the brush size to 8 pixels, Mode to Normal, Type to Content-Aware, and check Sample All Layers. Now, simply paint over the areas you want to heal. You may need to adjust the brush size as you go. Try to clean up as many of the “smears” as possible on the side of the truck, since that’s the primary focus in the image.

Step Three: Now, we’ll begin colorizing the truck. With the Quick Selection tool active (nested below the Object Selection tool [W] in the Toolbar), turn on Sample All Layers in the Options Bar, and then select the entire truck except for the roof since it’s black in both of the example images we found. Don’t worry about trying to exclude the areas through the windows or tires. If it selects any of the grass around the truck, hold the Option (PC: Alt) key and paint to remove those areas from the selection. Go to Select>Inverse, and then click Select and Mask in the Options Bar.
In the Select and Mask workspace, set the View menu in the Properties panel to Overlay (V). Then, in the Global Refinements section, drag the Smooth slider to 32. Leave Feather and Contrast at 0. Set Shift Edge to –30% to ensure you have a smooth edge around the truck. Make sure the Output To drop-down menu at the bottom of the Properties panel is set to Selection, click OK, and go to Select>Inverse again (if you don’t Inverse it again, you’ll colorize the grass rather than the truck).
Step Four: With the Eyedropper tool (I), click-and-hold in the image, and then drag it to the webpage with the image of the toy truck. Hover the cursor over the hood of the truck and release the mouse button to set the Foreground color to that color.
Press X to flip the Foreground and Background color swatches in the Toolbar, and again with the Eyedropper, sample the red by the oval window of the toy truck. With the darker red (#822d29 in the example shown here) as the Foreground color, go to Layer>New Fill Layer>Solid Color, name it Truck in the New Layer dialog, and click OK. When the Color Picker appears, just click OK to fill your selection with the Foreground color. Change the blending mode from Normal to Color, and leave the Opacity at 100% for now.
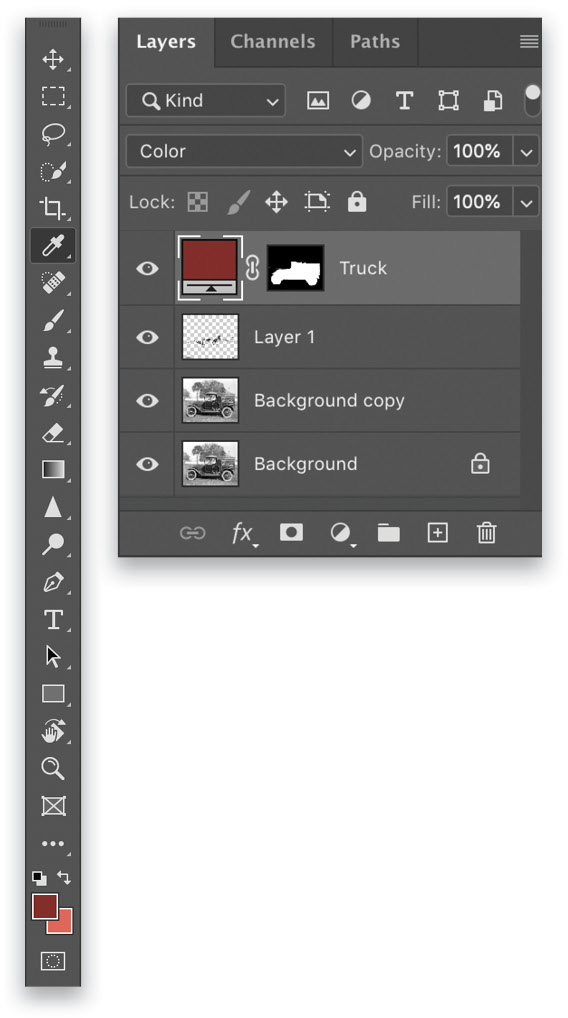
Step Five: With the Brush tool (B) selected, go up to the Options Bar and set its size to 10 px. Click on the mask thumbnail of the Truck layer in the Layers panel to make it active, and press X until the Foreground color is black. Paint away the red from the steering wheel, window, and metal bars attached to the roof, as well as from the tires (except the spokes) and any areas of grass you can see through the spokes. Also paint the red away from the spare tire on the side of the truck. When done, click back on the layer thumbnail and reduce its Opacity to 75%.
Step Six: As seen on this website, the Ford F100 model delivery truck has undertones of blue, purple, and pink in the red paint. Therefore, to create realistic paint for the time, we must add these colors to the truck.
Duplicate the Truck layer, double-click its layer thumbnail in the Layers panel to open the Color Picker, and enter the color #30DBD2. Click OK to close the Color Picker. Change the blending mode from Color to Soft Light and reduce the Opacity to 20%.
Step Seven: Duplicate the layer you just created, double-click its layer thumbnail to open the Color Picker, and set it to a purplish-pink (#DB3BC0). Click OK to close the Color Picker. Leave the blending mode set to Soft Light but reduce its Opacity to 5%.
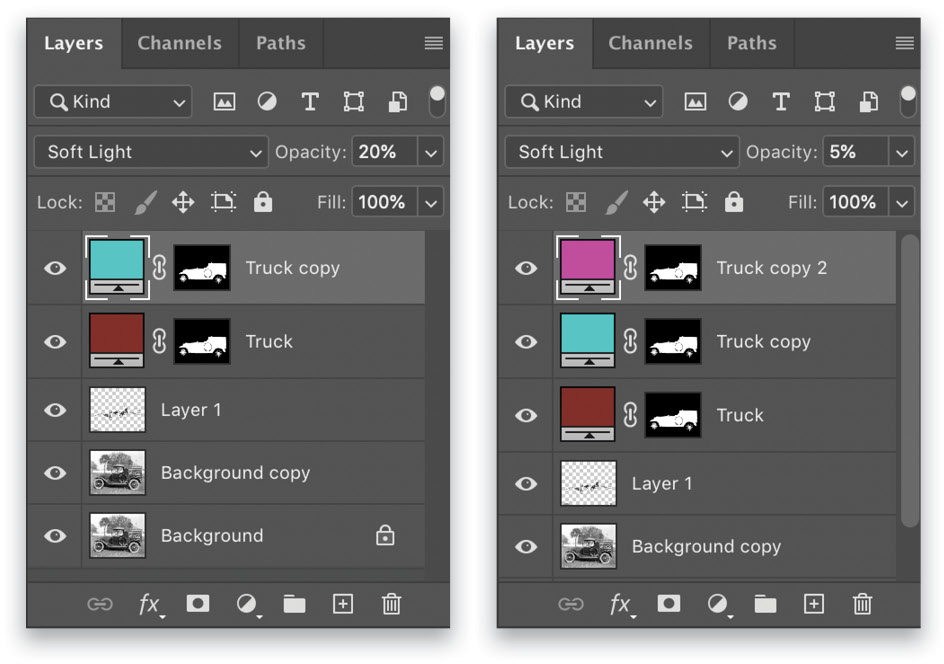
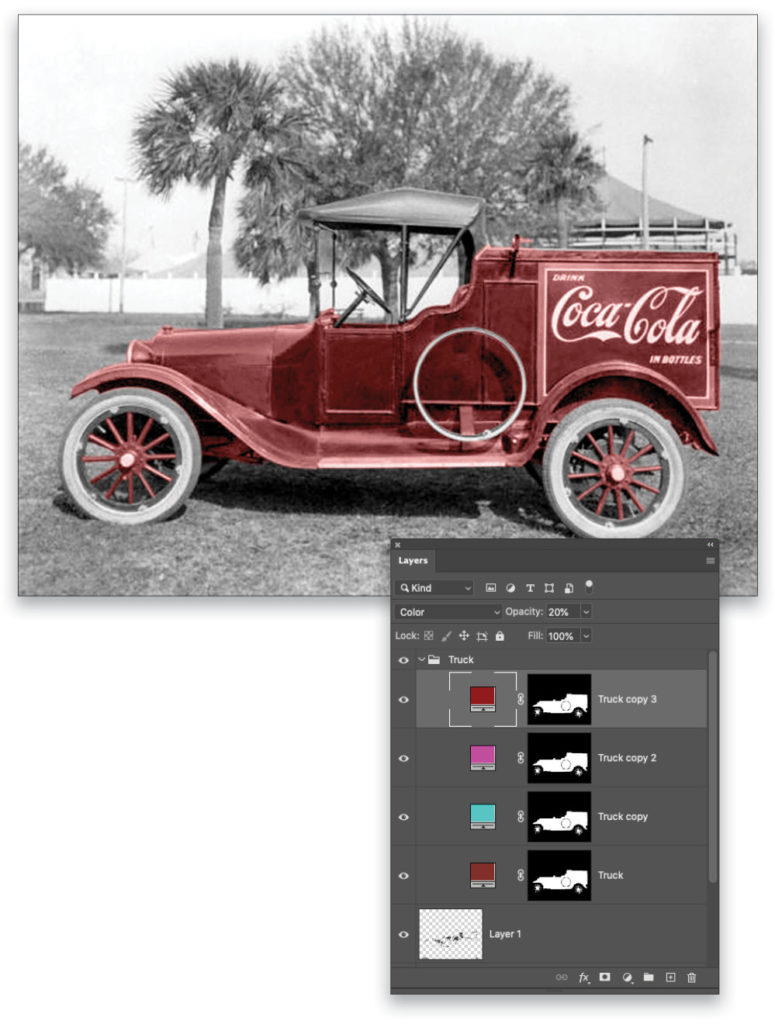
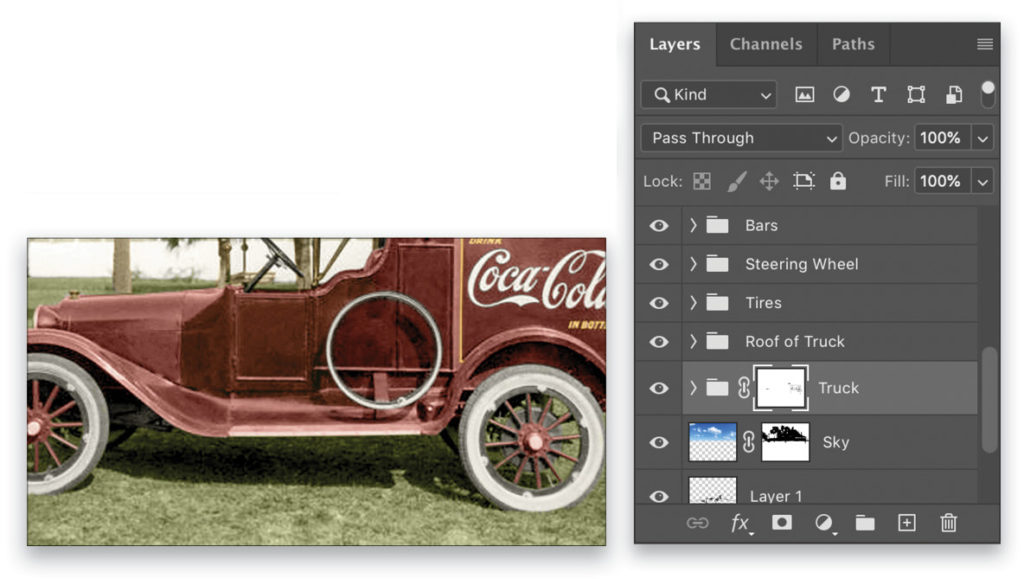
Step Eight: Duplicate the purplish-pink layer, and double-click its layer thumbnail to open the Color Picker. Back in the website with the image of the toy truck, sample the brighter red (#910000), and click OK. Change the blending mode to Color and the Opacity to 20%. Click on the top Truck layer in the Layers panel, Shift-click the bottom Truck layer to select all of them, and then press Command-G (PC: Ctrl-G) to group them. Double-click the name of the group and rename it to “Truck.”
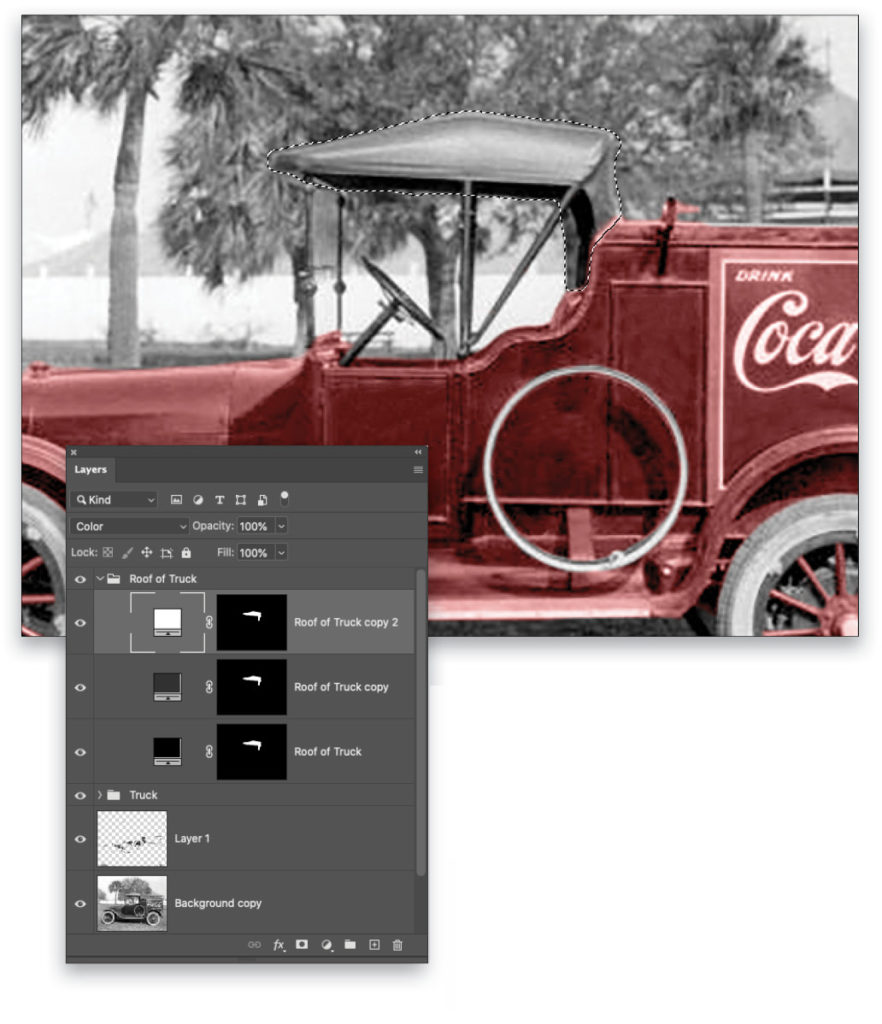
Step Nine: Next we’ll colorize the roof of the truck. Using the Quick Selection tool, select just the roof of the truck. Add a Solid Color fill layer, name it “Roof of Truck,” set it to black (#000000) when the Color Picker appears, and click OK. Change the blending mode from Normal to Color.
Duplicate the Roof of Truck layer, and change the fill color from black to dark gray (#313131). Duplicate it one more time and change the color to white (#ffffff). Select all three layers, group them, and rename the layer group “Roof of Truck.”
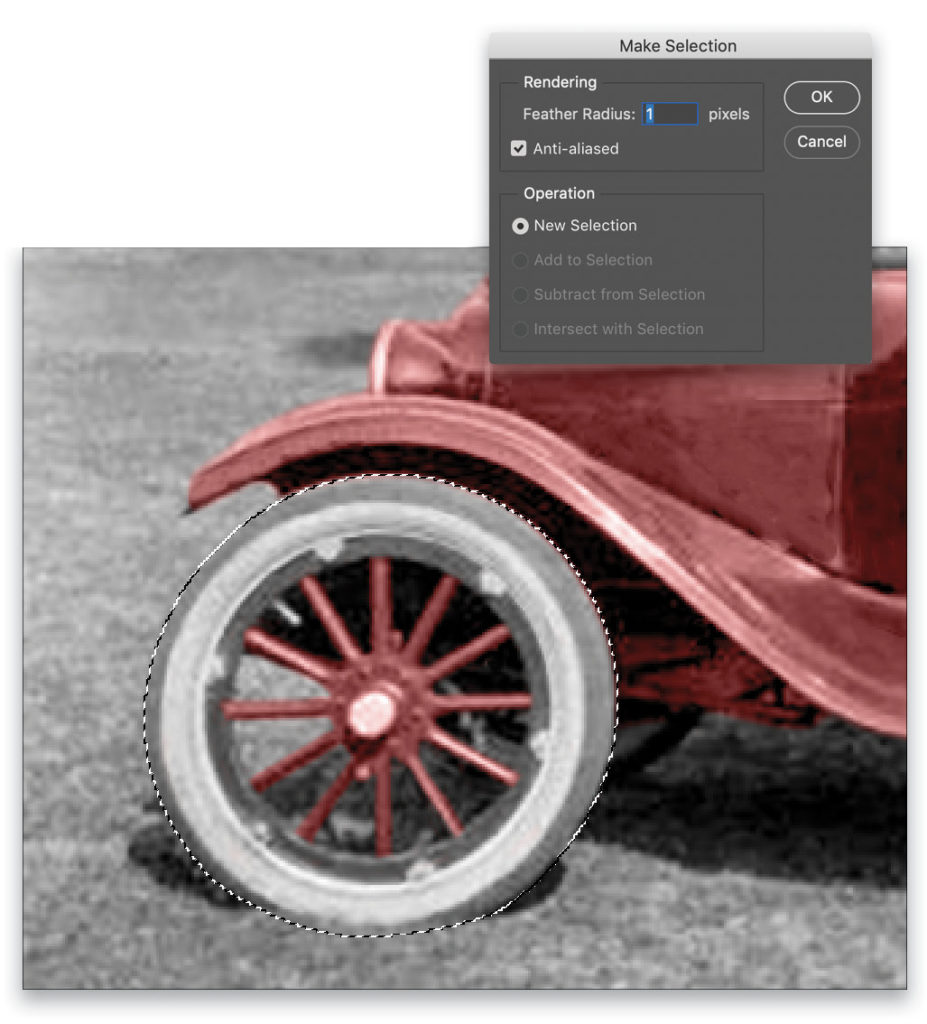
Step 10: Given that tires during that time were “white-wall,” we’ll colorize the lighter parts white and the darker parts black. According to Wikipedia, the white walls were pure white. Select the Curvature Pen tool (nested below the regular Pen tool [P] in the Toolbar), and draw a path around the front tire. Right-click in the document and choose Make Selection. In the dialog that appears, set the Feather Radius to 1 pixel, check on Anti-aliased, and click OK.
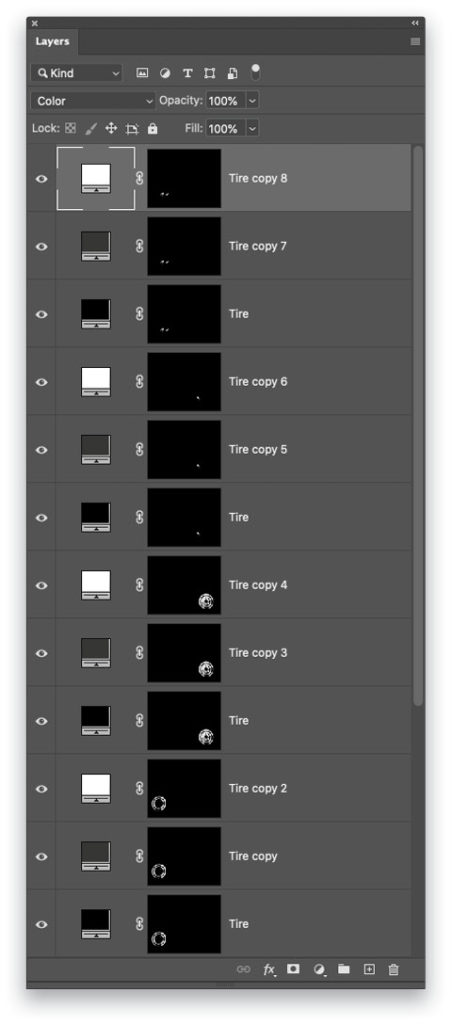
Step 11: Create a Solid Color fill layer named “Tire,” and make it black (#000000). Change the blending mode from Normal to Soft Light just so you can see the tire. Click on the layer mask thumbnail to make it active, and with the Brush tool set to white at 10 px, paint away the black on the spokes, grass, and light part of the tire (not the mechanisms attaching the tire to the truck). After doing that, change the blending mode to Color.
Duplicate the Tire layer and change the color from black to dark gray (#353535). Duplicate it again and change the color to white (#ffffff). Repeat Steps 10 and 11 for the back tire, as well as the small sections of tire you can see on the other side of the car.
Step 12: Add a Solid Color fill layer named “Whitewall” set to white with a blending mode of Soft Light. Click on it’s layer mask thumbnail, and press Command-I (PC: Ctrl-I) to Invert the mask to black, hiding the fill layer. Paint with white on the mask to reveal the fill layer over the white wall on the back tire. Repeat for the front tire, except set the white fill layer to the Color blending mode.
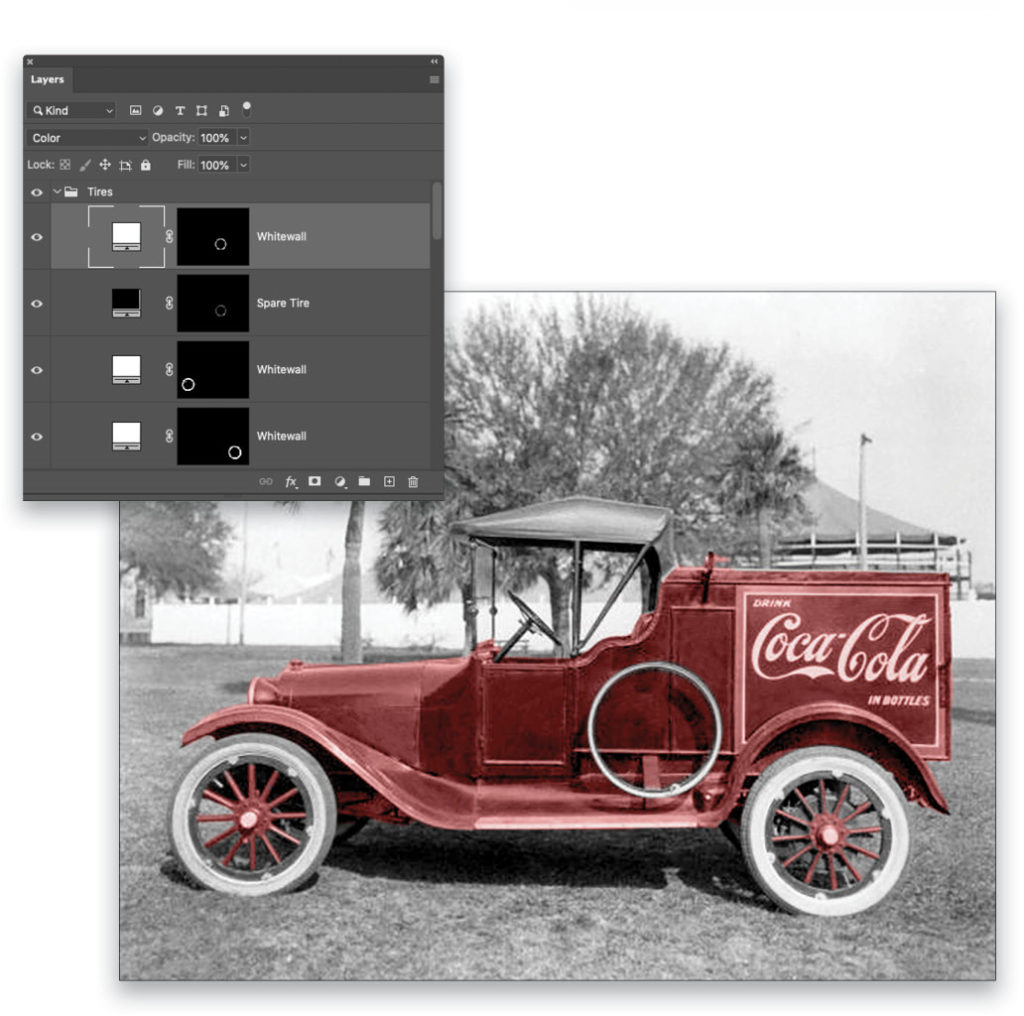
Step 13: Repeat Steps 10–12 for the “spare” tire attached to the side of the truck, except only create a single black Solid Color fill layer and then the Whitewall layer. Group all of the tire layers and rename the group folder “Tires.”
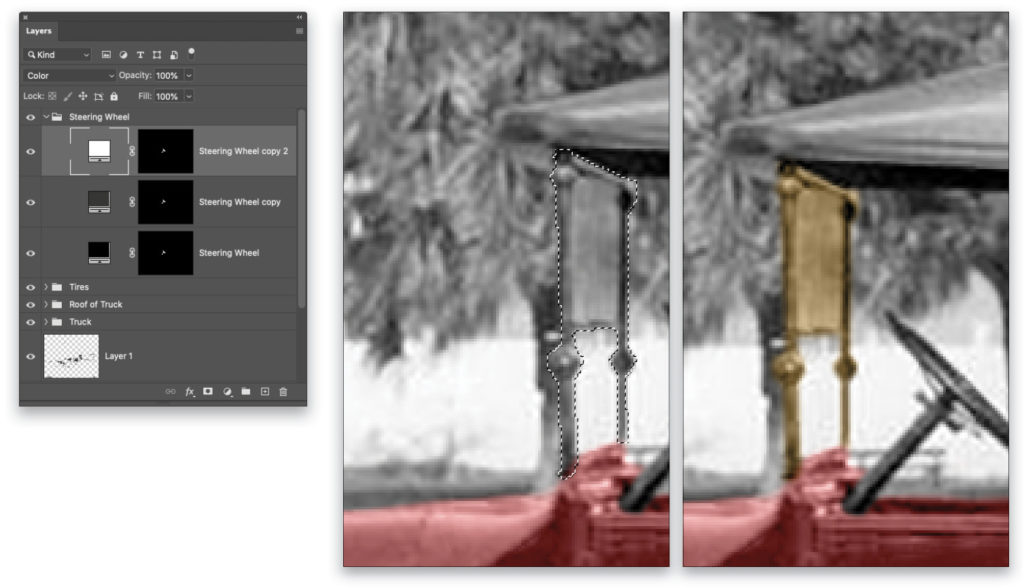
Step 14: Next we’ll work on the steering wheel. Using the Pen tool (P) draw a path around the steering wheel and column. Right-click in the image, and choose Make Selection. Set the Feather Radius to 1 with Anti-aliased checked, and click OK. Add a black (#000000) Solid Color fill layer named “Steering Wheel,” with a blending mode of Color.
Duplicate the Steering Wheel layer and change its color to dark gray (#353535). Duplicate it one more time and set its color to white (#ffffff). Place the Steering Wheel layers in a layer group folder called “Steering Wheel.”
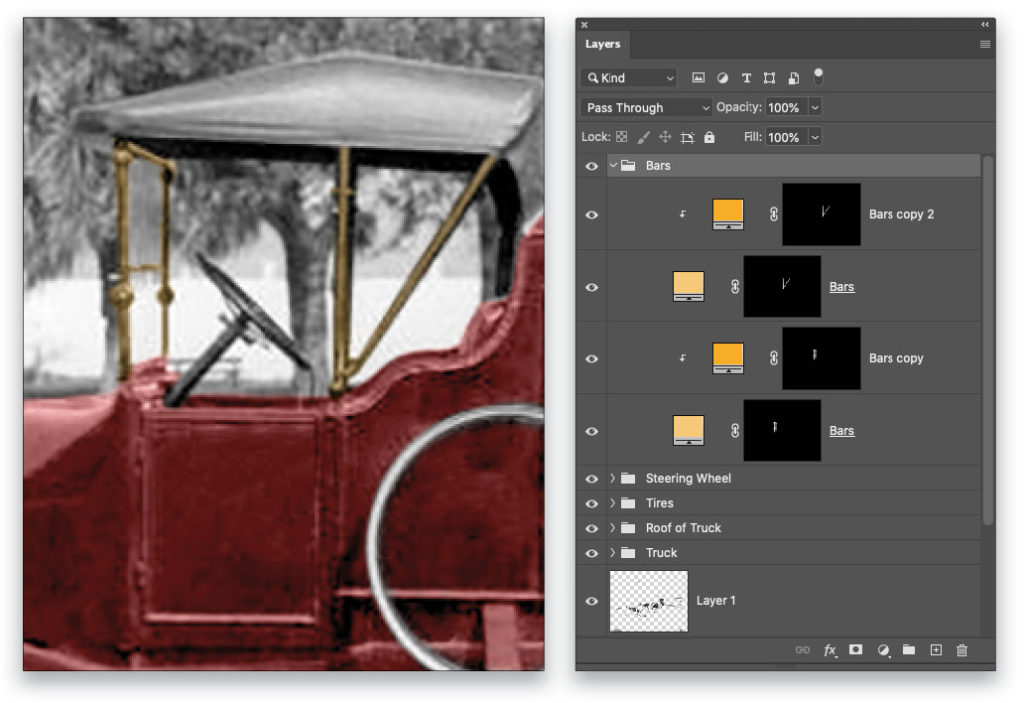
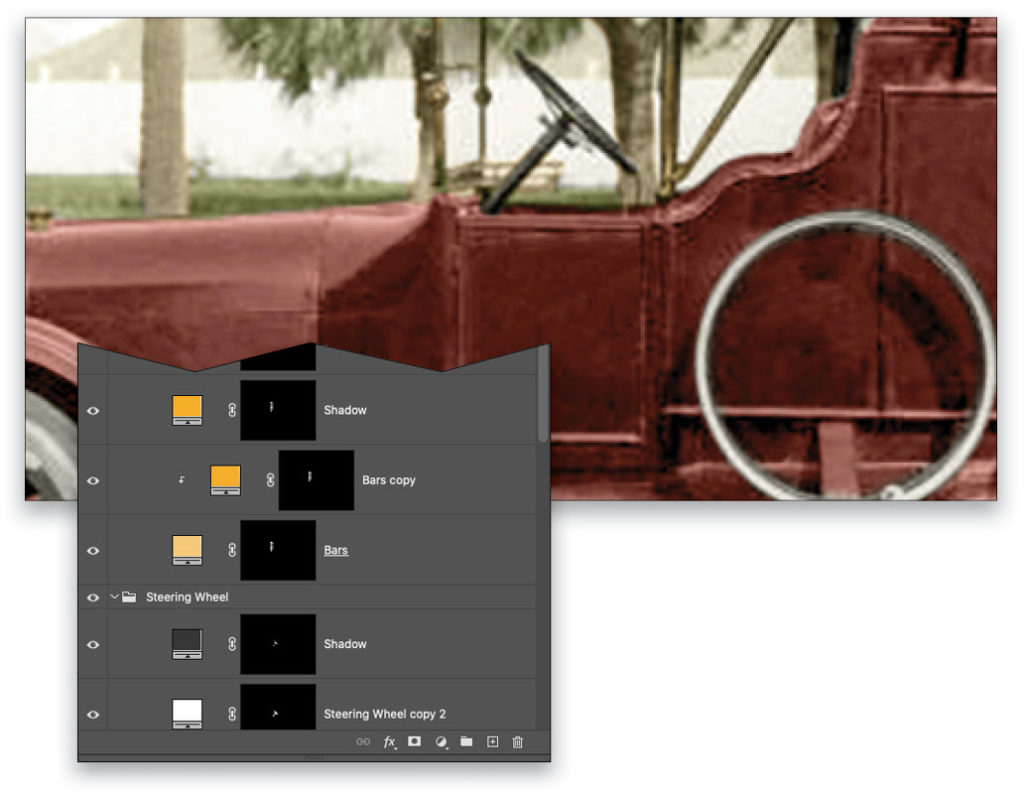
Step 15: Select the bars around the windshield. Add a gold (#f6c979) Solid Color fill layer named “Bars,” with a blending mode of Color, and reduce the Opacity to 50%. With the Brush tool set to 4 px and white, carefully paint away the gold on the windshield on the layer mask.
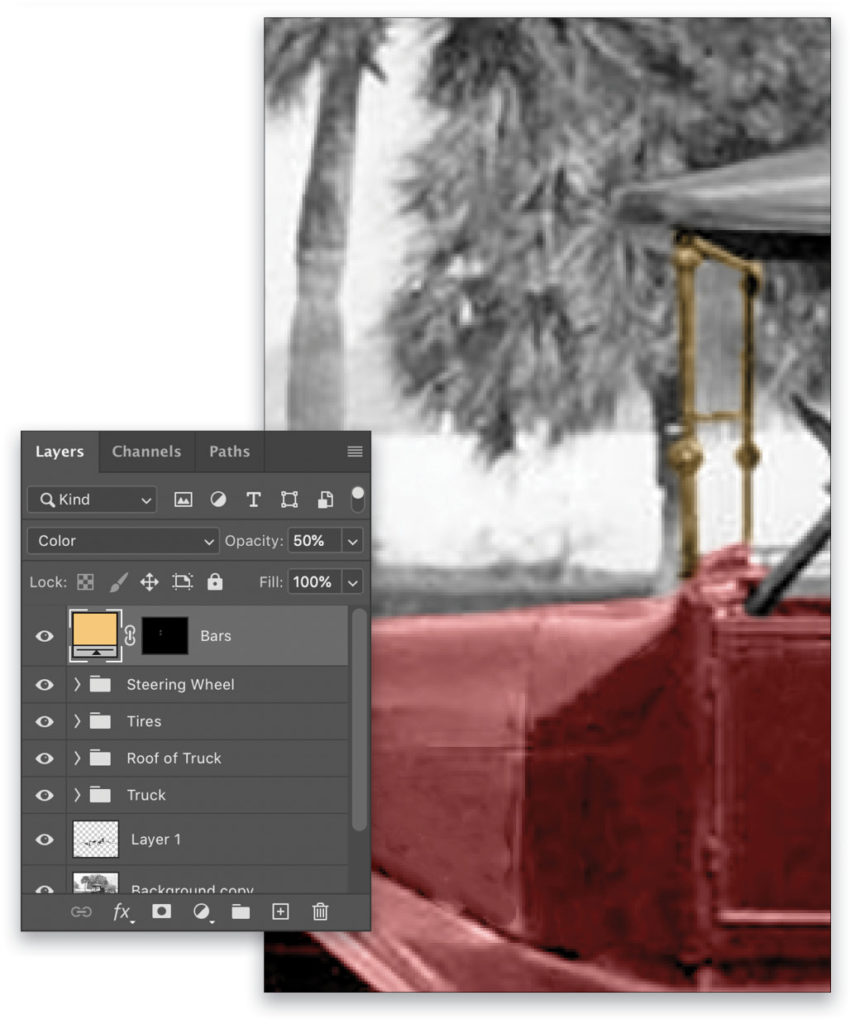
Step 16: Duplicate the Bars layer and change its color to a brighter gold (#f6ae2d). Reduce the Opacity to 20%, and create a clipping mask by Right-clicking the layer and selecting Create Clipping Mask.
Repeat Steps 15–16 for the other bars by the driver’s seat. Group all of the Bars layers and rename the folder “Bars.”
Step 17: Repeat Steps 15–16 again for the gas cap at the front of the hood. Rename the layers “Gas Cap” and add them to a layer group folder called “Gas Cap.” You’ll notice the gas cap still has red undertones. That’s because we colorized it red when coloring the truck. Go to the Truck layer group folder and add a mask on the layer. With the Brush tool set to 4 px and white, carefully paint over the gas cap. Now it looks gold.

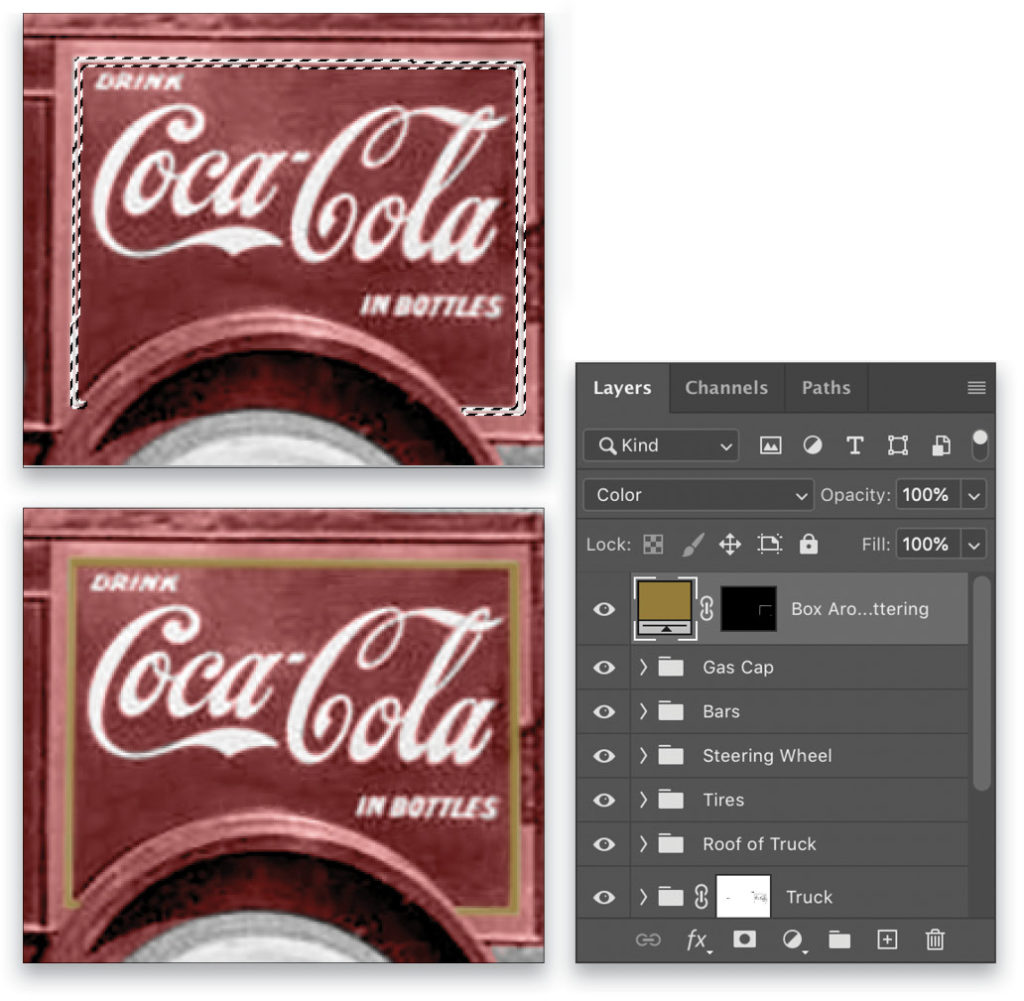
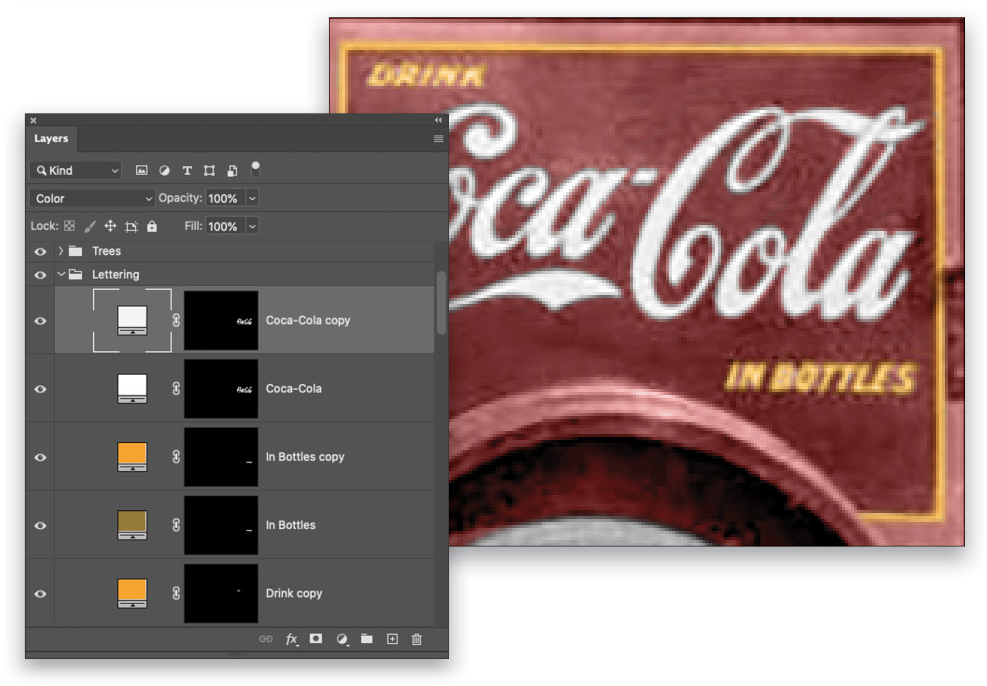
Step 18: Next, we’ll work on the Coca-Cola sign on the truck. With the layer mask on the Truck layer group still active, use a 2-px brush to paint away the red on the smaller lettering. For the larger lettering and the box around the lettering, adjust the brush size accordingly to paint away the red.
Using the Eyedropper tool, sample the gold color around the lettering on the toy truck example. Back in the main image, select the Pen tool, draw a path around the white box around the lettering, and convert it to a selection. Leave Feather Radius set to 1 and Anti-aliased checked. Click OK. Click on the top folder (Gas Cap) in the layer stack, and add a Solid Color fill layer named “Box Around Lettering” using the gold color (#957c3a) you just sampled. Change the blending mode to Color.
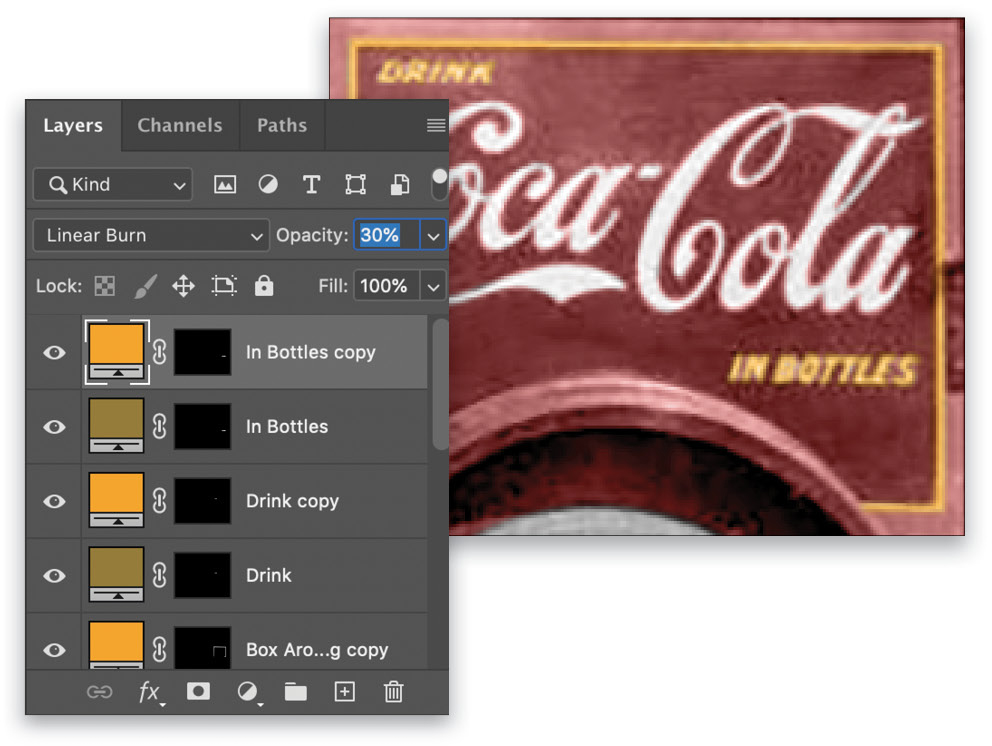
Step 19: Duplicate the Box Around Lettering layer and change its color to #f5a42f, blending mode to Linear Burn, and Opacity to 50%.
Using the Rectangular Marquee tool (M), draw a tight selection around the word “Drink” on the truck. Add a Solid Color (#957c3a) fill layer named “Drink” set to a blending mode of Color. With a size 2-px brush and the layer mask active, paint away the gold around the outside of the word.
Duplicate the Drink layer and change its color to #f5a42f, blending mode to Linear Burn, and Opacity to 30%.
Repeat this step for the words “In Bottles” on the side of the truck.
Step 20: Using the Rectangular Marquee tool, make a selection around the words “Coca-Cola” on the truck. Add a Solid Color (#ffffff) fill layer named “Coca-Cola” set to Color. With a 2-px brush, paint away the white (which appears gray against the red truck) around the outside of the word on the mask.
Duplicate the Coca-Cola layer and change its color to pale gray (#f4f4f4). Select all of the lettering layers and group them in a folder called “Lettering.”
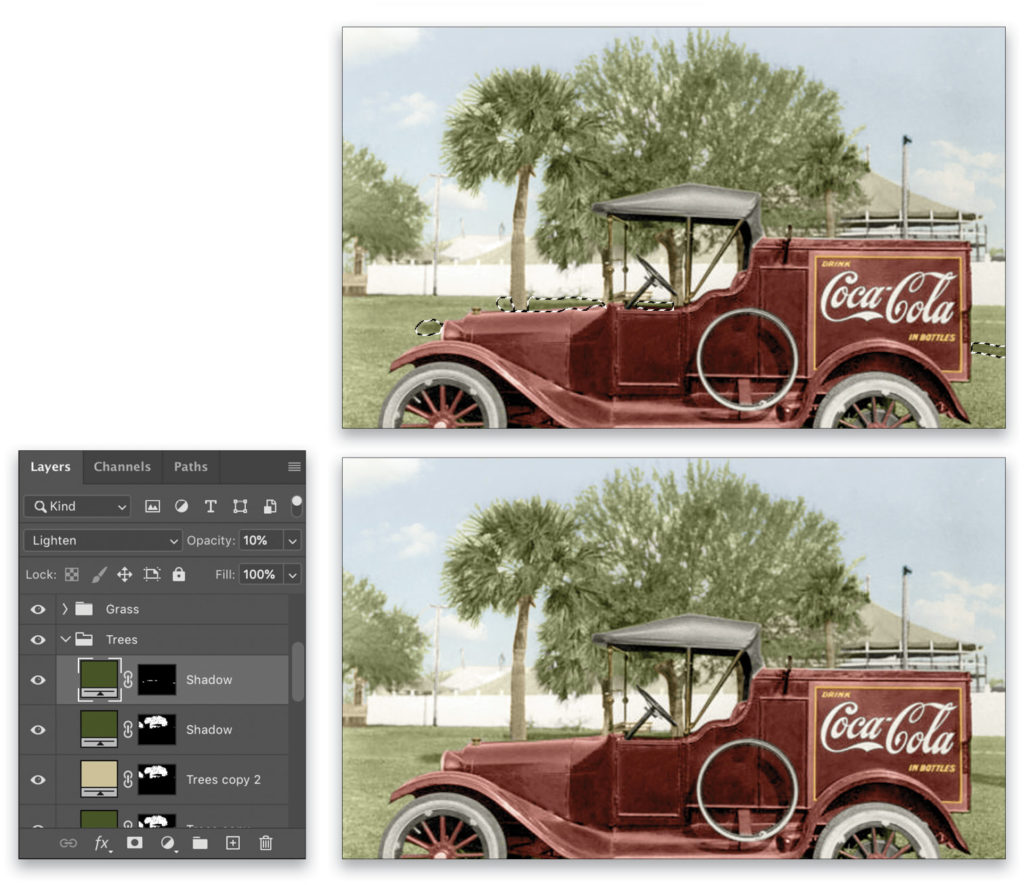
Step 21: Next, we’ll work on the trees. Using the Quick Selection tool and making sure Sample All Layers is checked in the Options Bar, make a rough selection of all of the trees. Remember, use the Option (PC: Alt) key to remove any areas that you don’t want selected.
Add a Solid Color fill layer (#333a17) named “Trees” set to Color mode. With the layer mask active and a 5-px soft brush set to black, start painting away any green not on the trees. Press X to switch the Foreground color to white if you need to add green to any of the tree areas. When done, reduce the Opacity to 50%.
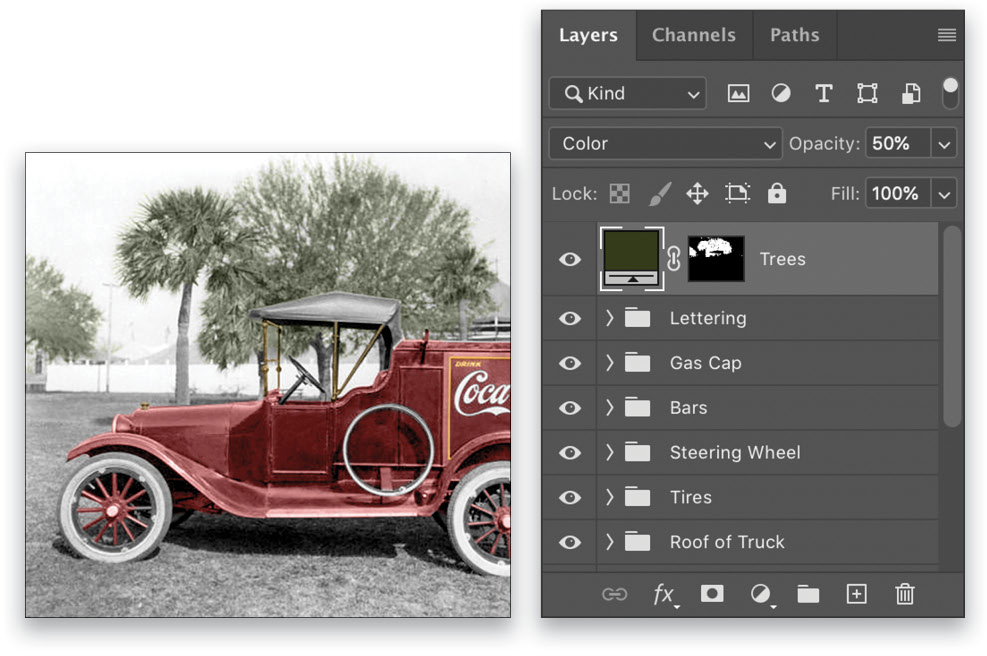
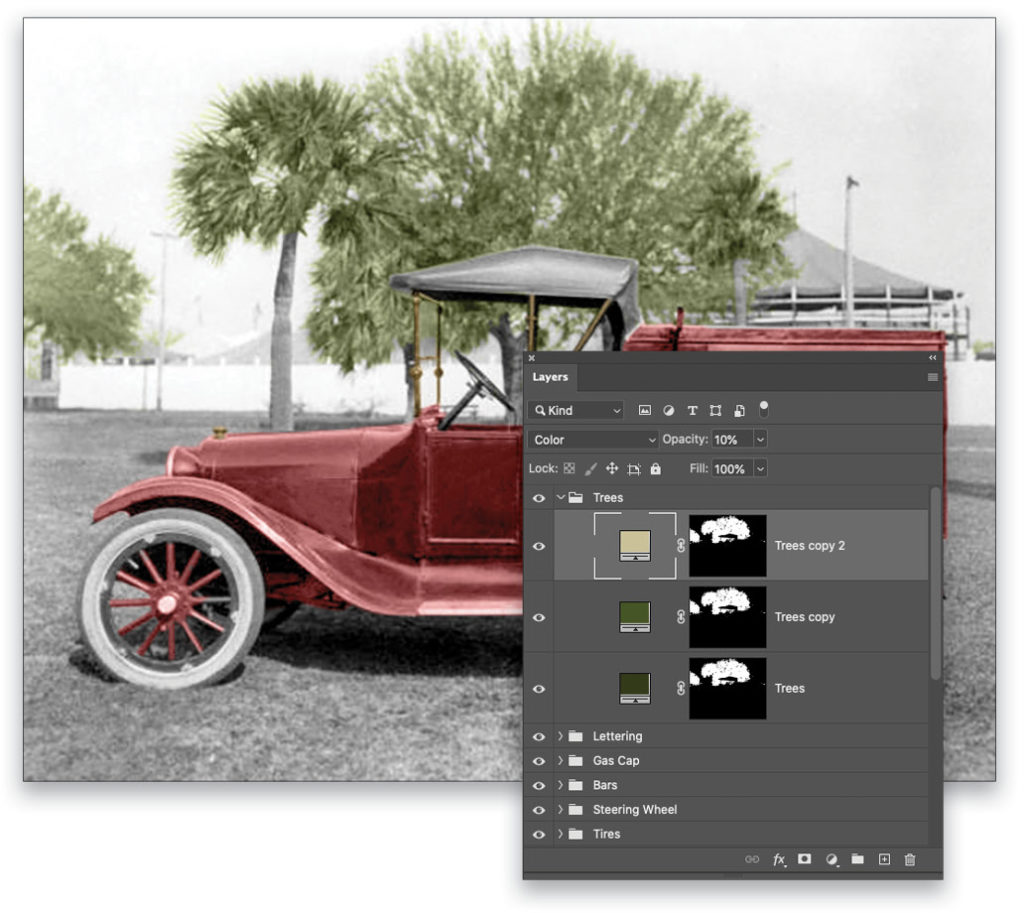
Step 22: Duplicate the Trees layer and change its color to a different shade of green (#465420). Duplicate it once more, this time changing the color to tan (#ccc199) and the Opacity to 10%. Select all of the Trees layers and group them into a folder named “Trees.”
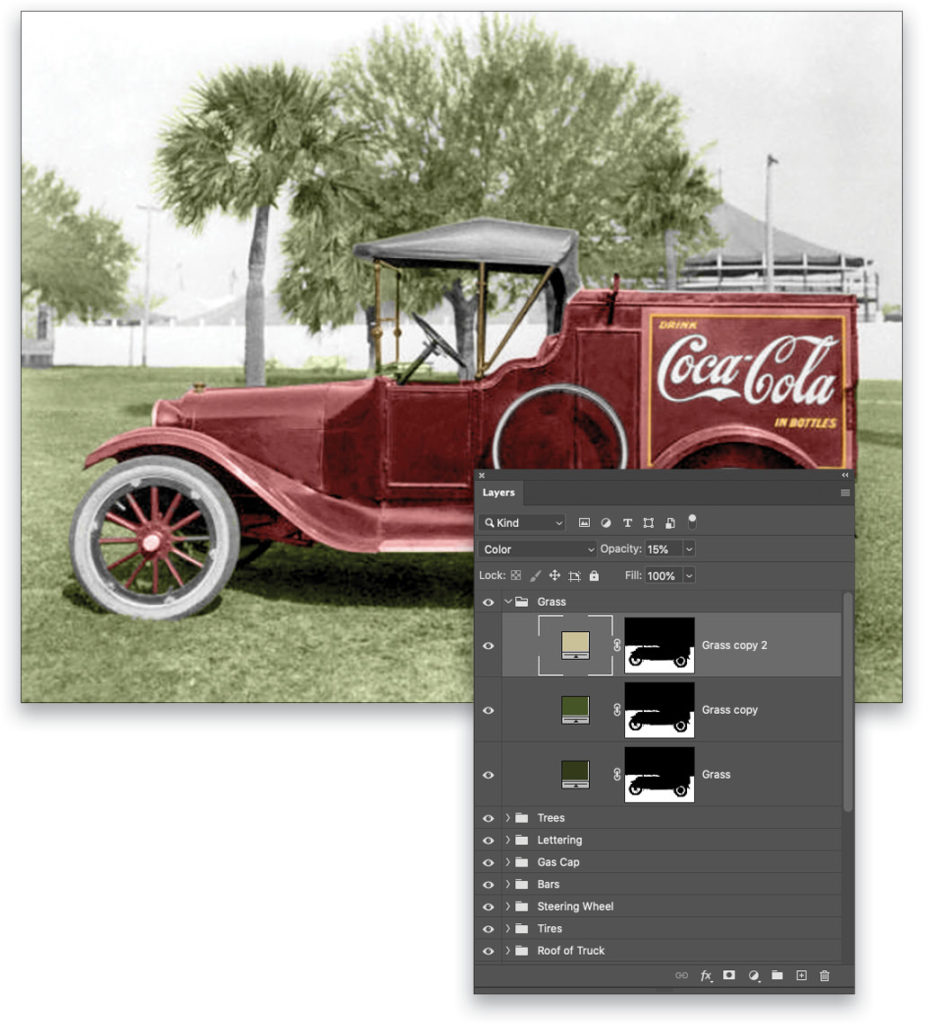
Step 23: Use the same steps for the grass as we did with the trees. The only difference is I left the Opacity of the initial Grass layer at 100% and set the Opacity of the third Grass layer to 15%.
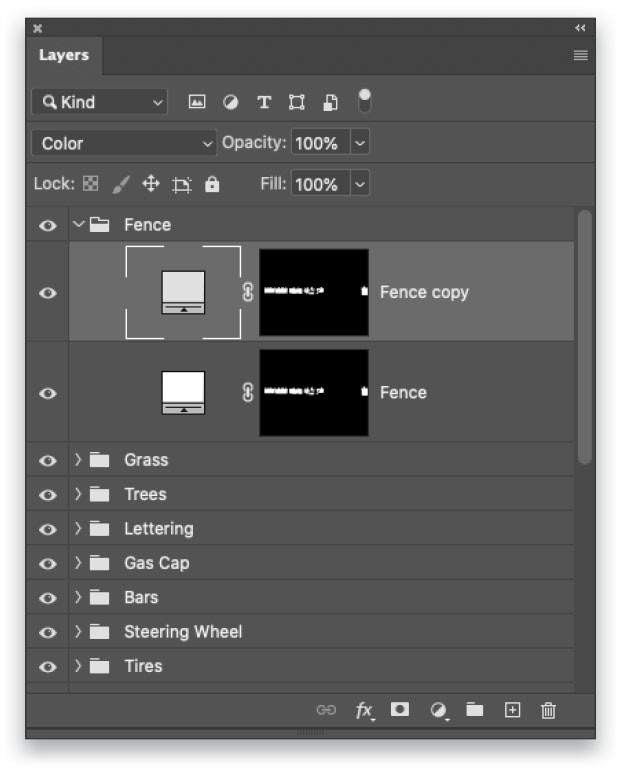
Step 24: Next, we’ll color the fence white. With the Quick Selection tool, select all of the fence, including the knobs on top. Create a white (#ffffff) Solid Color fill layer named “Fence” set to Color. Using a small, soft brush set to black, paint on the mask to remove any white on the tree trunks, steering wheel, or tent top. If you’re unable to see the “excess” white, temporarily change it to a color of your choice to make it easier to see. You can then revert it back to white when finished.
Duplicate the Fence layer, and change its color to pale gray (#e0e0e0). Group the Fence layers and name the group folder “Fence.”
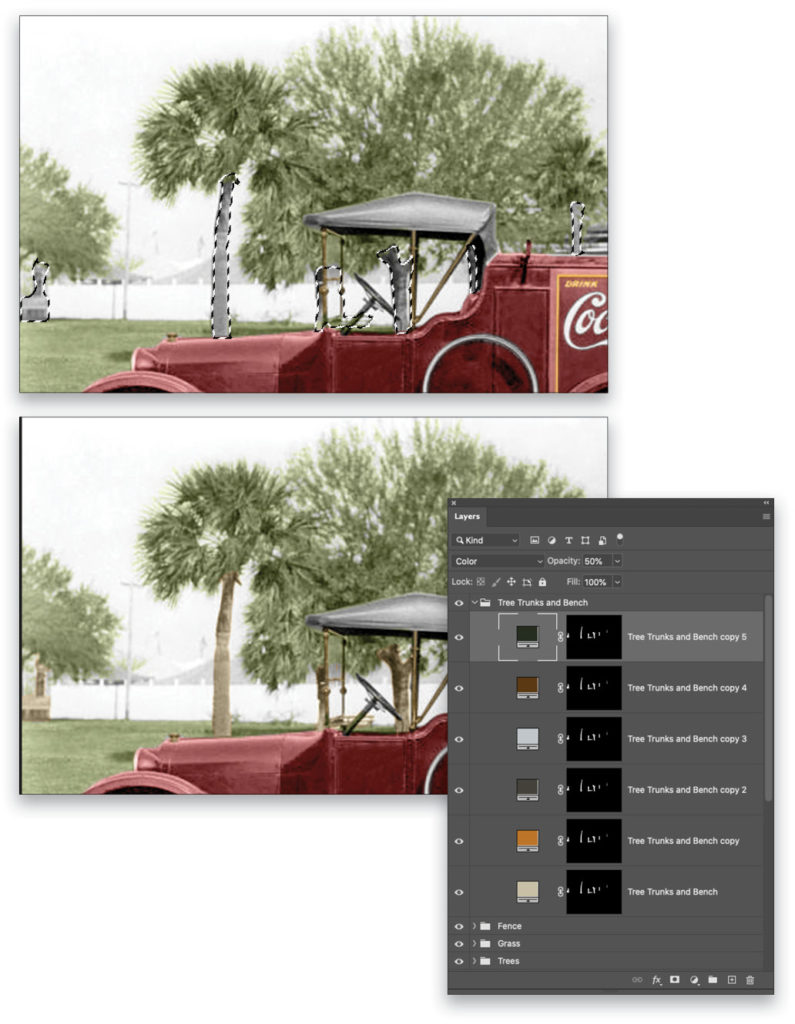
Step 25: Now select the tree trunks and bench, and add a Solid Color fill layer named “Tree Trunks and Bench” set to tan (#c8c0a6) with a blending mode of Color. Again with a soft, small brush set to black, paint on the mask to remove any tan not on the tree trunks and bench.
Duplicate the Tree Trunks and Bench layer and change the solid color to orange (#bd7211). Duplicate it again and change the color to grayish tan (#43413a) at an Opacity of 50%. Make another duplicate set to grayish blue (#c1c6cb) at 20% Opacity. Make yet another duplicate set to brown (#5c3708) at 68% Opacity. Make one last duplicate set to greenish black (#252c21) at 50% Opacity.
Group all of the Tree Trunks and Bench layers in a folder called “Tree Trunks and Bench.”
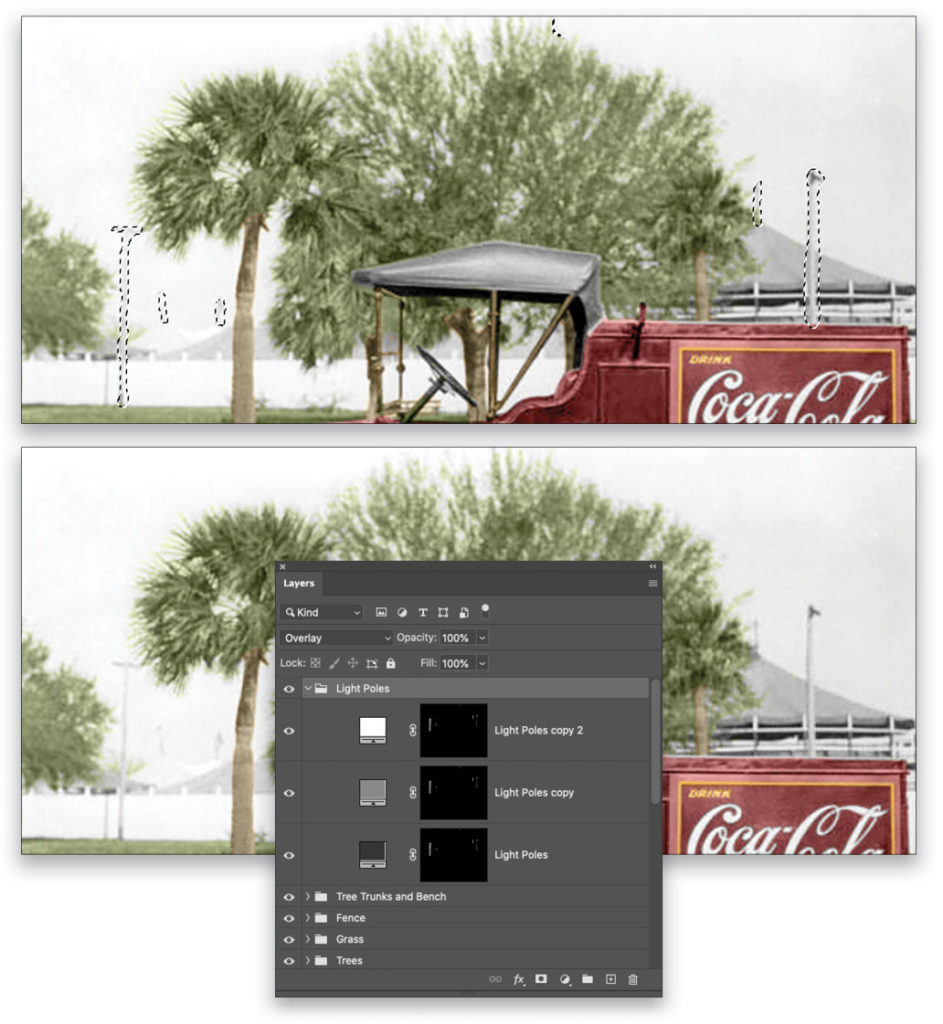
Step 26: Select all the light poles in the image. Add a Solid Color fill layer named “Light Poles” set to dark gray (#353535) and Color. Duplicate the Light Poles layer and change the color to light gray (#898989). Add one final duplicate set to white (#ffffff). Group all of the Light Poles layers, and rename the folder “Light Poles.” Change the blending mode of the layer group from Pass Through to Overlay.
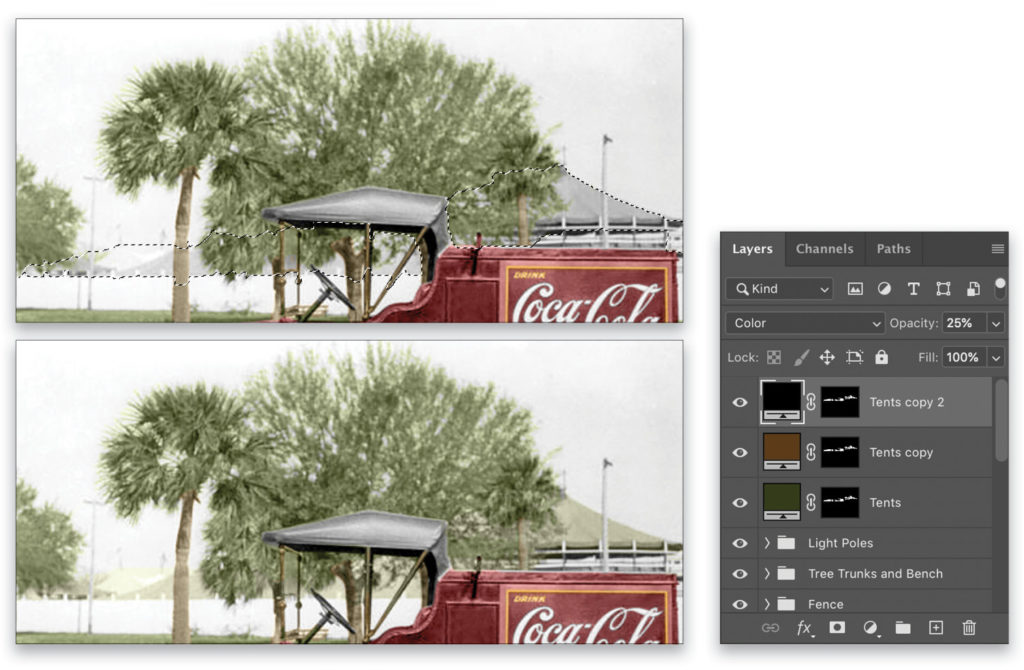
Step 27: Select all the tents in the background. Notice the one closest to us appears darker than the ones further away. We’ll initially color them a darker color, then we’ll use a lighter color for the tents further away. Doing it in this manner will save time in the long run.
Add a Solid Color fill layer named “Tents” set to a dark green (#333a17) with the blending mode set to Color and the Opacity at 70%. With a small brush set to black, paint away any excess color on the trees.
Duplicate the Tents layer and change its color to brown (#5b3a17) and its Opacity to 20%. Duplicate it again and change its color to black (#000000) and increase the Opacity to 25%.
Step 28: Duplicate the Tents layer again, change its color to white (#ffffff), and increase its Opacity to 100%. With a small soft brush set to black, paint on the layer mask to remove the white on the darker tents. This has saved us the step of having to independently select the tents. Rename this layer “White Tent.”
Duplicate the White Tent layer and change the color to light gray (#e6e6e6). Group the White Tent layers in a folder called “White Tent,” and group the darker Tents layers in a group folder called “Dark Tents.”

Step 29: The sky is extremely dull, therefore we’ll add a new sky. I have a folder filled with different skies (which I strongly recommend everyone have). The best way to choose the sky to use is to determine which direction the sun was shining when the photo was taken. Go to File>Place Embedded, navigate to the sky you want to use, and click Place. Drag the bounding box around the sky to the top of the photo, and then adjust the scale so the new sky fills all the visible area of the original sky. Press Enter to commit the sky.
I placed the sky layer just above Layer 1 (the Spot Healing Brush layer), so it’ll be under the trees and the finite retouching done on the image. Once your sky is placed and scaled, rename the layer “Sky.” Reduce the Opacity to the point you’re able to see through it to the tree leaves (this amount will vary photo to photo). For this photo, I reduced the Opacity to 43%.
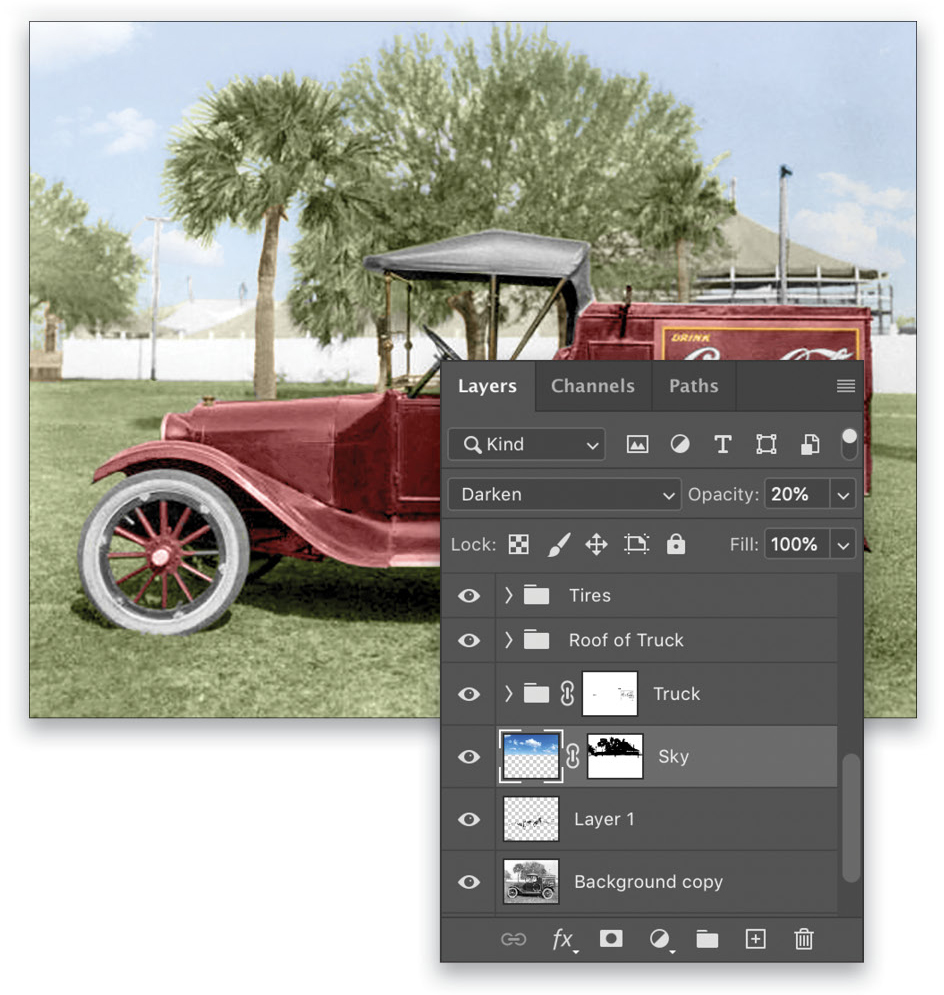
Add a layer mask to the Sky layer. Select a soft brush at a small size (6 or 7 px) set to black, and paint away the sky that’s on the fence, trees, truck, etc. This requires you to zoom in to a comfortable percentage, and have patience, especially around the tree leaves. Notice that, for this particular sky, the clouds show on the trees. Paint away the clouds on the tree leaves, leaving clouds/sky between leaves in the open spaces. When finished, change the blending mode to Darken and reduce the Opacity to 20%.
Note: You could try the new Sky Replacement feature in Photoshop under the Edit menu, but you might have a little trouble with the resolution and quality of this image. If you want to give it a try, make sure the Background copy layer is active first, and then you’ll need to adjust the Shift Edge slider in the Sky Replacement dialog to try and remove the sky from the fence and tent areas. After you click OK, it creates a Sky Replacement Group. You’ll want to drag this group above Layer 1 (the Spot Healing Brush layer). You can then paint on the layer masks in the group to control where the sky appears. You’ll also want to note that it adjusts the color of the image to try and match the new sky.
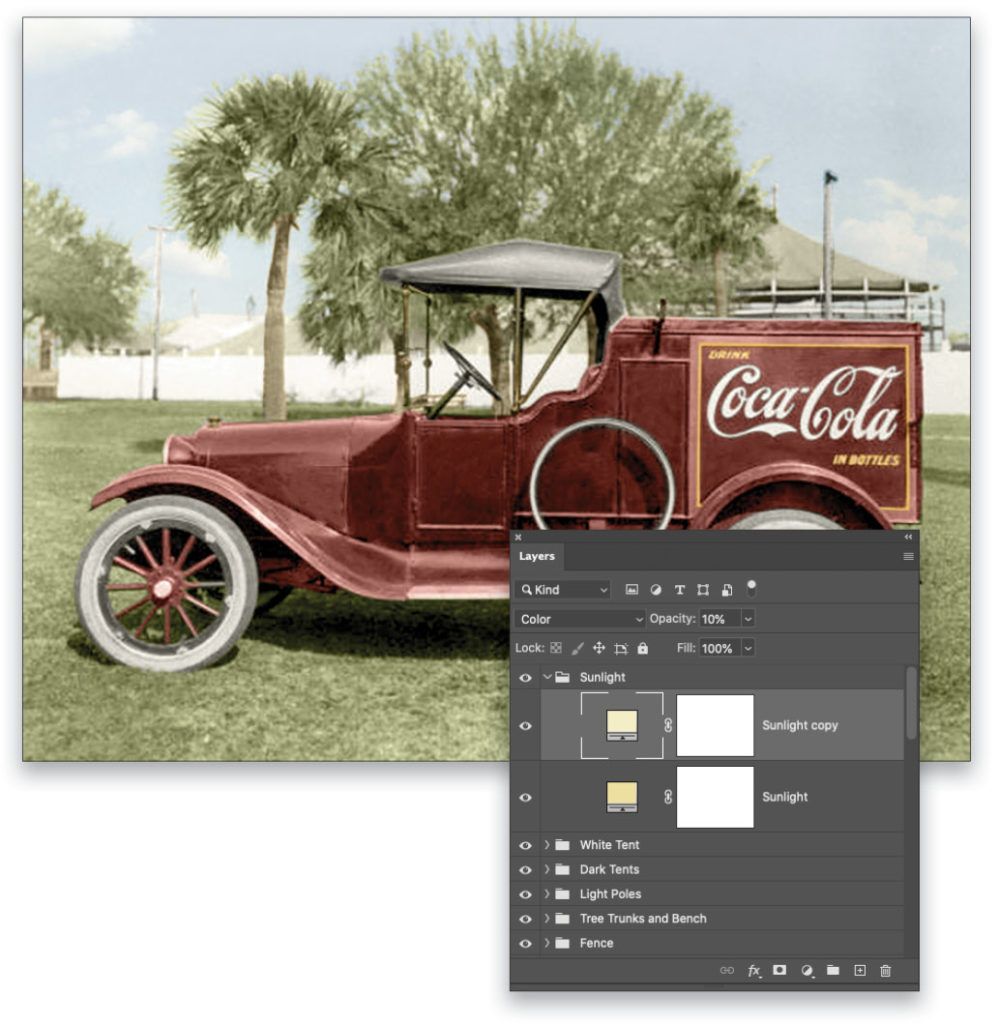
Step 30: Add a Solid Color fill layer named “Sunlight” at the top of the layer stack set to yellow (#ebdf9f) to depict sunlight. Change the blending mode to Color and reduce the Opacity to 10%.
Duplicate the Sunlight layer with a different shade of yellow (#f4eec7), and then group the Sunlight layers, renaming the folder “Sunlight.”
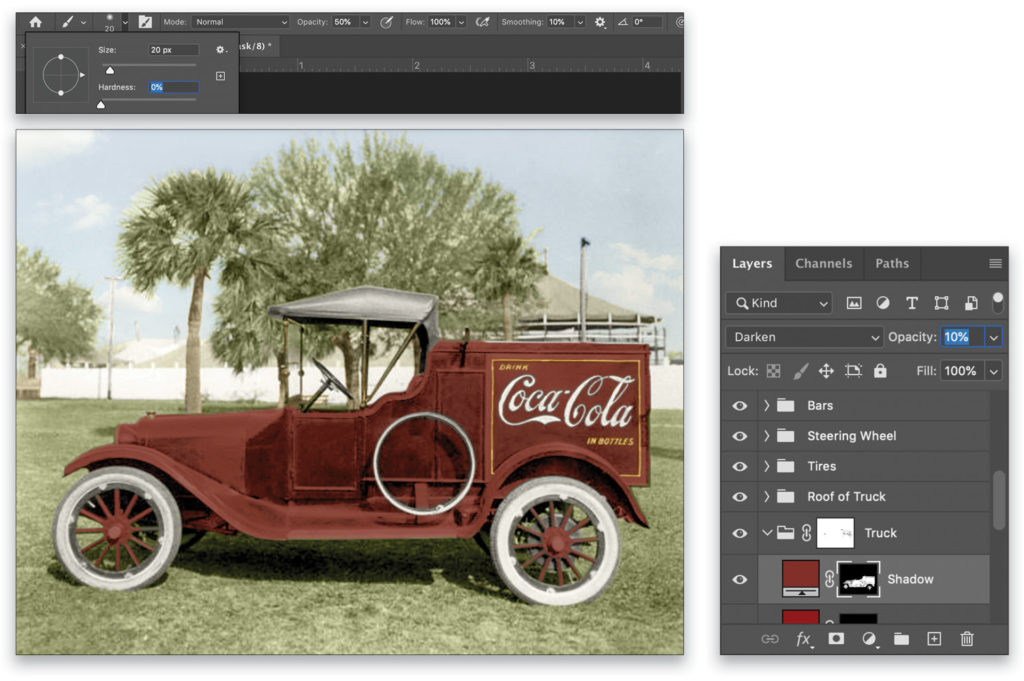
Step 31: Now we need to work on the shadows. To start, go back to the Truck layer group (this is why it’s important to name layers/folders). We’ll work our way upwards. Click on the darkest fill layer in the group, which in this folder is the bottom layer (#822d29). Duplicate that layer, and drag it to the top of the layers within that folder. Change the blending mode from Color to Darken, and rename it “Shadow.”
Select the Brush tool, and in the Options Bar, set its size to 20 px, Hardness 0%, and Opacity 50%. Click on the layer mask thumbnail to make it active, and paint away the lighter parts of the truck only. (Note: You’ll need to adjust the brush size while doing this.) After doing this, reduce the Opacity to 10%. This helps “blend” the lighter parts with the shadows.
Step 32: In the Roof of Truck layer group, duplicate the dark gray (#313131) layer to work on the shadows, as we did in Step 31. Remember to paint on the mask to remove the lighter areas of the roof (you’ll need to do that for all the Shadow layers you’re about to create).
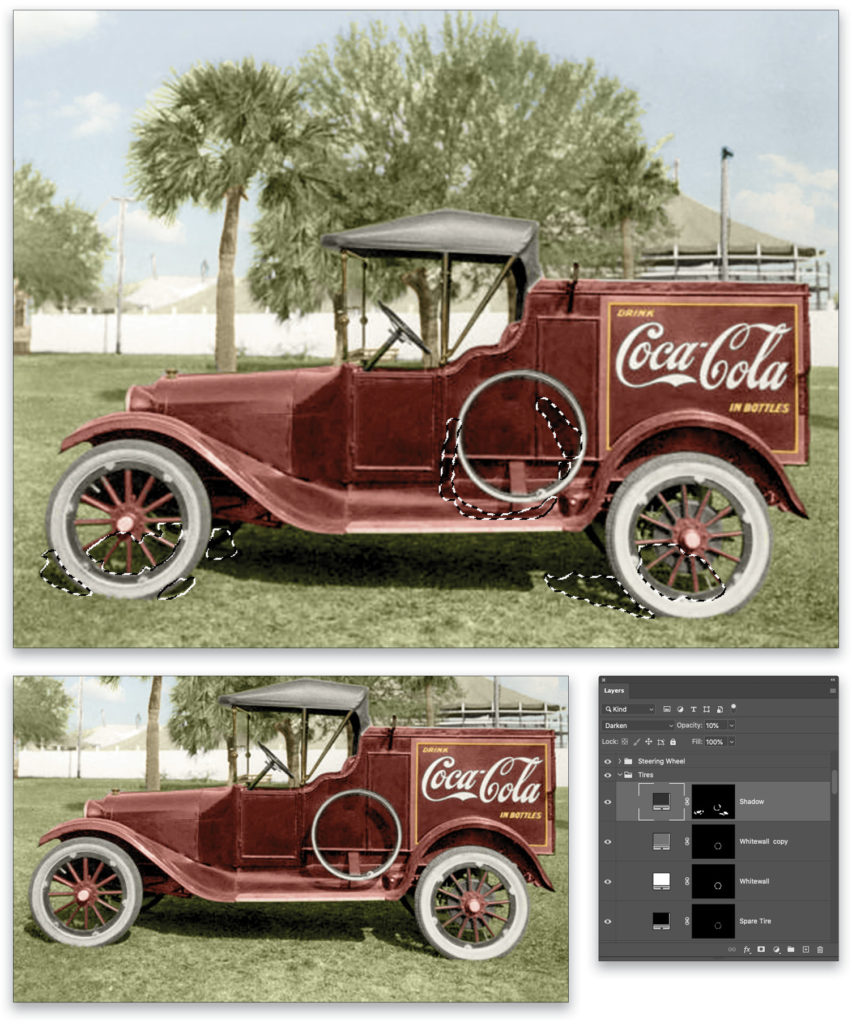
Repeat for each of the tires in the Tires layer group, this time selecting the dark gray (#353535) layer as the layer to duplicate for the shadows. After working on the shadows of the tires, duplicate each of the Whitewall layers, and instead of white, change their color to a gray (#737373) to subtly show against the whitewall.
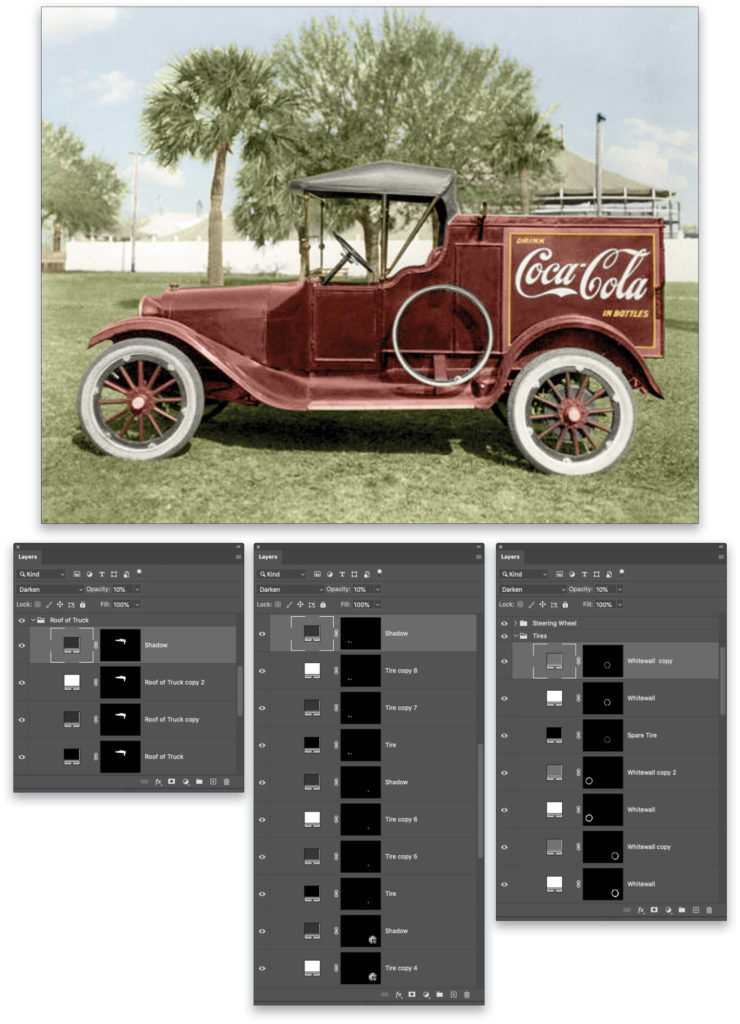
Step 33: After completing the whitewall parts of the tires, we need to color the shadows cast by the tires on the grass, as well as the shadow from the spare tire on the side of the truck. Using the Quick Selection tool, select those shadows as shown above. Add a Solid Color Fill layer at the top of the Tires layer group folder. Name it “Shadow,” set it to a dark gray (#313131), change its blending mode to Darken, and reduce its Opacity to 10%.
Step 34: In the Steering Wheel folder, duplicate the dark gray (#353535) layer for the shadows, set its blending mode to Darken, paint on its mask to remove the lighter areas of the steering wheel, and lower its Opacity to 10%.
Repeat for the Bars folder using both of the clipped #f6ae2d layers. If the duplicate layers are also clipped, release the clipping mask by pressing Option-Command-G (PC: Alt-Ctrl-G). Repeat for the Gas Cap folder, duplicating the clipped #f6ae2d layer.
Step 35: In the Trees folder, duplicate the middle green layer (#465420) for the shadows. Since we see shadows on the grass from the trees, select those shadows with the Quick Selection tool. Add another #465420 Solid Color fill layer at 10% Opacity. Use the Lighten blending mode for this layer; otherwise, the Darken blending mode will look too dark against the sunlit grass.
Step 36: In the Grass folder, duplicate the middle green (#465420) layer for the shadows. In the Fence folder, use the Quick Selection tool to select between the bottom of the fence and grass (where the shadow is). Add a Solid Color fill layer set to gray (#c8c8c8). Set the blending mode to Darken and lower the Opacity to 10%.
Step 37: In the Tree Trunks and Bench folder, duplicate the reddish brown (#5c3708) layer. Change its blending mode to Darken and reduce its Opacity to 10%. Paint away the lighter areas on the layer mask.
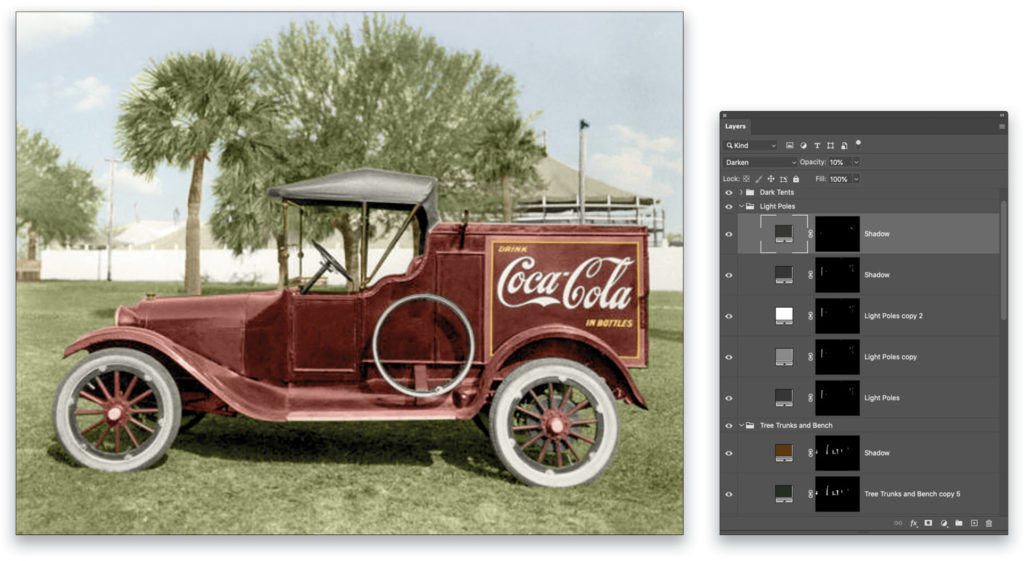
In the Light Poles folder, duplicate the dark gray (#353535) layer for the shadow. Using the Quick Selection tool, select the shadow of the light pole on the top of the tent on the right side of the photo and the shadow cast on the fence by the pole on the left side of the photo. Add a Solid Color fill layer set to gray (#353535), Darken, and 10% Opacity.
Step 38: In the Dark Tents folder, duplicate the brown (#5b3a17) layer for the shadows. In the White Tent folder, duplicate the gray (#e6e6e6) layer, set it to #c8c8c8, Darken, and 10% Opacity.

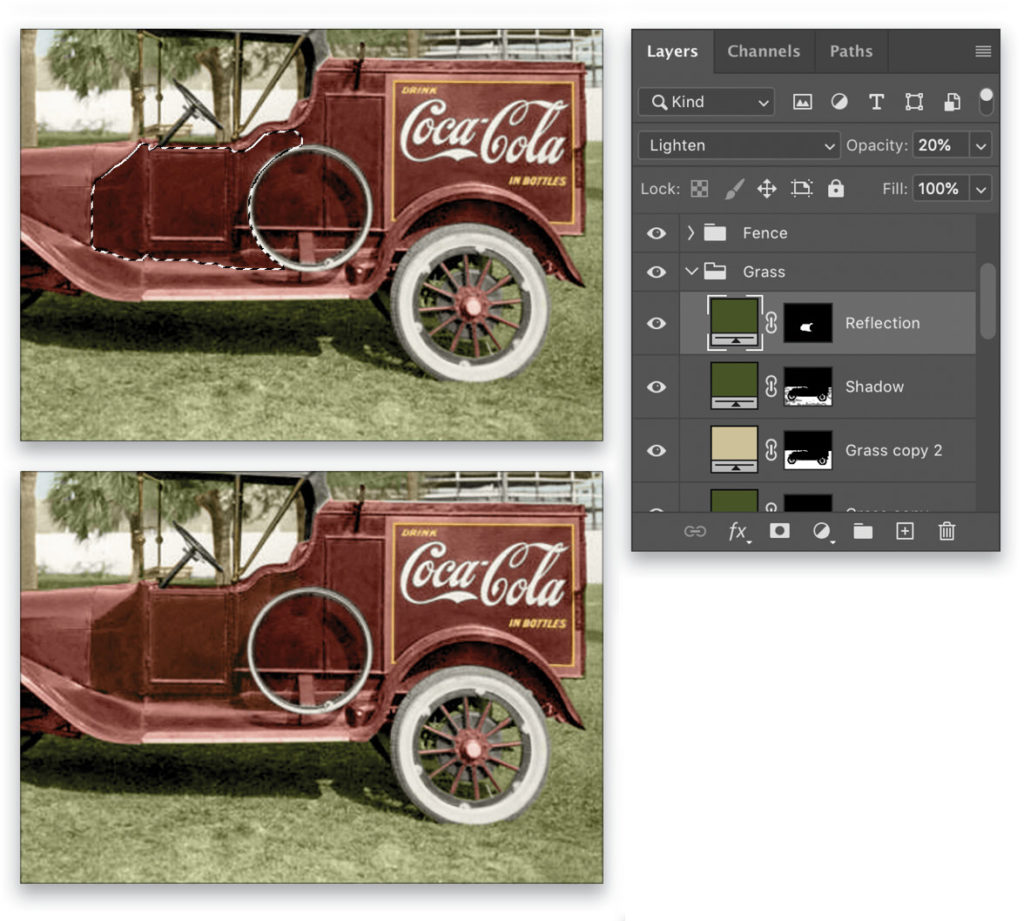
Step 39: Now we need to add a reflection of the grass on the side of the truck for realism. Go to the Grass folder, and make a selection on the side of the truck as shown here. Add a Solid Color fill layer set to #465420, Lighten, and 20% Opacity.
Step 40: You’ll notice when we colored the truck, we also colored the underside. We need to change this to black for realism and colorize the black shadow on the grass. Return to the Truck folder. On the mask of that folder, with a small, soft brush set to black, paint away the red on the mechanisms under the truck only by the front tire. The other part around the back tire is part of the red truck, so don’t do anything around the back tire.
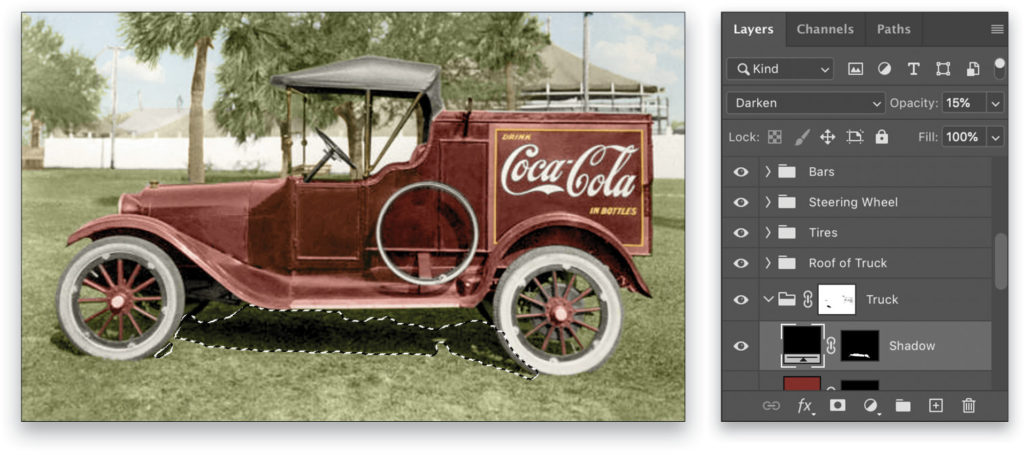
Step 41: With the Quick Selection tool, select the shadow on the grass under the truck and tires. Add a Solid Color fill layer set to black (#000000). Change the blending mode from Normal to Darken and reduce the Opacity to 15%.
We now have an authentic Coca-Cola delivery truck from 1920! I hope everyone enjoyed learning about this process. It’s time-consuming and requires patience, but looking at the before and after really brings the image to life, reflecting how people of the time saw these trucks.
This article originally published in the January, 2021 issue of Photoshop User magazine.