Nondestructive Glow Generator Plug-In for Photoshop
Review by Gilmar Smith
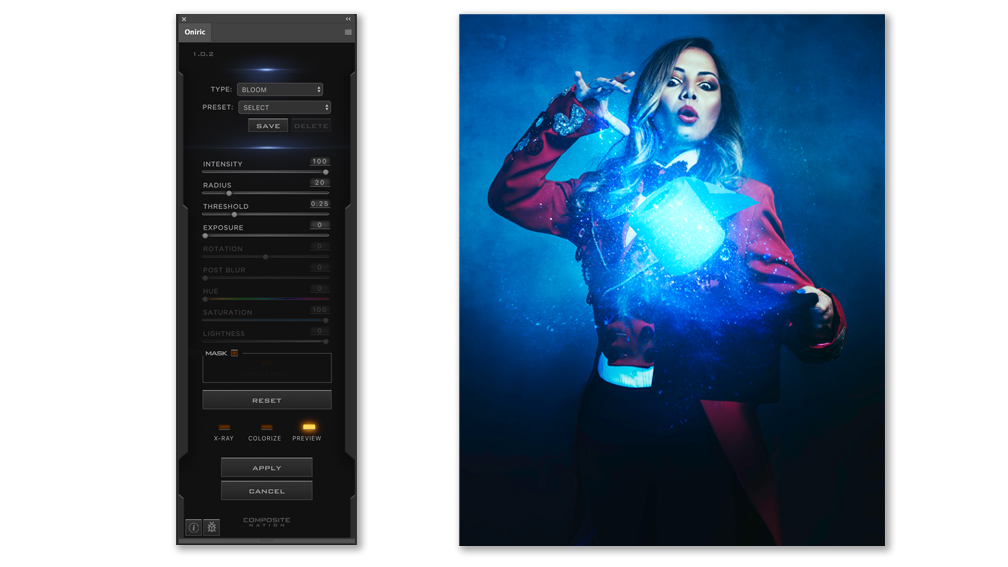
Oniric is a nondestructive glow generator panel that simulates high-quality, natural-light glow effects such as bloom, light streaks, lens flare, etc. Compatible with Windows and Mac, this plug-in is supported by versions of Adobe CC 2018 and above.
Using Oniric is pretty simple: You just open the panel extension in Photoshop and click on Generate. Once you click on Generate, Oniric creates a glow on the brightest areas of the image. Depending on the image, you will or will not see much of an effect at first, but that’s when the fun starts. That’s when you use a few sliders on the panel to fine-tune the effect according to your taste and the result you desire.
First, you pick the type of effect you want: Bloom or Streaks, or you can apply a Preset that you may have created after playing with the panel a few times. Presets can be handy when you’re creating a series of images with a similar effect, or when you want to create a signature look.
Next, you click on the X-Ray button (near the bottom), which lets you visualize the brighter pixels in the image that will be affected by the glow. This area can be fine-tuned by using the Threshold slider. Clicking the X-Ray button again will take you back to the image, and then you can adjust the Intensity, Radius, Threshold, and Exposure of the glow.
You can manually select the areas where you want to add glow by using the Mask feature, and then push the effect in some areas or delete it in others by using the Erase tool (press the E key). And you can also change the color of the glow by clicking the Colorize button and adjusting the Hue and Saturation slider in the panel.
When you’re working with the Bloom effect, two of the sliders—Rotation and Post Blur—are grayed out; however, they’re available when you choose the Streaks effect.
When you’re satisfied with your effect, click Apply, and you’ll be directed to Photoshop where the effect is applied (non-destructively) to your image as a smart object.
I was really impressed by Oniric: I loved creating this kind of effect in so little time just by dragging a few sliders. Usually in Photoshop, these kinds of results are created by adding a series of adjustment layers with a lot of different blending modes, brushes, and gradients. Using the Oniric panel is a timesaver as well as a new way to experiment with images creatively. ■


I agree that the panel can make some great effects, and saves time making luminosity masks, but it is ridiculously overpriced and still has a bug whereby it puts the effect into your document at the wrong size in the wrong place after switching some of the settings. This, and the fact that it forces you to be online all the time has made me dump it. My internet went off and the panel disabled itself half way through an edit. There are plenty of glow plugins out there that are much cheaper and don’t demand that you go cap-in-hand to the developers every time you want to use them. Buyer beware!