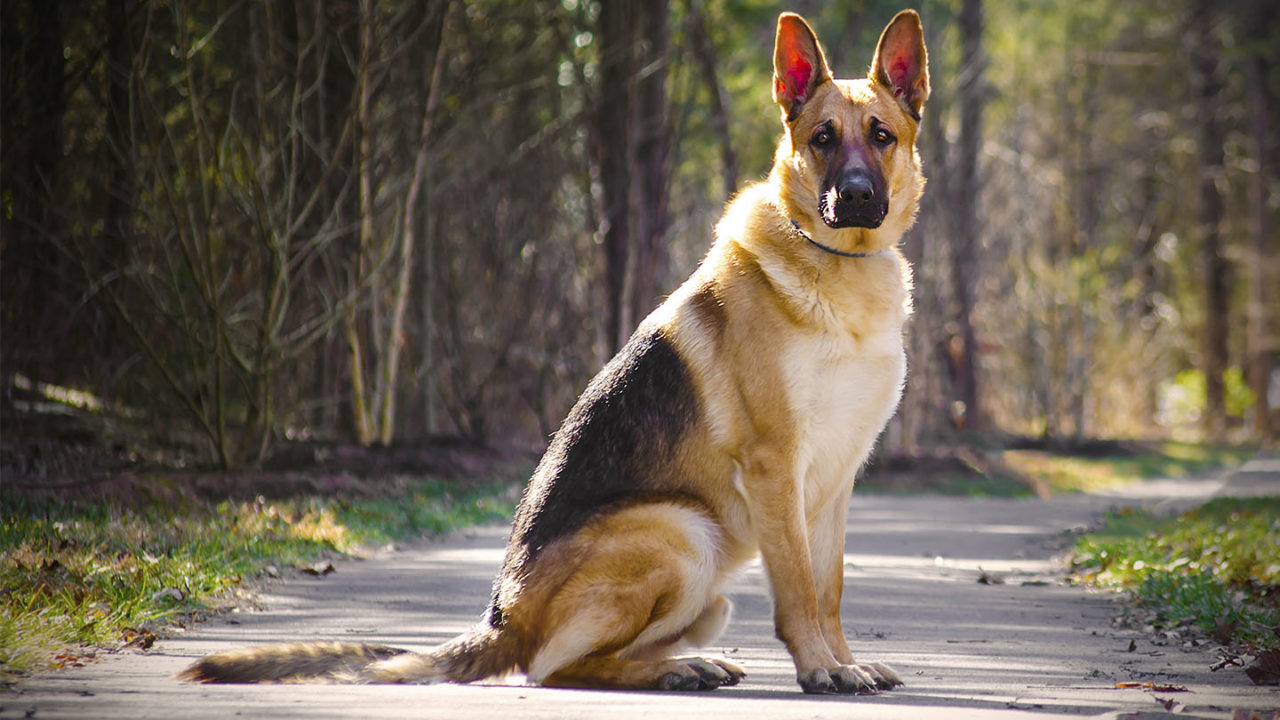
One of the most unique courses recently added to the KelbyOne training library is a course called Dog Photography: Overcoming Challenging Situations by Kaylee Greer. In her course, Kaylee outlines some exceptional techniques for capturing the gaze of dogs who aren’t quite used to being models. These beloved pets aren’t trained to sit still for the cameras, and often you get just a brief moment to grab a capture before the dog looks away again. In the suggestions, Kaylee discusses how leashes and handlers can frequently be removed from the image afterwards. In this tutorial, we explore some retouching techniques that can follow up on the photography techniques that Kaylee teaches. The German Shepherd in this tutorial isn’t that well trained and required the near presence of his handler for the entire photo shoot, which made this project a perfect example of real life retouching for dog portraits.
Step One:
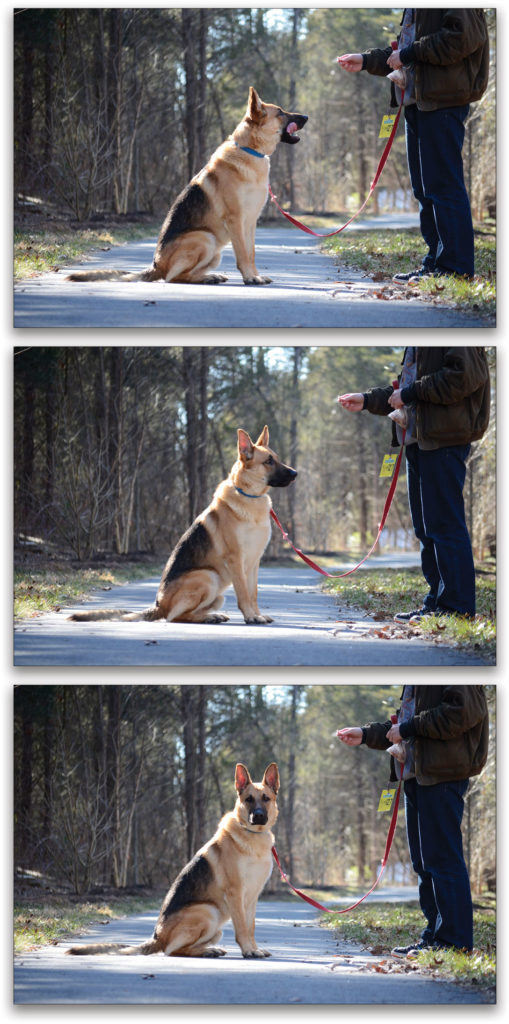
Kaylee’s course was the primary inspiration for this photo shoot. Here you can see the sequence of Samson, the one-year-old German Shepherd, looking to his handler for treats and then responding to a quick squeak from a toy behind the camera. Capturing these moments are part of what makes dog photography so fun and rewarding.
[KelbyOne members may download the file used in this tutorial here. All files are for personal use only.]
Step Two:
Open the file in Photoshop. If you’re using a RAW file, Photoshop will automatically open it in Adobe Camera Raw; if you’re opening a JPEG, you’ll need to launch the Camera Raw Filter by going to Filter>Camera Raw Filter. In the Basic tab, set the Exposure to –0.25, increase the Highlights to +18, decrease the Whites to –18, and set the Blacks to +30. Set the Clarity to +30, Vibrance to +55, and Saturation to +13. Don’t close the filter window just yet!
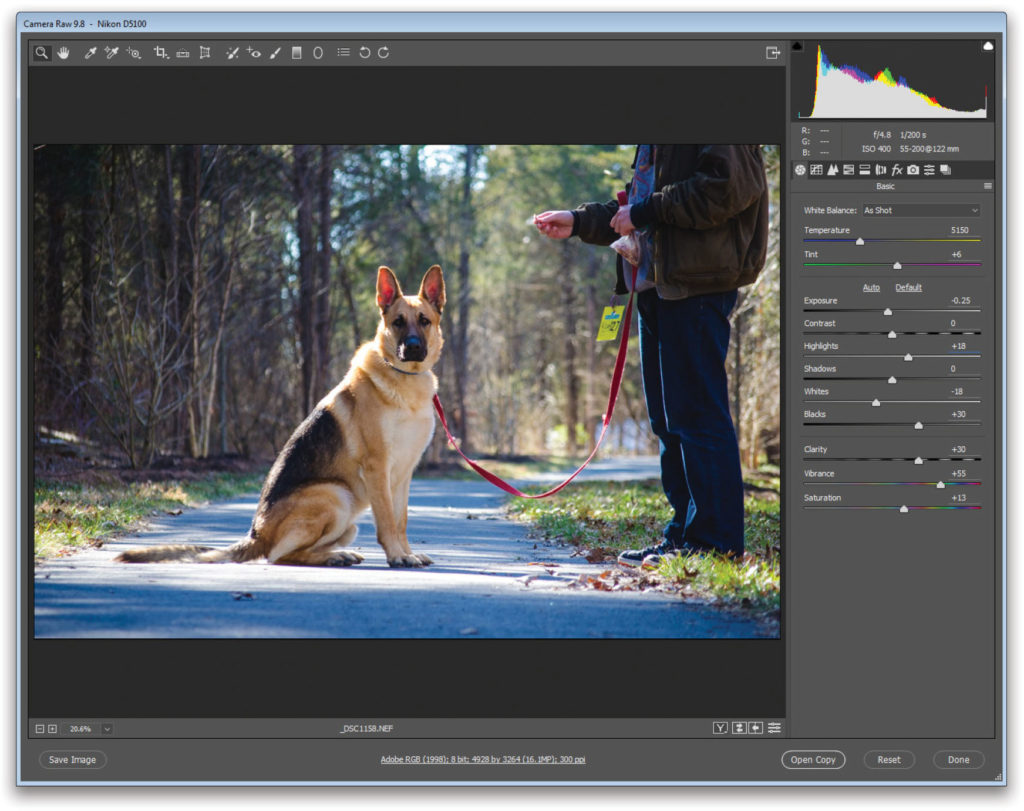
Step Three:
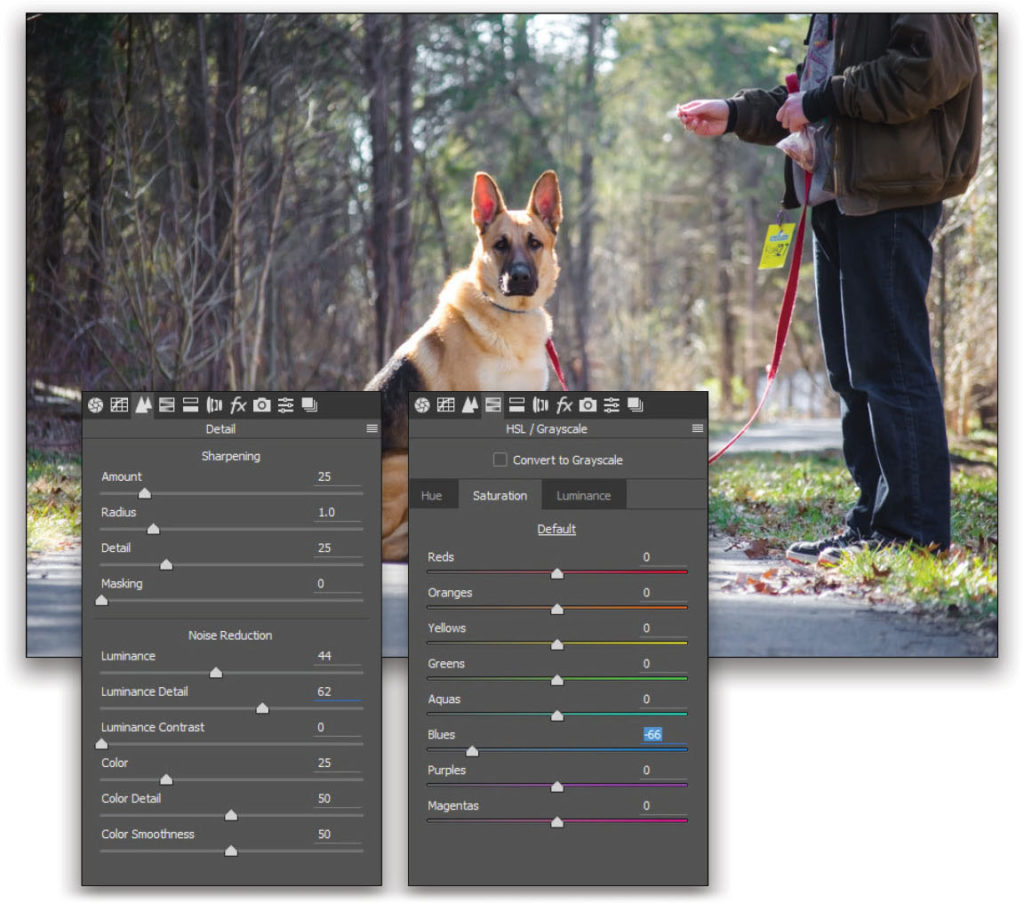
Switch to the Detail tab. In the Noise Reduction section, set the Luminance to 44 and the Luminance Detail to 62. Increasing the Vibrance and Saturation in the previous step created a strange blue tint on some of the highlights, so switch to the HSL/Grayscale tab, and in the Saturation subtab, reduce the Blues to –66. Hold the Option (PC: Alt) key to change the Open Image button to Open Copy, and click it to apply the settings and open the file in Photoshop. (If you’re in the Camera Raw Filter, click the OK button.)
Step Four:
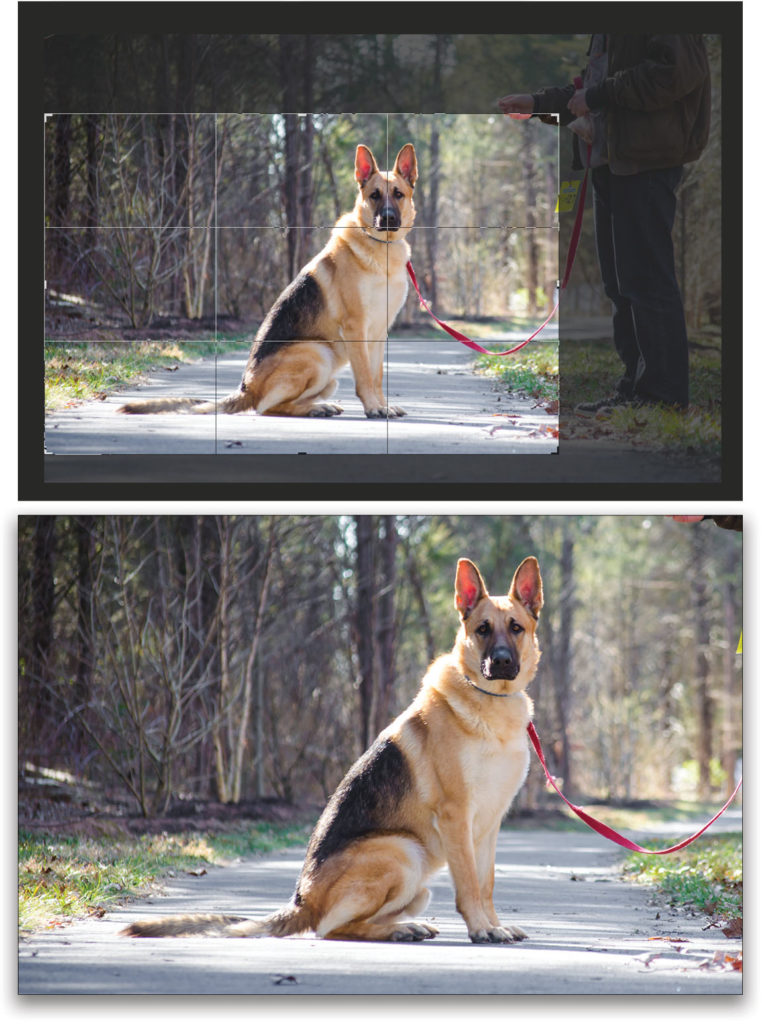
In Photoshop, use the Crop tool (C) to crop out most of the dog’s handler. Use the rule-of-thirds grid with the Crop tool to put the top-right intersection directly under the dog’s snout. Holding down the Shift key while resizing the crop window will ensure it maintains the original aspect ratio. Press the Enter key to commit the crop.
Step Five:
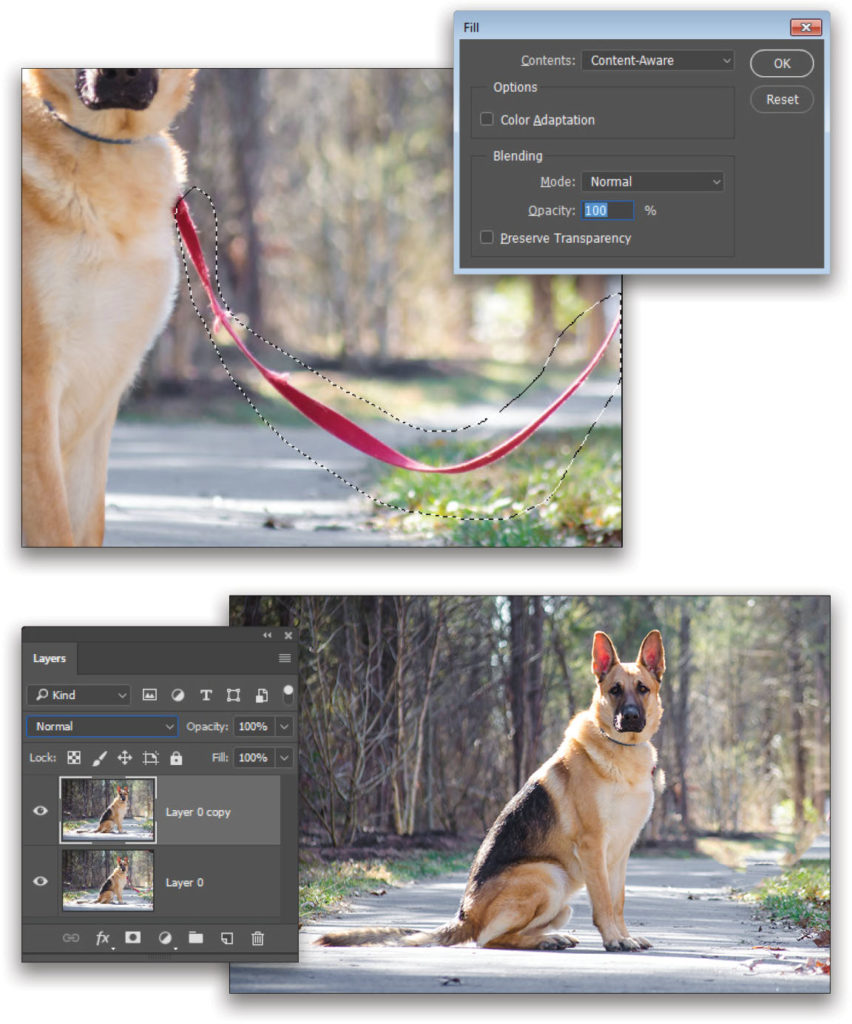
Create a copy of the photo layer by pressing Command-J (PC: Ctrl-J). This will preserve the original just in case things go awry. Use the Lasso tool (L) to draw a selection around the leash. Then, go to Edit>Fill, set the Contents drop-down menu to Content-Aware, and click OK. Photoshop will fill in the selection with samples from the background so the leash is no longer visible. Be sure to press Command-D (PC: Ctrl-D) to cancel the selection. Then use the same technique to remove any portion of the handler that’s still visible.
Step Six:
The Content-Aware Fill left an odd result where the leash met the dog’s fur. To correct this, use the Healing Brush tool (nested below the Spot Healing Brush tool [J] in the Toolbar). Sample a source by holding down the Option (PC: Alt) key while clicking on the background just below the trouble area. Then paint over the anomaly. Photoshop uses the pixels from the source area to reconstruct the new edge of the fur without any trace of the leash. You may have to sample from several different areas of the background to help heal away the leash and fur.
Step Seven:
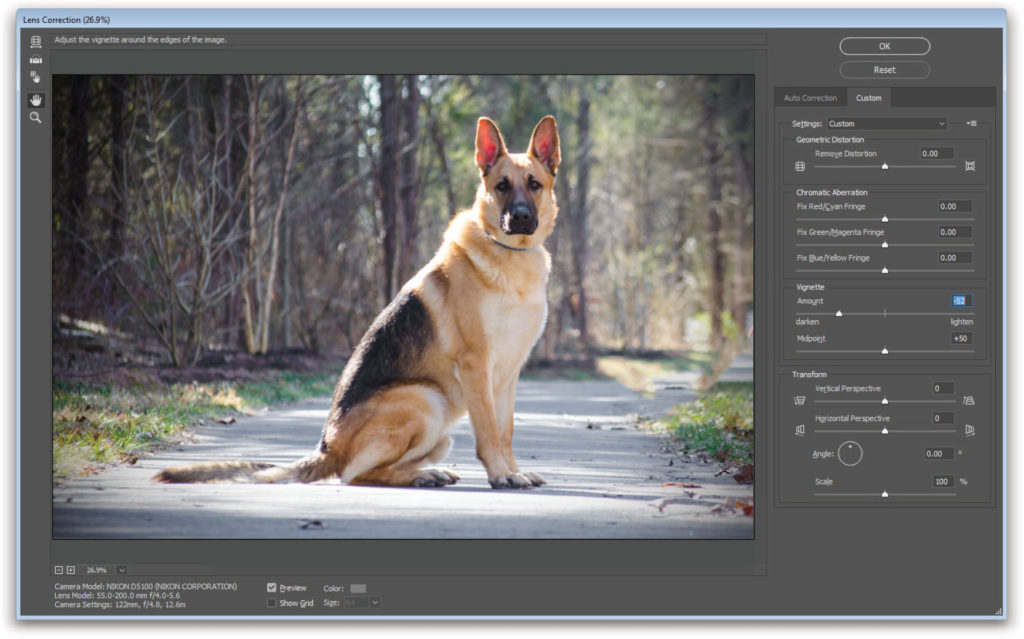
Convert this layer for smart filtering by going to Filter>Convert for Smart Filters. Then, go to Filter>Lens Correction. Switch to the Custom tab, and in the Vignette area, reduce the Amount to –52 to add some darkening to the edges of the image. Click OK.
Step Eight:
There still seems to be some slight blue leaking into the shadow areas. So add a Hue/Saturation adjustment layer from the Adjustments panel (Window>Adjustments). Switch to the Blues in the Properties panel, and reduce the Saturation slider to –50. If the colorization still persists, reduce the saturation for the Cyans, as well.
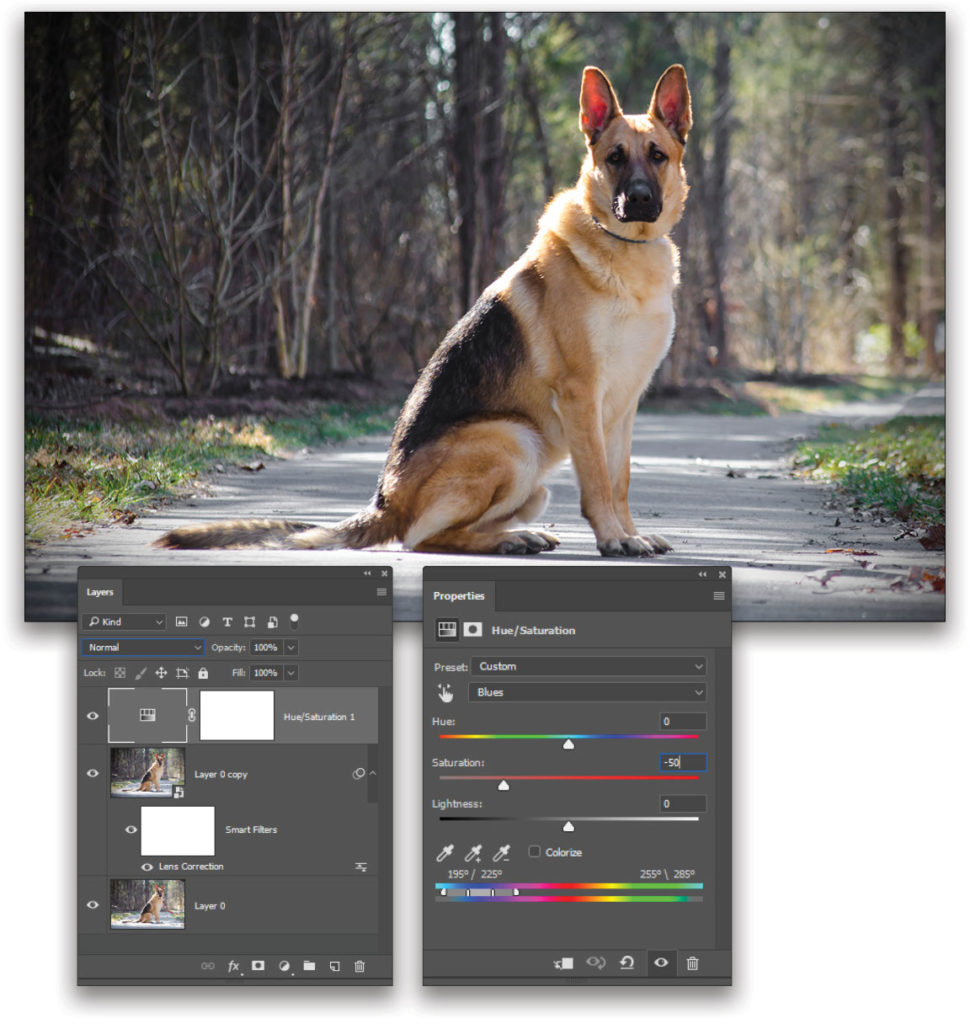
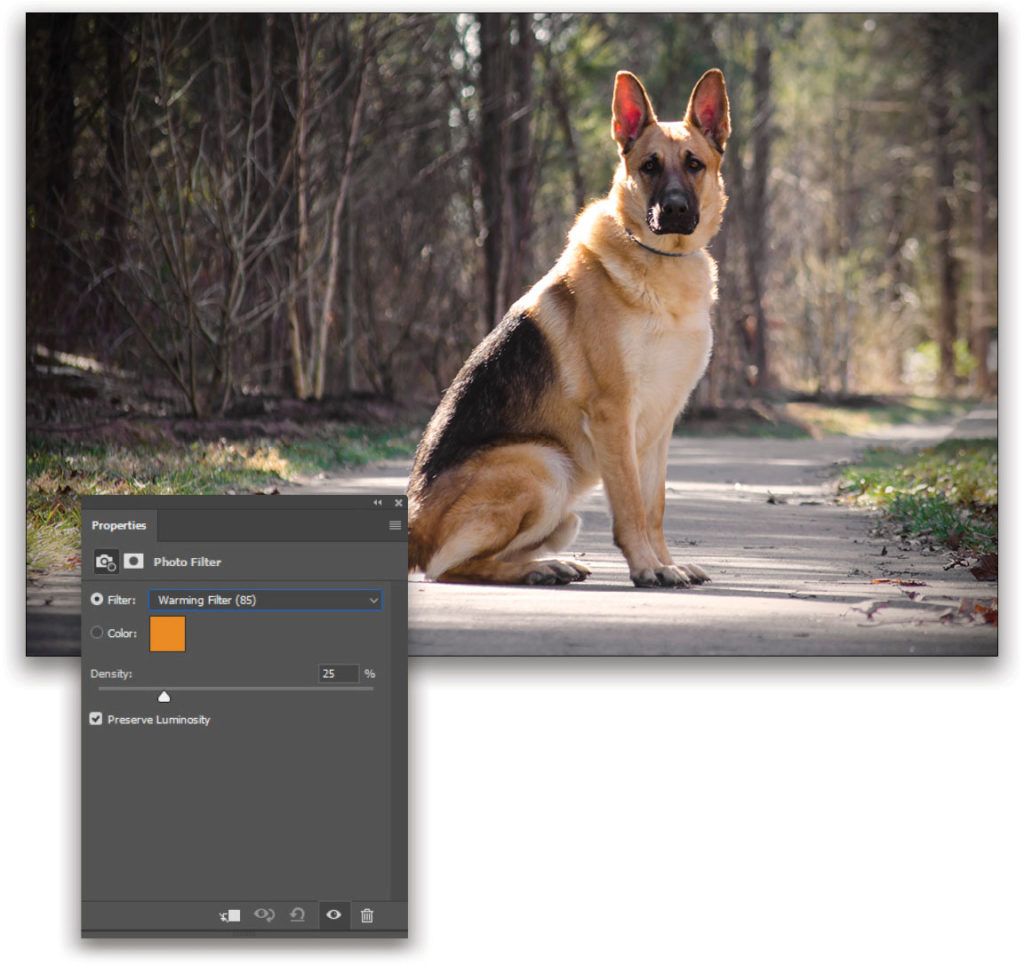
Step Nine:
To add some warmth to the image, use the Adjustments panel to add a Photo Filter adjustment layer. Set the Filter to Warming Filter (85) at a Density of 25%, and enable the Preserve Luminosity option
Step 10:
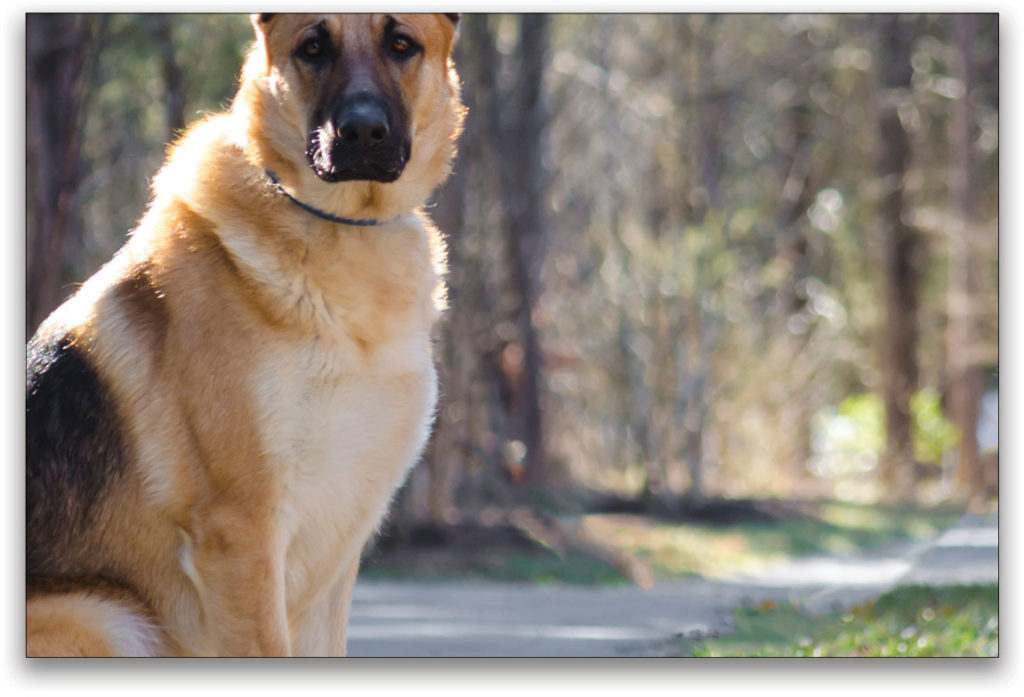
The eyes of the beast are naturally dark. Click on the photo layer in the Layers panel to make it active, and use the Quick Selection tool (W) to select the eye areas. Tip: Use the Left Bracket key ([) to quickly decrease the size of the brush. If the Quick Selection tool selects too much, press-and-hold the Option (PC: Alt) key, and paint those areas to remove them from the selection. Create a new layer from the selection by going to Layer>New>Layer Via Copy (or Command-J [PC: Ctrl-J]). Move this new layer to the top of the layer stack, and set the blend mode to Screen near the top left of the Layers panel to brighten the eyes significantly. Then, use the Eraser tool (E) with a soft round tip to soften any hard or sharp edges. Double-click the name of the layer, and rename it “Eyes.”
![]()
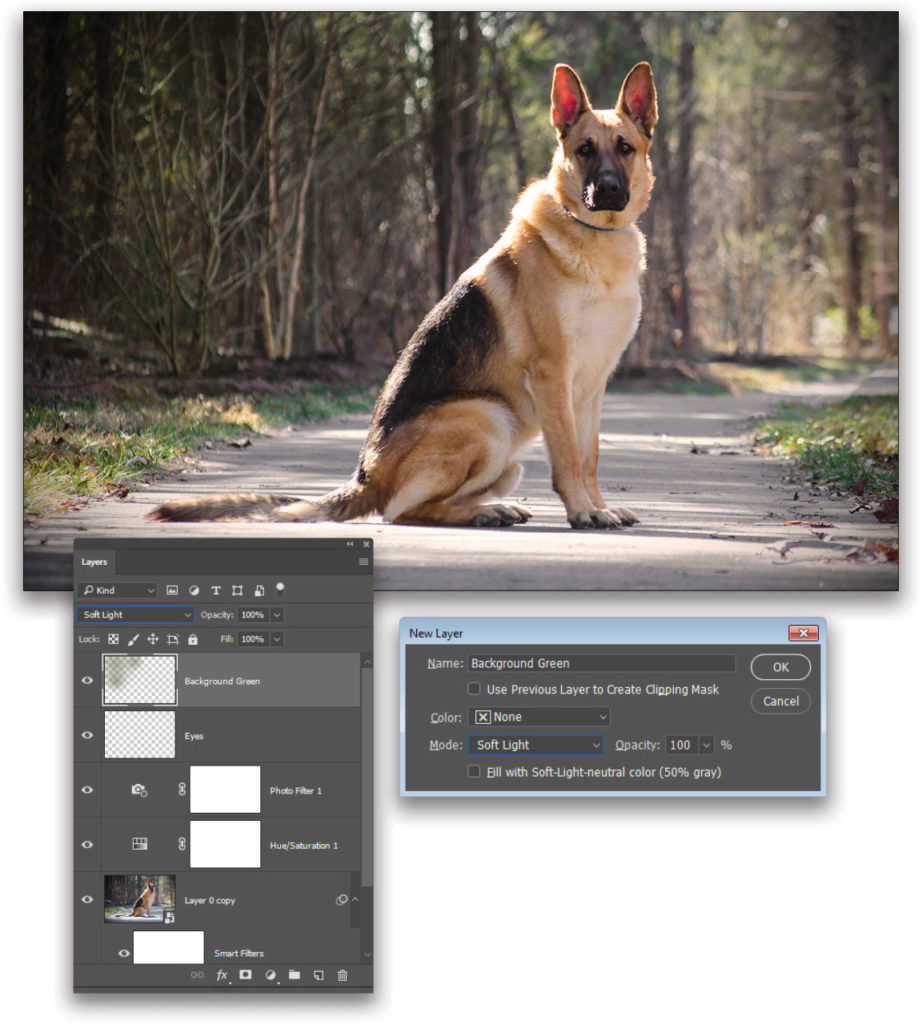
Step 11:
Add a new layer with Layer>New>Layer. In the New Layer dialog, name this layer “Background Green,” set the Mode to Soft Light, and click OK. Switch to the Brush tool (B), and in the Options Bar, select a large soft-round brush tip from the Brush Picker and reduce the brush Opacity to 20%. Hold down the Option (PC: Alt) to sample a deep green from the background area. Then, paint over some of the dull brown wooded area to add more color to the background.
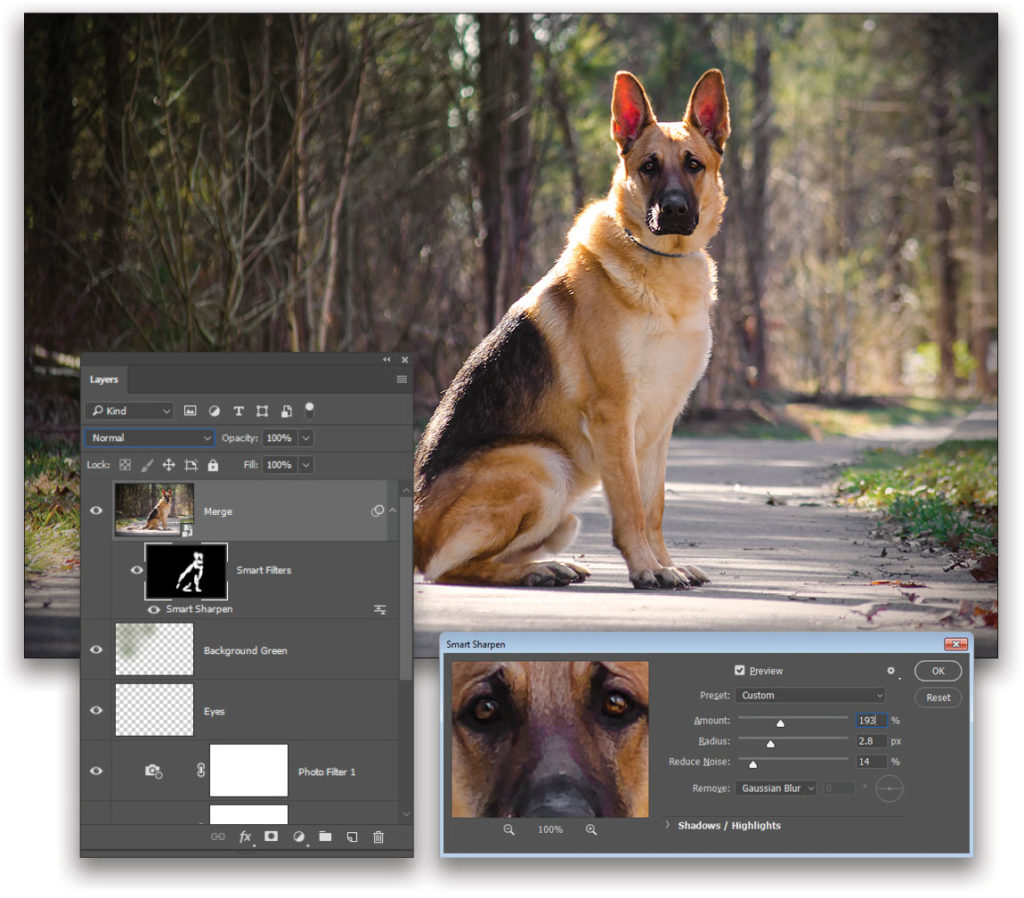
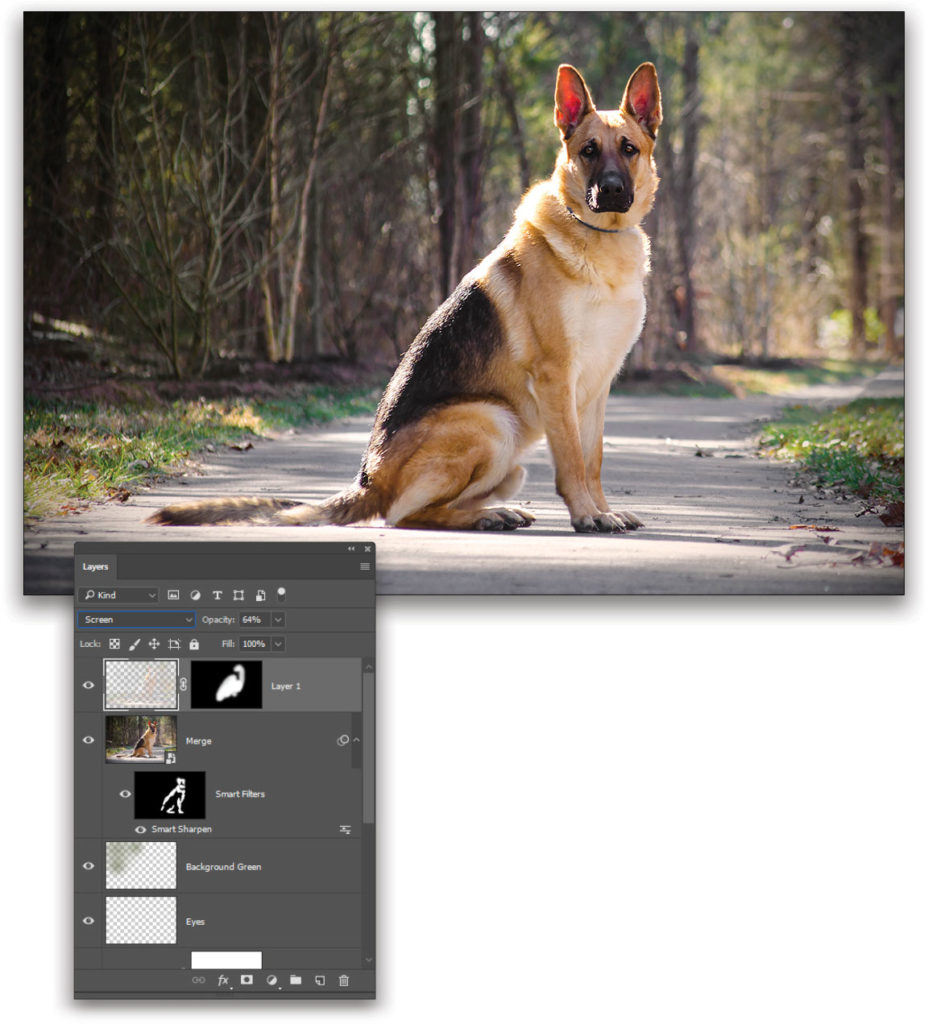
Step 12:
Create a merged layer by holding down the Option (PC: Alt) key and going to Layer>Merge Visible. Rename this layer “Merge,” convert it for smart filtering, and go to Filter>Sharpen>Smart Sharpen. Set the Amount to 193%, Radius to 2.8 px, and Reduce Noise to 14%. Change the Remove drop-down menu to Gaussian Blur and click OK. After applying the filter, target the smart filter mask in the Layers panel. Fill the mask with black using Edit>Fill, setting the Contents drop-down menu to Black, and clicking OK. This removes the sharpening effect. Use the Brush tool again with white paint (press X until your Foreground color is white) at 100% Opacity to reapply the sharpening to the dog’s eyes, nose, feet, and highlighted fur.
Step 13:
Switch to the Channels panel (Window>Channels) and hold down the Command (PC: Ctrl) key while clicking on the RGB channel thumbnail. This will load the luminosity as a selection. Switch back to the Layers panel, click on the Merge layer so it’s active (and not the Smart Filters mask), and press Command-J (PC: Ctrl-J) to create a new layer from the selection. Set the blend mode to Screen and reduce the Opacity to 64%. Then, go to Layer>Layer Mask>Hide All to add a black-filled layer mask to the layer. Use the Brush tool again with white paint on the mask to reveal the augmented highlight areas on the brightest parts of the dog’s fur.
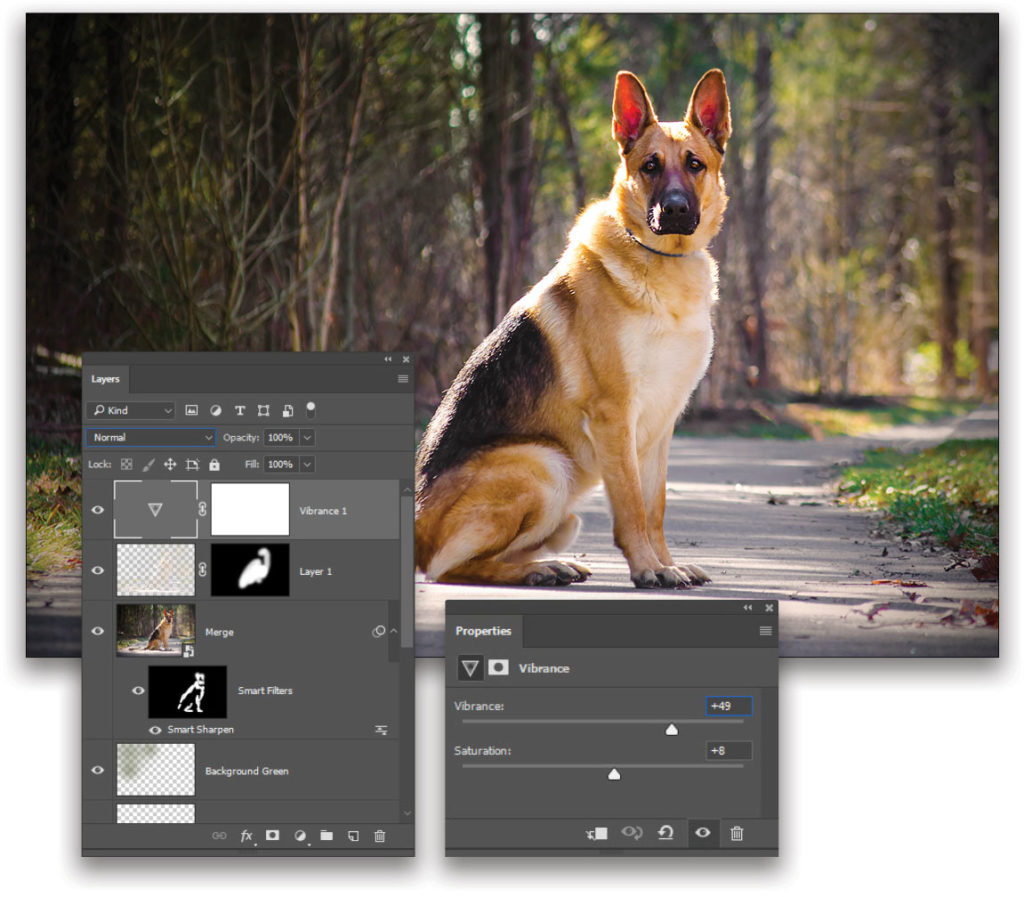
Step 14:
For the final step, add a Vibrance adjustment layer from the Adjustments panel and increase the Vibrance to +49 and the Saturation to +8. Then sit back and enjoy the image of this handsome German Shepherd.
Ultimately, the fun of dog photography isn’t in the retouching, it’s in the actual photography. But canines are notoriously challenging subjects. Kaylee’s course is phenomenally helpful in capturing the right moments, but even after the shutter clicks, it’s nice to be able to know how to add some retouching to the image, to make the moment even more magical.
This article originally published in the March, 2017 issue of Photoshop User.


Hi, Steps Ten and Eleven won’t work for me. Who can help me? Thanks.
Hi! What is happening when you attempt to do steps 10 and 11?