The heart of this issue’s Photoshop User is about speeding up your workflow with various tools and plug-ins. One of the key elements for my workflow is a digitizing tablet, in particular the Wacom Intuos Pro. Beyond the obvious benefits of using a pen as input for creative control, I also take advantage of customizing the buttons, Radial Menu, and touch features to both speed up certain tasks and to reduce the number of times I reach for the keyboard. If you haven’t dived into customizing your tablet, read on and give it a try!
I’m using the 2017 Intuos Pro Medium (PTH-660) that was released earlier this year, so if you’re using a different model, you may have different features and options. I’ll start with describing my preferred setup, then outline a strategy for you to figure out your own best configuration, tailored to how you work (or would like to). While the screenshots presented here are from the Mac operating system, they should look pretty similar on Windows. Make sure you’re using updated drivers, too!
Note: You can set up preferences for individual applications, along with default settings for other applications. For purposes of this article, I’m only going to address working in Photoshop, so will use the default All option in the Application section for my preferences.
What Does This Button Do?
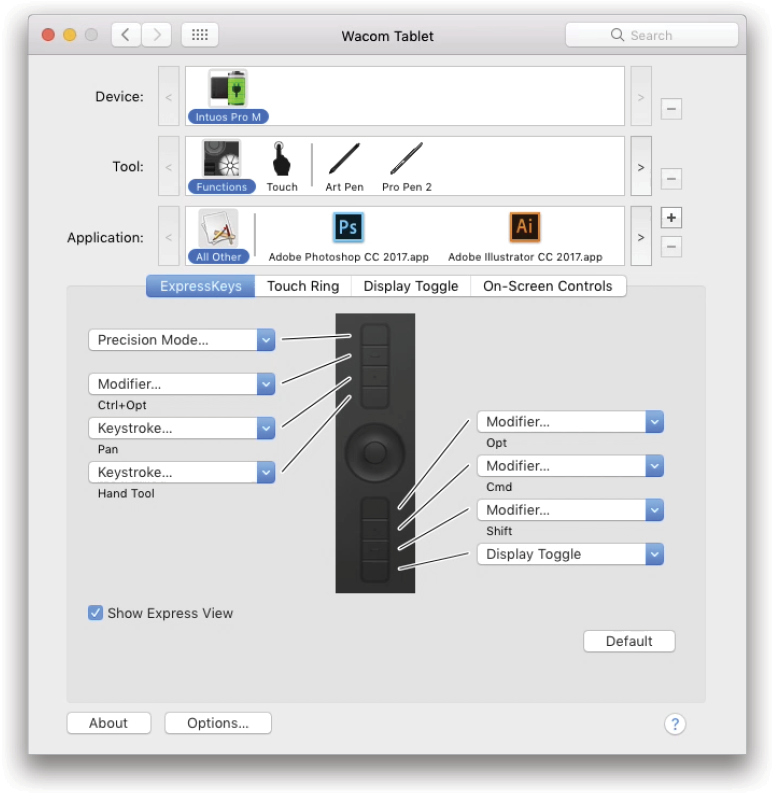
The first thing I do is set up the physical buttons, or the ExpressKeys, on the tablet itself. To access these settings, click on Functions in the Tool section, and click the ExpressKeys tab. There are lots of options presented in the drop-down menus for each ExpressKey, and the buttons can be treated like toggles (switching between functions) or momentary actions (functions that only operate while you hold down the button). I only have one toggle application, and that’s to move the assigned tablet mapping (e.g., where the physical space of the tablet maps to a virtual space on the screen) between screens. Since I use two screens, I prefer to have the full area of the tablet be dedicated to Photoshop when I’m working there, which takes up one entire screen. When I need to switch to the other screen, a quick tap enables the pen to work there, or on both screens without restriction. You’ll find Display Toggle under Tablet in the drop-down menus.
Pro tip: While the pen can be limited to one screen through mapping assignments, touch always operates across all screens like a giant touch pad. This is actually pretty handy when you want the precision of the pen on one screen, but still have access to the rest of your display through touch.
The remaining buttons are all set to various modifier or spring-loaded options that only function while holding the button down. Tons of Photoshop tools take advantage of modifier keys for advanced behavior. The modifier keys that I’ve assigned to my ExpressKeys are Control-Option (PC: Ctrl-Alt), Option (PC: Alt), Command (PC: Ctrl), and Shift. Then I have two buttons for Bird’s Eye panning, and the Hand tool. The last button is used for Precision mode—really handy for fine-tuning path control points, guides, and painting minute details on delicate masks. The functions I use most often are closest to the Touch Ring, and Precision Mode and Display Toggle are furthest away because I don’t use them as often.
Interestingly, I discovered that I use the Touch Ring to zoom and rotate when I’m working on photographs, but prefer using touch gestures for these functions when I’m sketching and painting. That means I have the same function available two different ways. Weird, huh?
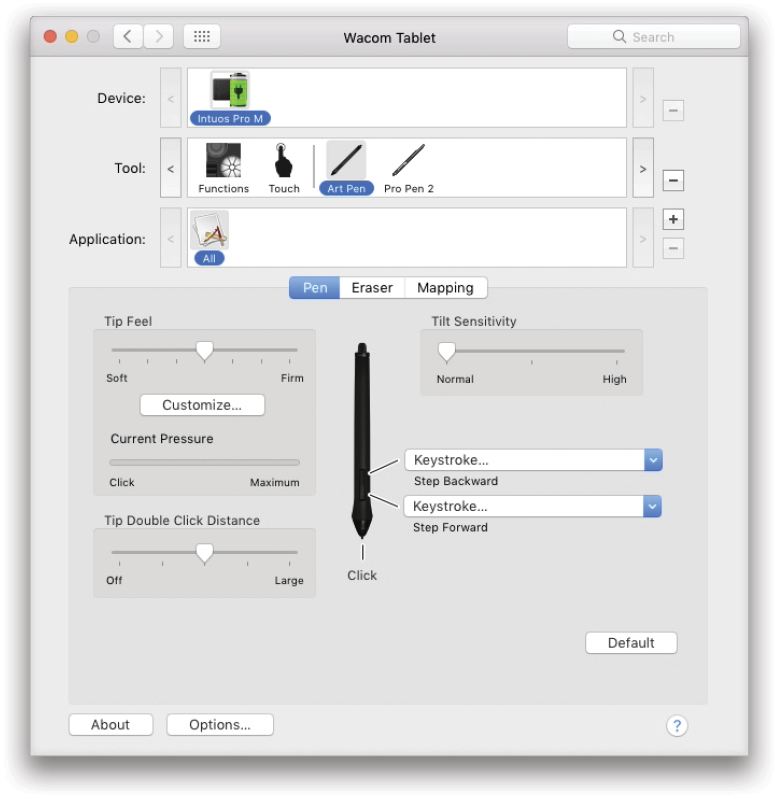
On the stylus, you’ll find a rocker switch and eraser, all of which can take custom functions. (Click on the stylus in the Tool section to access its settings.) I have the rocker switch set to Step Backward and Step Forward. This is more flexible than Undo/Redo because you can take multiple steps if you need to work back through history a bit. I have the Eraser button assigned to trigger a screen capture in another application, using a custom keystroke combination—something I need frequently while writing! A few retouchers I know have assigned the rocker switch to scroll up and down through layer stacks. And at least one illustrator friend uses the buttons to quickly flip the canvas upside down or backward to examine compositional balance.
Note: You can use more than one stylus, and each can have its own custom features. In addition to the Pro Pen 2, I have the Art Pen, which enables rotation of brushes in Photoshop and other painting applications.
Stop Touching Me!
Many people don’t know what to make of the touch features found on Wacom Intuos and Cintiq tablets. Early on in the technology, using touch could be quirky and sometimes a real pain if you accidentally triggered a touch function, such as moving layer content or causing your cursor to jump around. The usual response was to turn it off and forget about it. A few artists, especially those with the larger Cintiq tablets, would wear fingerless gloves to prevent contact with their palm, leaving their fingers available for touch gestures. In the last several years, though, that problem has largely gone away. If you’re one of those people who decided it was too much hassle, please give it a new look.
I have all of the Standard Gestures enabled, but I rely constantly on Rotate, Zoom, and Drag. The others I simply forget about, or use the pen and Touch Ring instead. I’ve found, especially for detailed brush work, that rotation and zoom are amazingly natural and accurate with touch gestures, though it does take more deliberate action—you have to place your fingers, then make the gesture. After a few minutes, this becomes very natural in my work rhythm. I tend to use my non-pen hand for rotate and zoom, but change my grip and use my pen hand for dragging.
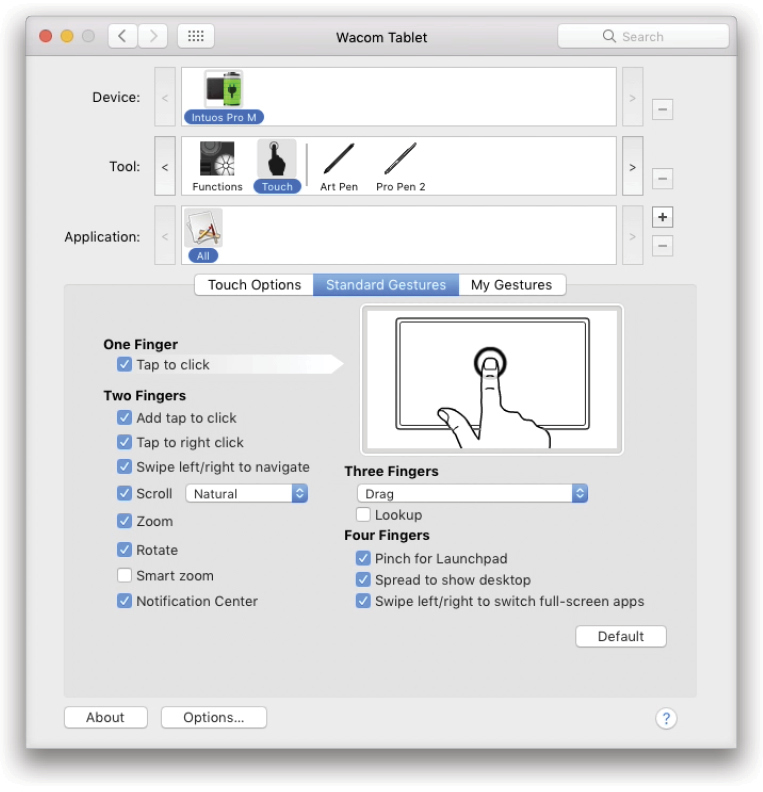
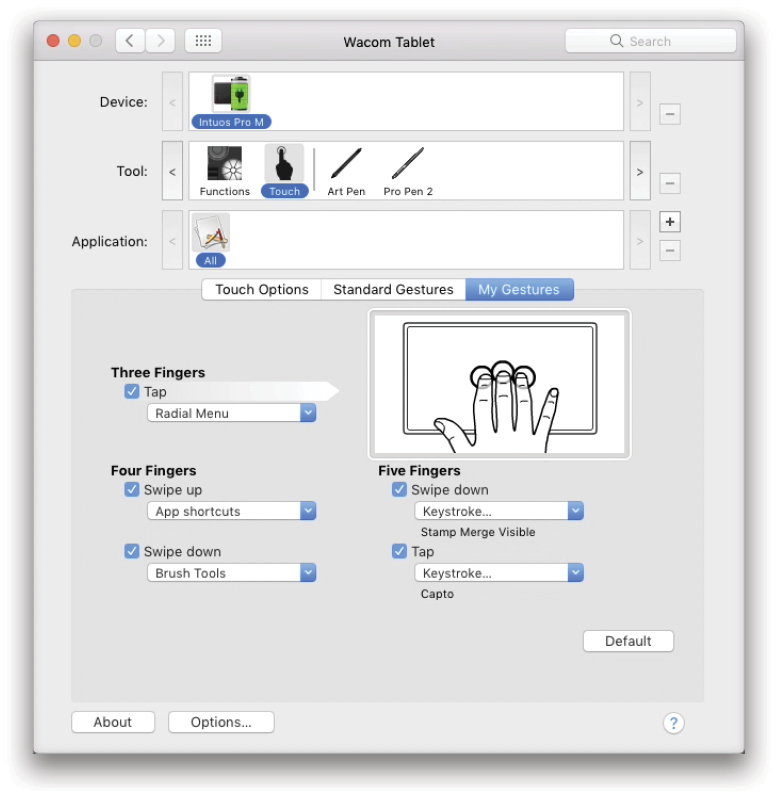
Custom gestures get used less frequently, but are still pretty important to the way I work. The two I use nearly all the time are Three Fingers Tap to bring up the Radial Menu (covered below), and Five Fingers Swipe Down to engage The Claw!…I mean, Stamp Merge Visible. This shortcut (Command-Option-Shift-E [PC: Ctrl-Alt-Shift-E]) creates a blank layer then fills it with a flat, stamped version of whatever’s visible (it’s best done at the top of a layer stack to create a snapshot).
In the screenshot, you can see I have a Four Fingers Swipe Up set to open App Shortcuts, and Down to open the Brush tools panel. Honestly, I don’t use those because I stick to using the Radial Menu for those features.
What is this Radial Menu of Which You Speak?
I’m glad you asked! Okay, the Radial Menu itself is actually kind of clever, but I admit it took a while for me to get comfortable with it. The idea is that you assign an ExpressKey or gesture to call it up, and you get eight menu items that you can populate in myriad ways, including creating sub-Radial Menus. This is where users tend to get excited, then they get overwhelmed with options, and finally give up. It’s tragic, really, because once you dial it in, you can do some really cool, fast work without touching the keyboard.
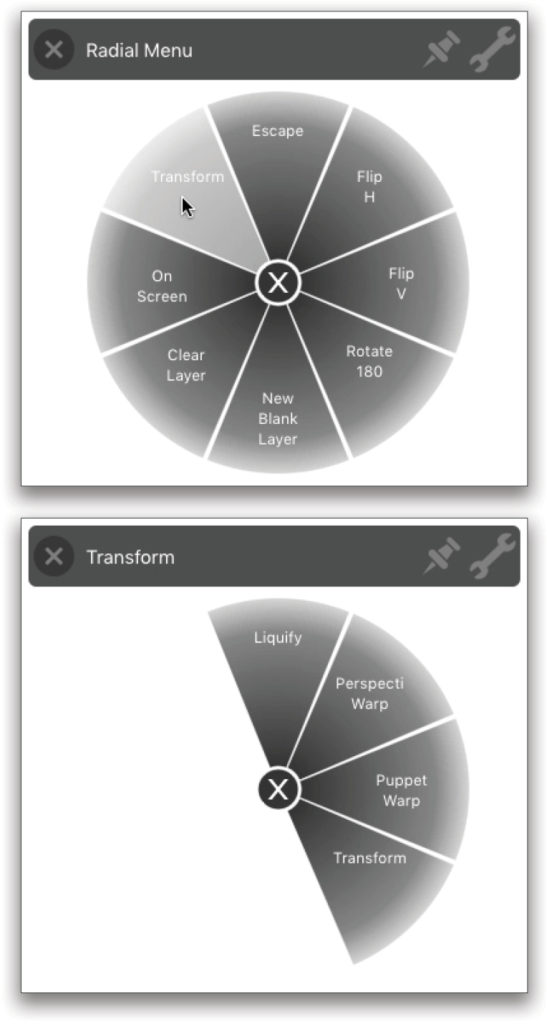
I have a few Photoshop menu items and shortcuts on the first level, and two sub-Radial Menus: On Screen and Transform (see images below). On Screen controls behave more like buttons, and are generally meant to be persistent, while the Radial Menus are intended to be used and then go away.
When you go to set up the Radial Menu and On Screen controls, you’ll get a chart-like interface with drop-down menus. (To access the On-Screen Controls tab, click on Functions in the Tool section to reveal it.) On the left in the Panels section, you have a list of the Radial Menus (the ones with the pie-chart icons) and On Screen controls available (the ones with the dot icons), and you can use the + button below to add more as you see fit, choosing each collection to be either a Radial Menu or On Screen control box (with various layouts). You can refer to each by name if you want to add more levels. Just click on an item in the Panels section, and then use the drop-down menus on the right to assign functions to the sections of each Radial Menu or the On Screen buttons.
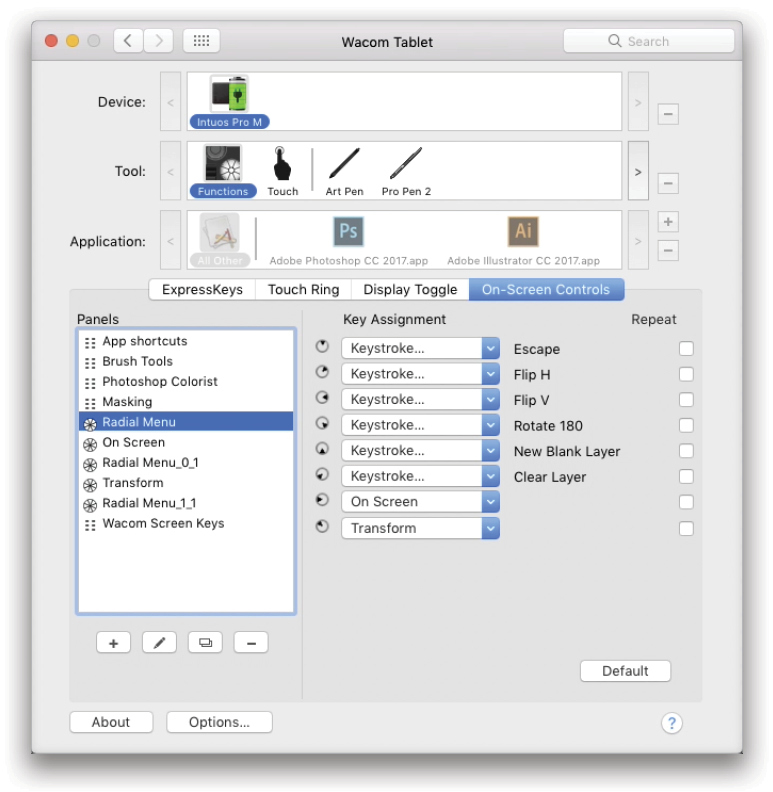
As I mentioned earlier, I’ve called one sub-Radial Menu “On Screen” because I have three sets of custom On Screen controls set up: Brush Tools, Masking, and App Shortcuts. Each one has a few buttons that I like to leave available while working on certain tasks, like brushing or masking. Clever, no?
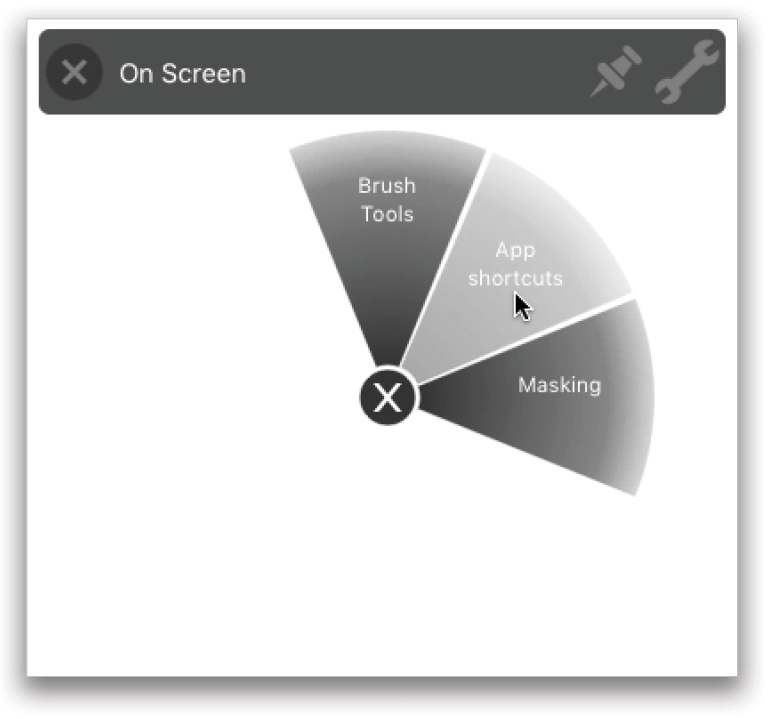
Okay, so the way this works is I use a three finger tap gesture to call up the Radial Menu, then select On Screen to display a secondary Radial Menu, and then I choose the button set I want. Those buttons stay put while I’m working, again for the purpose of avoiding reaching for the keyboard. For other commands, I might not need the buttons, so I’d choose the menu item and the Radial Menu would disappear.
You can get insanely complicated with these menus, but I don’t recommend it. After about the second level, you’ll start costing more time unless you’re using really complex custom actions. For example, I have one setup that uses deeper menus for firing scripts that I don’t use often enough to remember their shortcuts or menu locations.
Radial Menus can be loaded with keyboard shortcuts and some built-in application commands, but you can’t write scripts or timed sequences into them. I feel this is kind of a limitation, but I don’t know what technical gymnastics would be required to build real scripts. So for now, you’ll need to either use keyboard shortcuts or create actions with shortcuts to trigger more complex interactions.
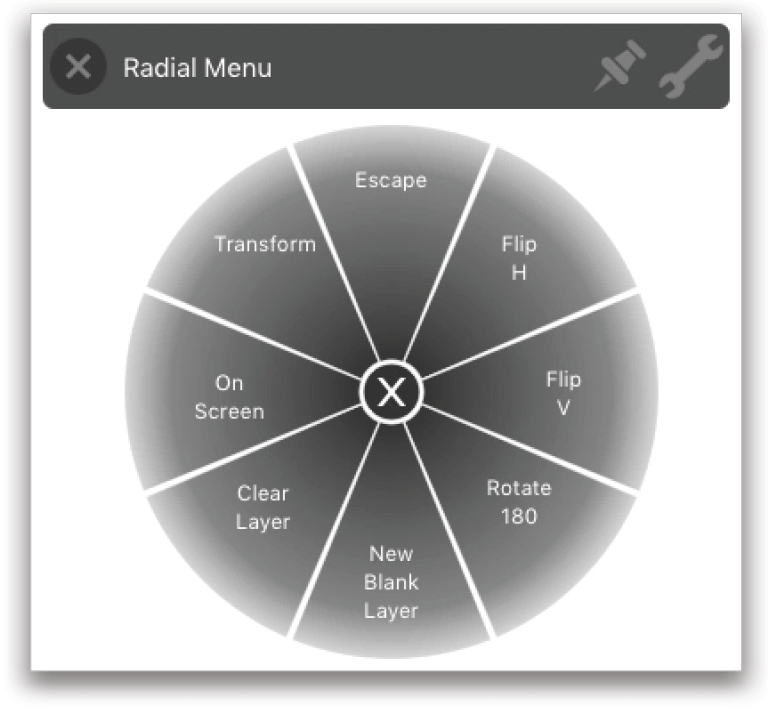
Radial Menu reveals a sub-Radial Menu
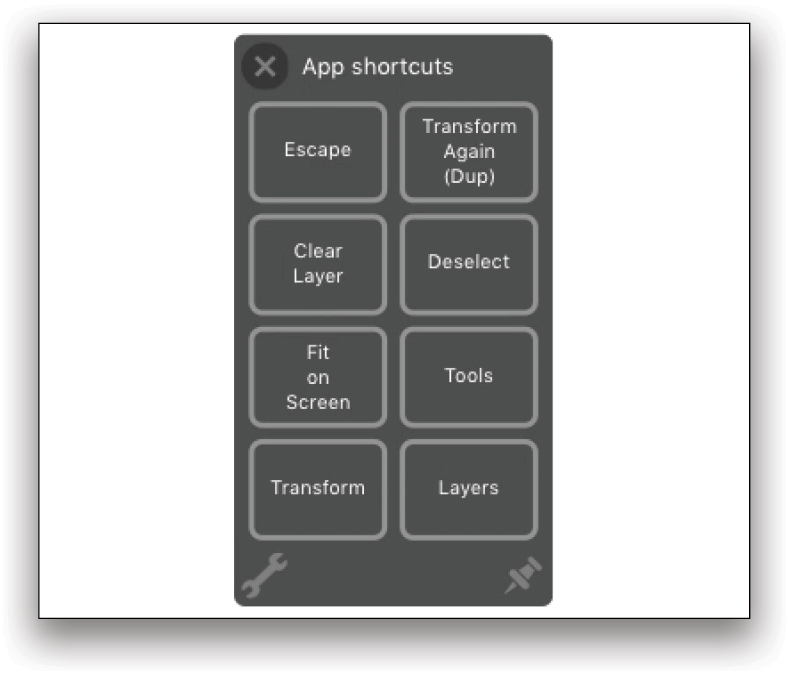
This panel stays onscreen until I click the x at its top left.
That’s Great! Now, Why Should I Care?
Okay, here’s what it all comes down to. The point of customization is to let you work more freely, so the level to which you customize is entirely driven by how you want to work. I see tons of people look at the options and just throw their hands in the air. Others dive in eagerly and go nuts, filling every slot and enabling every feature, trying to make sure they get full value from the capability. So I’m going to repeat: make it useful for you and your work. Sure, there’ll be some learning and tweaking, but only use what makes sense.
The trick is patience. Well, patience and a little analysis of your own workflow. For myself, I go through several different kinds of tasks in Photoshop, from retouching to painting to design. They all use different features and have different approaches to using the tablet. You’ll want to start with one general task you do frequently, and make a short list of the most common functions you perform. If you’re primarily a digital painter, you may want to adopt my approach of assigning modifier keys to buttons, rotate and zoom gestures, and perhaps something like flipping the canvas or loading tool presets into action shortcuts. If you’re an instructor for various classes, perhaps you want to use the Radial Menu to manage workspaces and libraries. Do a lot of masking? Consider assigning gestures to trigger actions for creating automated masks from layers.
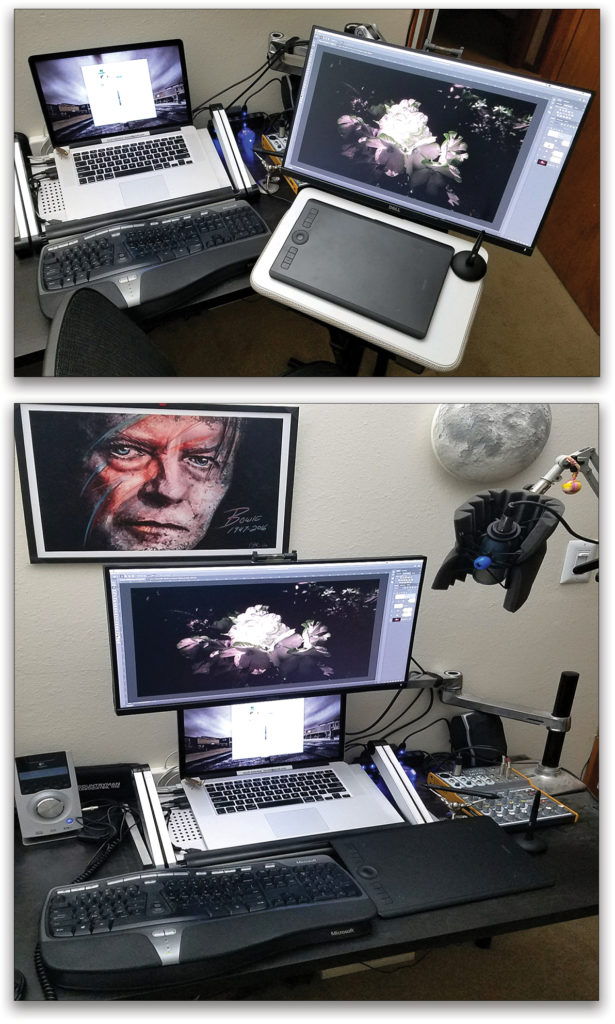
You also have to look at how you physically use the tablet. Some people work with the pen in one hand, and a keyboard constantly under the other, side-by-side. Others like to move the keyboard altogether and place the table front and center, hitting the keyboard occasionally. A few people will sit back and hold the tablet like a clipboard or on their laps, moving their entire bodies to reach for shortcuts only when absolutely necessary. Personally, I do a mix of the first two depending on the task. For serious painting, I have the Intuos Pro situated below my monitor (which is on an articulating arm).
The further away the keyboard is physically, the more benefit you’ll get from customizing. But even if you keep one hand on the keyboard at all times, there’s a lot to be gained by taking advantage of at least a few buttons and gestures.
Here’s my general view of how to choose custom assignments: The tablet and pen buttons should be things you intend to use all the time. Since they can be toggled or spring-loaded, it makes sense to use things like modifier keys and other temporary, fast functions. I once saw an insanely good illustrator use the pen’s front rocker switch for the Lasso tool, and the backward switch for the Eyedropper tool, while the tablet buttons were set for the Gradient tool and Paint Bucket. Using just those features, he could knock out drawings for children’s books at lightning speed. In my own setup, when using the Brush tool, one tablet button is set to call up the Brush HUD so I can change size and hardness right there onscreen by dragging.
Custom gestures can be a little more intimidating to remember. While you can turn on the Show Express View option in the ExpressKeys tab for showing the tablet button assignments when you rest your finger on one of them, there’s no such cheat sheet for gestures. This is what took me the longest to adopt, but now it’s completely natural to use two or three while working. More than that and I start to forget which is which. Gestures should be things that you do less frequently, but are still important. Things like saving your work, toggling panel visibility, and complicated shortcuts are great candidates for custom gestures. Of course, that’s in addition to the basics like zoom and rotate, which aren’t custom and I didn’t have to learn over time.
Radial Menus and On Screen Controls are real power user tools that can pack some serious punch, but are most useful if you use actions or scripts in your work. On Screen Controls are great for minimizing the visual clutter, since you can do things like load tool presets or switch panels without the need to have the full Photoshop interface visible. Consider Radial Menus when you don’t want to keep the Actions panel open, or when you want to minimize touching the keyboard.
For compositing work, I have a submenu set to the four basic Transform commands because I can never remember the shortcuts, and hate having to go to the Photoshop application menu every time to find them. In this way, the Radial Menus are faster even with a gesture and two clicks because there are only four options immediately visible. In Photoshop proper, I have to click the Edit menu, and then remember whether the transform I want is under the Transform menu item or is by itself (like Puppet Warp vs. regular Warp). Reducing visual clutter isn’t just for the working canvas, but for menu items, too.
Chart Your Course
Planning all of this can be a real challenge. I’ve used various methods in the past to track which tools and shortcuts I use, including creating spreadsheets and recording screencasts to collect statistics. If you’re so inclined, knock yourself out. What I do now is pay attention to my process while I’m working. Whenever I think to myself, “Hey, this should be easier,” I make a note describing the idea in a sentence or two. It could be “I keep hitting C instead of X when trying to swap the Background and Foreground colors,” and so X might be a candidate for a button or gesture. With the Transform example above, I’d constantly use a couple of warp and transform tools for minor tweaks, so the menu route became a chore to navigate. I made a note. But I didn’t interrupt my work until I was at a natural stopping point anyway.
When I took a break, I’d look at the notes and set one or two configuration options. Then I’d start using them. Some I’d keep, some I’d change, and some I’d abandon. Over a couple of weeks, I had developed a pretty robust system that finally stayed in my head while working. Things get more complicated if you choose to use different customized settings for different applications. I find it gets confusing to try and set different functions, so I recommend thinking about general behaviors rather than custom functions. For example, Undo is managed differently in various programs, but the experience should be the same—you press a button, you undo the last action. While most applications use Command-Z (PC: Ctrl-Z) for multiple undos, Photoshop requires you to Step Backward through history, and so uses a different shortcut.
I guess my advice here is to sneak up on the customizations! Don’t feel like you have to use all the features, and certainly don’t try to customize everything at once. Start with some basics, change one or two things, and be patient. Add something when it makes sense, and if it doesn’t work out, move on—try a different combination or get rid of it altogether. Even if you only use half a dozen custom features that ease your work and keep you flowing, you’ve won!
Remember: Never let your tools get in the way of your art.
This article originally published in the August, 2017 issue of Photoshop User magazine.


