
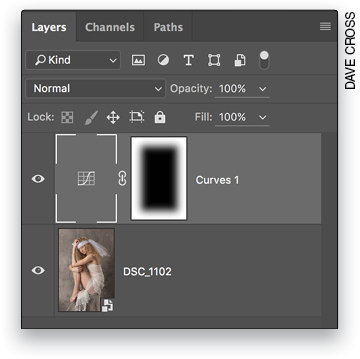
Add a Curves adjustment layer (Layer>New Adjustment Layer>Curves), click on the top-right corner of the curve in the Properties panel, and drag straight down: this will darken the entire photo. Then on the mask of the Curves adjustment layer, use the Rectangular Marquee tool (M) to select the middle area, leaving a border. Press X until the Foreground color is black, and then press Option-Delete (PC: Alt-Backspace) to fill the selection with black, hiding the Curves adjustment layer in that area. Finally, in the Properties panel, click on the Masks icon (circle in a square) at the top, and use the Feather slider to soften the edges. Now you can adjust the Curve, the size of the mask, and the Featther amount—and you can copy the adjustment layer onto another document.
Excerpted from the October 2016 Hot Tips issue of Photoshop User magazine.
![Creating Reflections in Photoshop [Flashback Friday!]](https://insider.kelbyone.com/wp-content/uploads/2017/05/FeaturedIMage-1-440x264.png)
![Line Burst Background Effect [Flashback Friday!]](https://insider.kelbyone.com/wp-content/uploads/2017/05/Heroimage-440x264.jpg)
![Nondestructive Dodge & Burn Shortcut [Tip Thursday!]](https://insider.kelbyone.com/wp-content/uploads/2017/05/AfterContour-440x264.jpg)