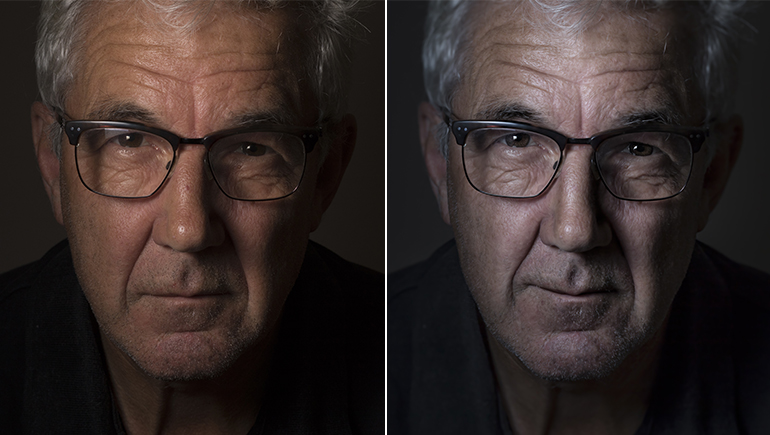
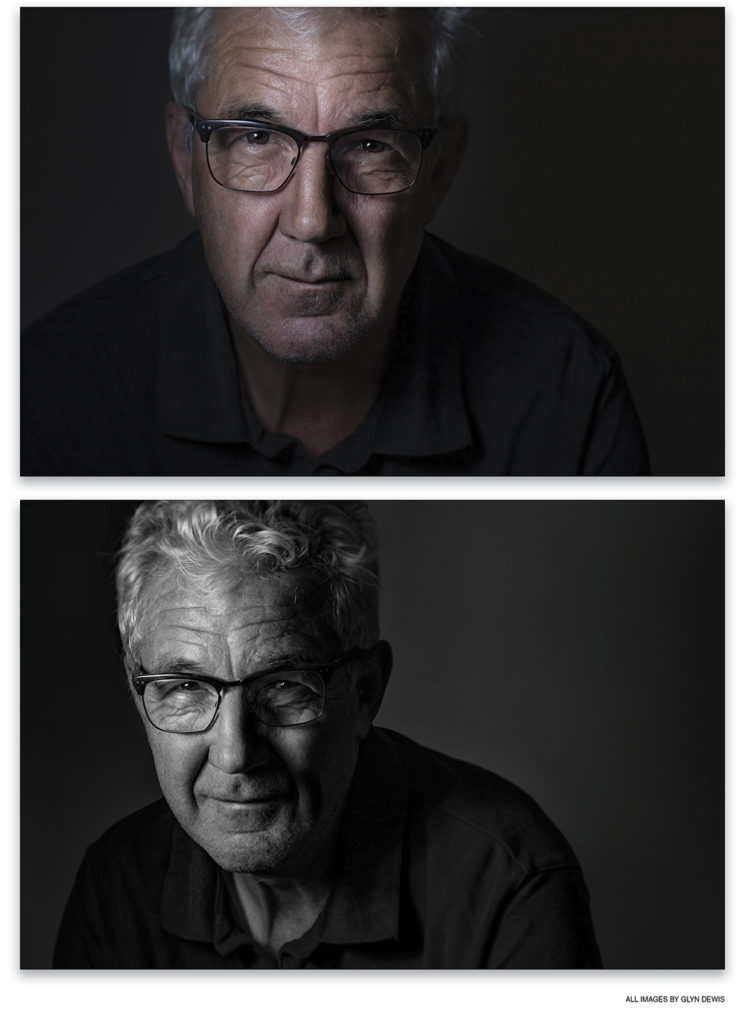
In this tutorial, I want to take you through the retouching steps that I currently use to give my portraits added depth and dimension, almost as if the face of the person is coming forward from the screen or page.
As photographers and retouchers, we know that there are three main elements to a picture that draw the viewer’s attention: light, contrast, and sharpness. When it comes to the light, which is much like dodging and burning in Photoshop, the brighter areas of a picture appear to come forward toward the viewer, whereas the darker areas give the feeling of pulling away from the viewer. Areas that contain more contrast also draw the viewer’s attention, as do areas of sharpness.
So throughout these retouching steps, you’ll see how light, contrast, and sharpness can be used in combination to boost the depth and dimension in a portrait and give a very distinctive look.
Step One: RAW Conversion
Starting off in Lightroom, we’ll change the white balance, as the out-of-camera shot is a little on the warm side. With the White Balance Selector (W), click on an area of the background to the right of the man’s head; then reduce the magenta by adding in some green in the Tint slider: around –22 should be enough. With the Spot Removal tool (Q) in the Heal mode, remove some of the blemishes and the hot spot on the man’s nose.

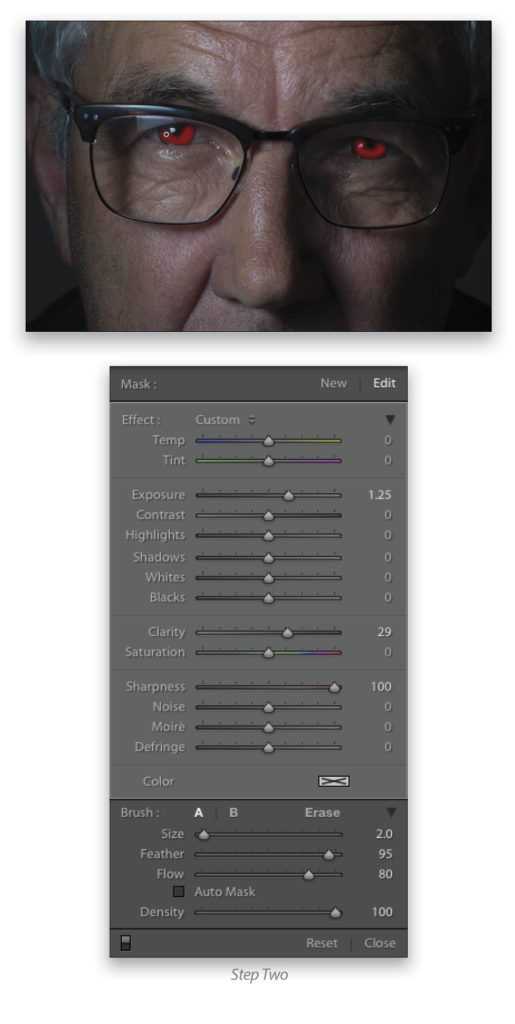
Step Two: Eyes Plus Sharpening
What I love these days about Lightroom, or indeed Camera Raw, is what used to take several steps in Photoshop can be completed in a fraction of the time using the Adjustment Brush (K). So zoom into the eyes and select the Adjustment Brush. Reset all the sliders by double-clicking on the word “Effect” near the top of the Adjustment Brush panel, and increase the Exposure a small amount. Tick the Show Selected Mask Overlay checkbox below the image preview so you can see exactly where you’re painting and, consequently, what areas are going to be adjusted. Use the Bracket keys on your keyboard to quickly change the size of your brush, and then paint over the eyes to select them. Turn off the overlay and then increase the Exposure to around 1.25. Also, add in some Clarity and Sharpness to add punch to the eyes. Press K to deactivate the Adjustment Brush. Finally, zoom out and add some overall sharpening by going to the Detail tab, increasing Sharpening to around 55, and then restricting the sharpening to the face by increasing the Masking slider to around 80.
Step Three: Dodge & Burn
This is where we start to give our portrait that almost 3D kind of feel rather than being flat and two dimensional. We’ll use dodging and burning, contrast, etc. to add depth and dimension. So, go to Photo>Edit In>Edit in Adobe Photoshop to export the image to Photoshop and then go to Layer>New>Layer. In the New Layer dialog, name the layer “D&B.” In the Mode drop-down menu, choose Soft Light, tick the Fill with Soft-Light-Neutral Color (50% Gray) checkbox, and click OK. Choose the Dodge tool (O) from the Toolbox, and in the Options Bar at the top of the screen, set the Range to Highlights and Exposure to between 5 and 10%. With the Dodge tool, work around the image brightening highlight areas and any other areas you wish to appear closer to the viewer. With the Burn tool (nested under the Dodge tool in the Toolbox), darken the midtone and shadow areas. In the image shown here, I’ve turned off the Background layer so you can better see the areas I dodged and burned.

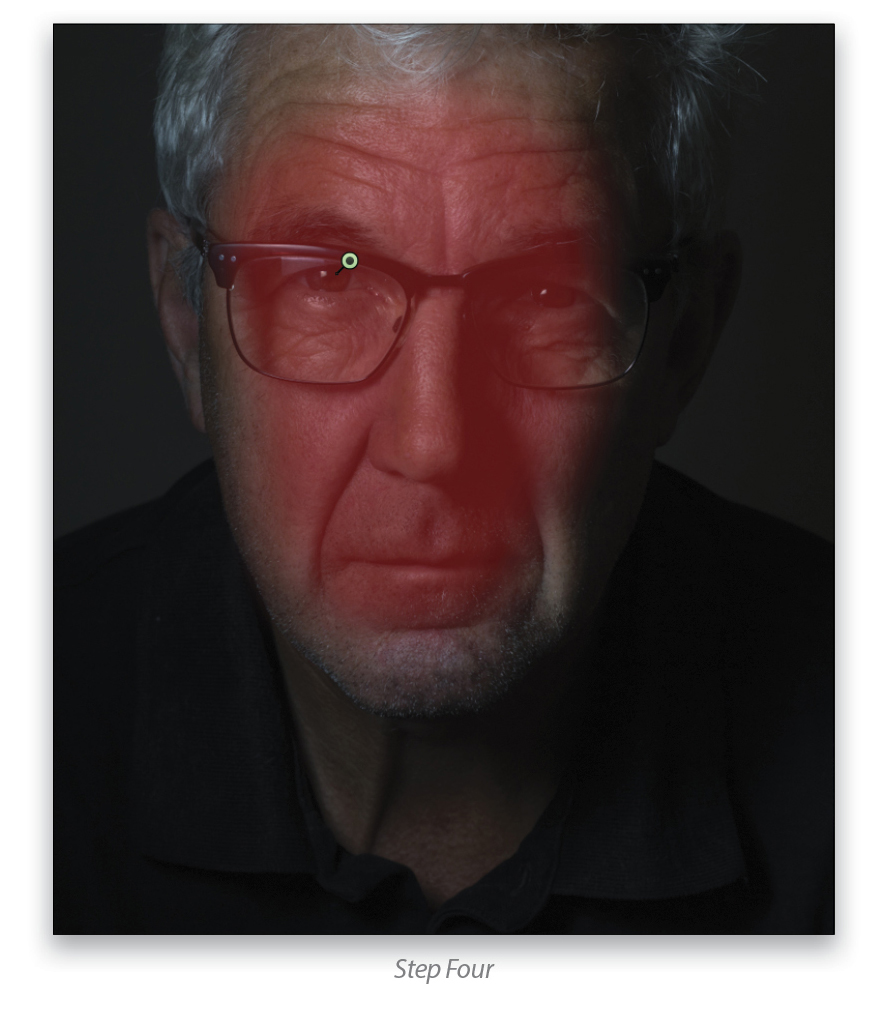
Step Four: Contrast and Sharpening
Add a merged/stamped layer to the top of the layer stack by pressing Shift-Command-Option-E (PC: Shift-Ctrl-Alt-E). Double-click the name of this new layer, and rename it “C&S” for contrast and sharpening. Then, go to Filter>Camera Raw Filter and choose the Adjustment Brush. Click on the plus icon to the right of Clarity to set it to +25 and to reset all the other adjustment sliders to zero. Activate the Mask near the bottom of the panel, then paint over the center part of the face. Turn off the Mask overlay, increase the Sharpness to around +10, and Click OK.
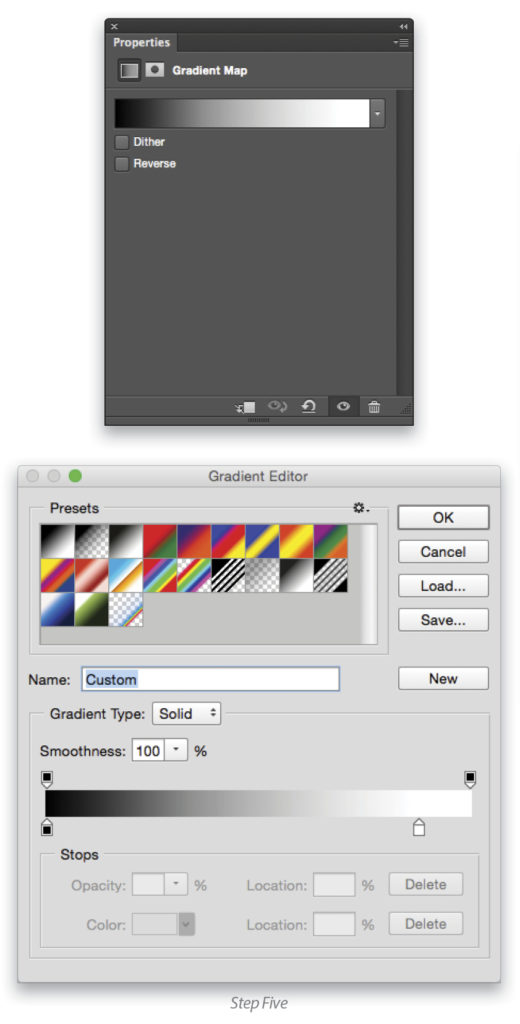
Step Five: Desaturate
Press D to set the Foreground and Background colors to their defaults of black and white, respectively, and then click the Create New Adjustment Layer icon (half-white, half-black circle) at the bottom of the Layers panel to add a Gradient Map adjustment layer. Within the Properties panel, click on the gradient ramp to open the Gradient Editor. Drag the white color stop in toward the center. You’ll see a midtone point appear (small diamond) after you drag the white color stop. Drag that midtone point to the left a small amount until you get the desired black-and-white conversion. Click OK then reduce the Opacity of this adjustment layer to 30% in the Layers panel.
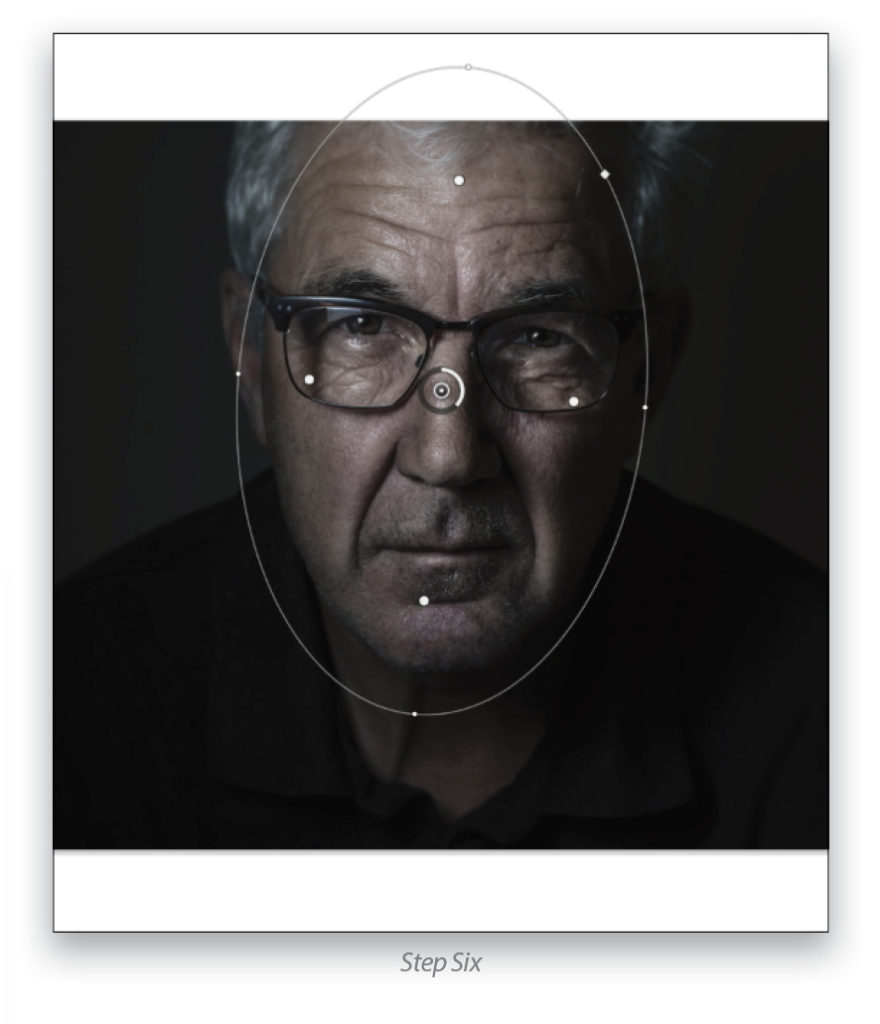
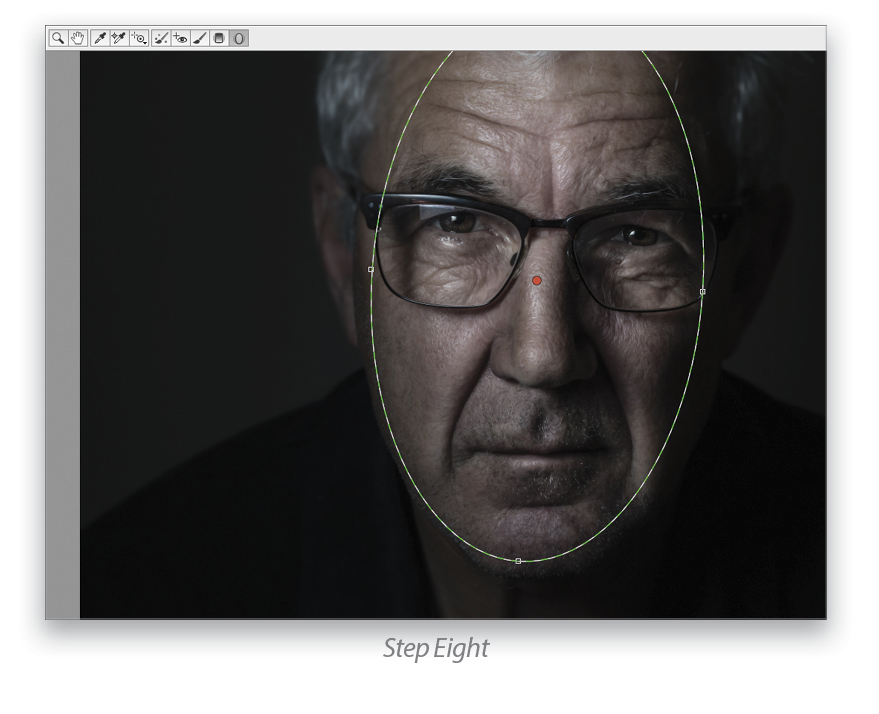
Step Six: Fake Depth of Field
Of course there’s nothing that beats photographing a shallow depth of field in camera, but we can do a pretty good job faking it using blur in Photoshop. To add to this depth and dimension, add another merged/stamped layer to the top of the layer stack and rename it “IRIS BLUR.” Then, go to Filter>Blur Gallery>Iris Blur and position the oval so that it fills the main face area and extends just beyond the chin. Click on the small dots on the outer circle to rotate the oval, and click-and-drag the white line to resize the oval. Adjust the transition points (the four larger dots inside the oval) individually by holding down the Option (PC: Alt) key and clicking-and-dragging them to ensure that none of the areas you want to be in focus have any blur over them. Increase the Blur amount to around 16 px in the Blur Tools panel and click OK in the Options Bar.
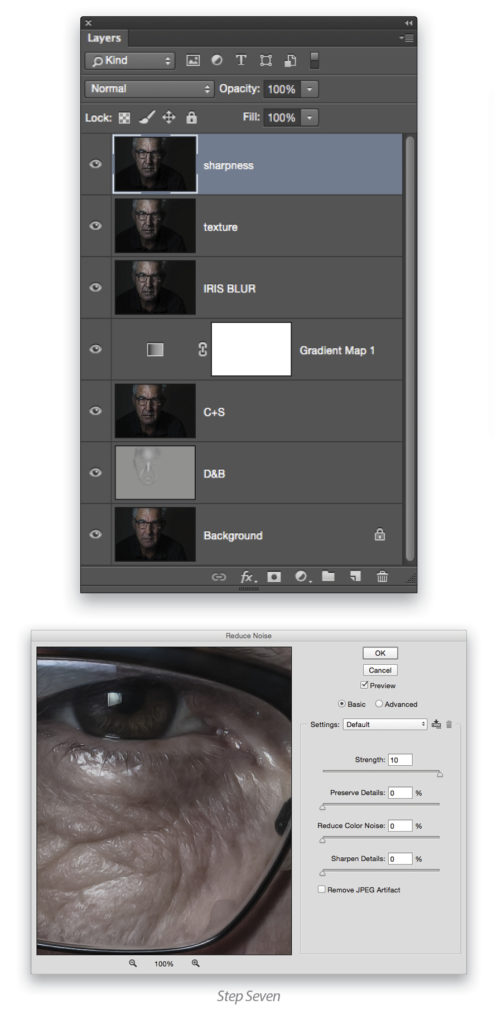
Step Seven: Adding Texture
Now create two copies of the uppermost layer in the layer stack by holding down the Command (PC: Ctrl) key and pressing J twice. Rename the first copy “Texture” and the second copy (the uppermost layer) “Sharpness.” Click on the Eye icon for the Sharpness layer to turn it off, and with the Texture layer active, go to Filter>Noise>Reduce Noise. Increase the Strength to 10, decrease all of the other sliders to 0, and click OK. Then, turn on the Sharpness layer, and with it active, go to Filter>Other>High Pass. Add in a Radius of 1 Pixel, click OK, and change the blend mode of the Sharpness layer to Overlay. Hold down the Shift key and click on the Texture layer to make both the Texture and Sharpness layers active, then go to Layer>New>Group from Layers and click OK. Click on the Add Layer Mask icon (circle in a square) at the bottom of the Layers panel, and with the Brush tool (B) set to a black soft-edged brush, paint over the eyes to remove the texture effect.
Step Eight: Adjusting the Light
Add one final merged/stamped layer to the top of the layer stack and rename it “Lighting.” Then, go to Filter>Camera Raw Filter and choose the Radial Filter (J). Ensure that the Outside option is selected and then draw out an oval in the general position and size that you want it. Click-and-drag inside the oval to position it so that it encircles the main part of the face. Click-and-drag outside of the oval to rotate it slightly and then adjust the Exposure slider to darken areas outside of the Radial Filter. An amount of around –0.15 is enough to make the face the brightest part of the picture, giving it the added appearance of coming toward the viewer. Make sure the other sliders are set to 0 and click OK.
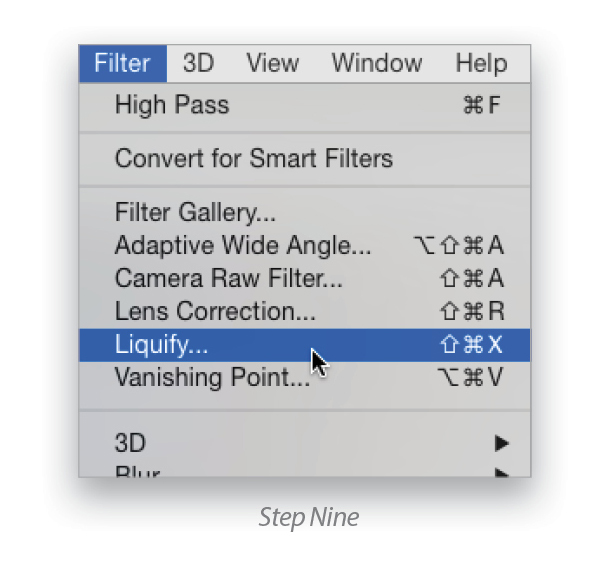
Step Nine: Faking a Smile (Optional)
Photoshop is an incredibly useful tool that enables us to make more of our images and not necessarily by layer upon layer of retouching. From time to time I come across images where I really like the lighting and pose of the model but wish their expression was slightly different. Adding in a slight smile can make a huge difference to the feel of an image and is something I do occasionally. This is incredibly easy with a subtle use of the Liquify filter (Filter>Liquify).
Tip/Technique: Aperture and Shutter Speed
I’ve always been one for trying to get as many different looks as I can when using the same lighting setup. This can often be achieved by a simple control of the shutter speed. When we’re using off-camera flash, it’s the shutter speed that controls how much ambient light is in our picture, and the aperture that controls the power of the light coming from the flash. Therefore, if we slow the shutter speed down (commonly referred to as dragging the shutter), we can increase the amount of ambient light in our pictures without affecting the exposure from the flash. In this example, I wanted more of the background to show through to give greater separation.
If you have any questions or comments please don’t hesitate to drop me a line at glyn@glyndewis.com. To check out more of my work, visit my blog over at www.glyndewis.com which I update up to five times each week with lots of behind-the-scenes information. There’s also my YouTube channel over at www.youtube.com/glyndewis.
This article originally published in the March, 2016 issue of Photoshop User magazine.


Great post! I can’t believe this is as old as 2016… how did this slipped through me unnoticed?! Thanks for bringing it back!