In previous columns, we uncovered the Photoshop magic that is Content-Aware Fill, and it was quite glorious, indeed. We did the very simple version of it, however, and we didn’t really get into what happens when it doesn’t work as well as you’d hoped (or not at all), so that’s what we’re covering today. You’ll only have to use this technique when things go wrong, so hopefully, this won’t be an everyday thing, but when you do need it, it’s important to know how to use this feature because it can make all the difference in the world.
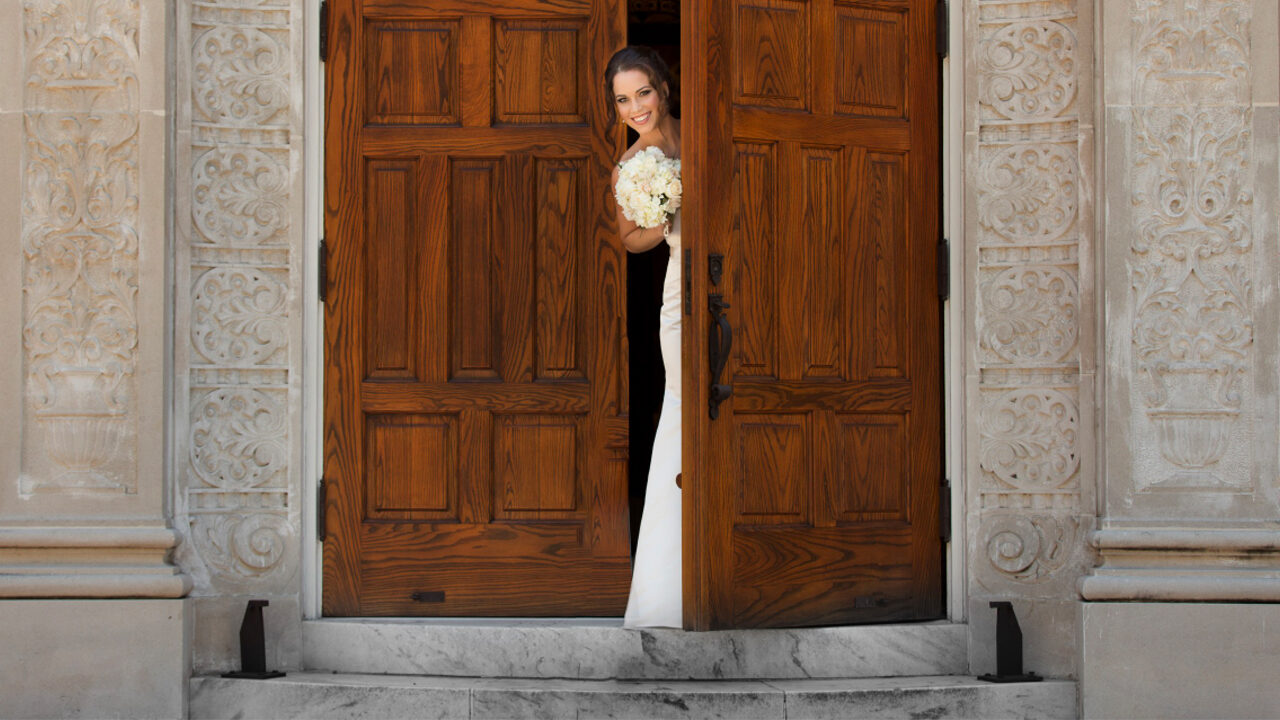
Here’s our original image, and the one thing I wish wasn’t there is that black metal railing right in front of the bride. Unfortunately, it falls in a place where it covers part of her dress, so it might make for a messy cleanup with regular Content-Aware Fill, but we should at least give it a try, right? Let’s try the simple version first. (KelbyOne members can click here to download a low-res version of this file to follow along for practice purposes only.)
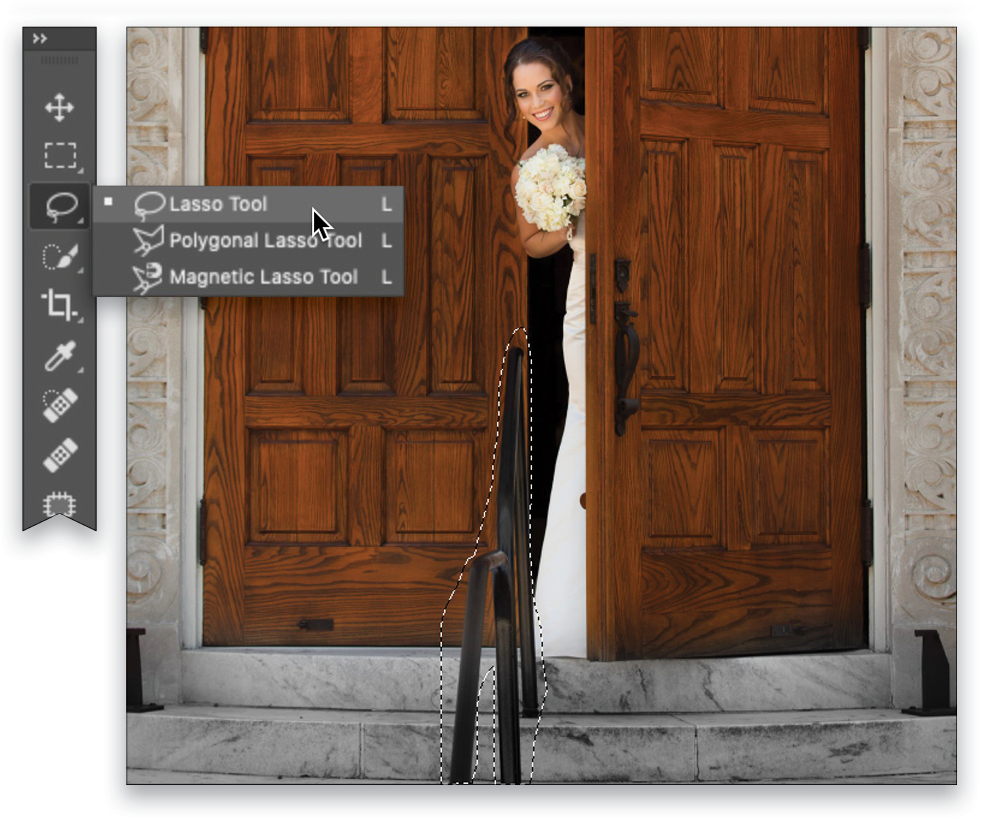
Step One: Get the Lasso tool (the one that lets you draw freeform selections) by pressing the letter L on your keyboard, and draw a selection around that railing in front (as shown here).
Step Two: If this image is on your Background layer in Photoshop, press the Delete (PC: Backspace) key on your keyboard and the Fill dialog pops up. If your image isn’t on the Background layer, go under Photoshop’s Edit menu and choose Fill. It brings up the same Fill dialog either way.
Once the Fill dialog appears, make sure that, up top where it says “Contents,” it’s set to Content-Aware (if it says anything else, choose
Content-Aware from the pop-up menu). Now click the OK button and let’s see how our simple method of
Content-Aware worked out.
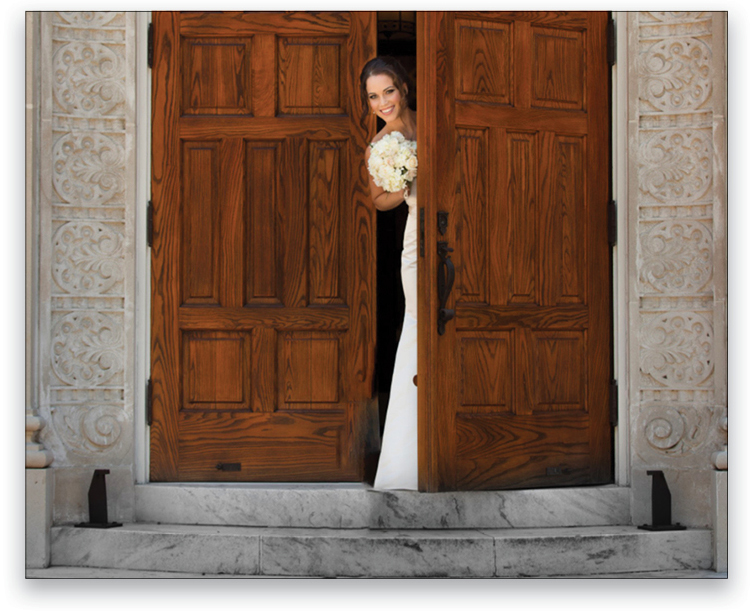
Well, not perfect, but not terrible. The one thing I think it did brilliantly is how it fixed the bottom of her dress. Seriously, that’s amazing. The door on the left, though, is kind of a mess and, in cases like this, we can use the full-featured Content-Aware Fill workspace for those areas. But first, since we like the way it worked on her dress, let’s save that part in case we can use it later. Press Command-A on (PC: Ctrl-A) to select the entire image. Now press Command-C (PC: Ctrl-C) to copy the image how it looks now into memory.
Step Three: Press Command-Z (PC: Ctrl-Z) multiple times to go back through your history steps until the railing is back in the image and it has the selection you created with the Lasso tool. Then, go under the Edit menu and choose Content-Aware Fill (it has its own separate menu command because when you choose this, it brings up an entire Content-Aware Fill editing workspace as shown below).
You’ll see two images onscreen: the left image is your work area where you’re going to influence the areas Content-Aware can use to get rid of that railing. The area in green is showing you the areas Photoshop can use for the repair, and since almost everything is in that green tint, it can pretty much pull from anywhere.
Our job is to start taking away areas that we don’t want Photoshop to sample. For example, when you look at the image on the right (that’s our live preview of what’s happening), you can see the fixed area has a lot of black. It probably sampled some of that from the opening between the doors, so that’s what we’re going to remove in the next step.
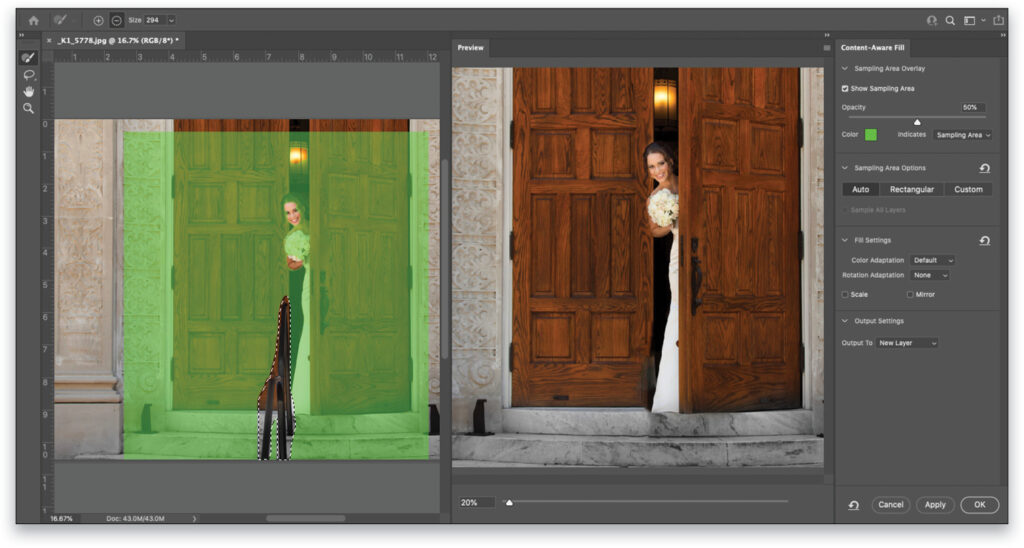
Just a note: The top section of the Content-Aware panel on the right is there to help you control what you’re seeing in your work area. Where it says “Color,” that little color swatch brings up a Color Picker where you could choose a different tint color. So if you were working on, say, a large area of grass, you might not want green for the tint color; you might want red or blue so it’s easier to see. To the right of that, I find it easiest if the Indicates pop-up menu is set to Sampling Area. That way, anything tinted is fair game for Photoshop to use and, of course, our job is to limit what it can use so it only uses areas that make sense.
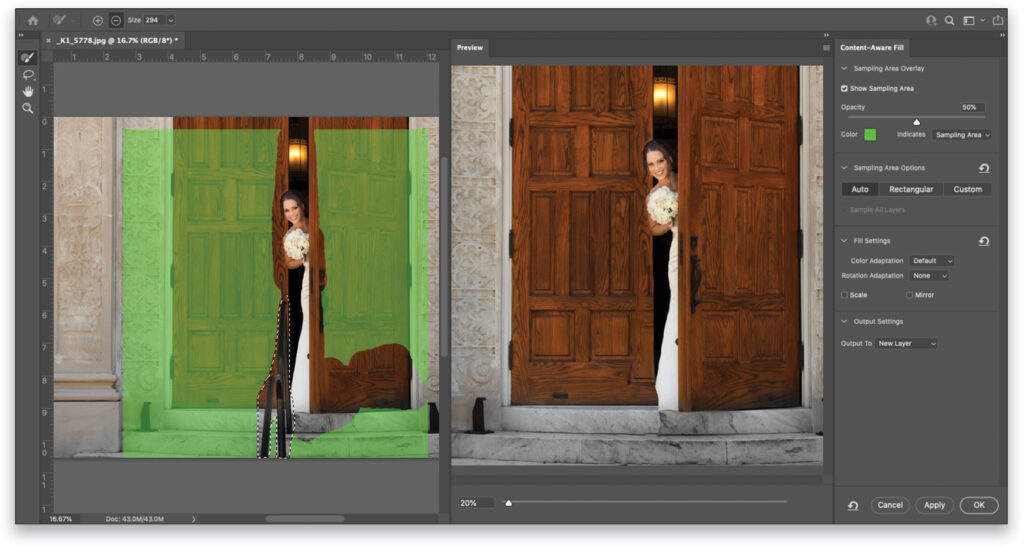
Step Four: At the top of the mini-Toolbar up in the top-left corner of this workspace is the Sampling Brush tool (B), which allows us to “paint away” areas we don’t want Photoshop to use for sampling. In this case, we want to paint over our bride, as well as over the opening between the doors so it no longer uses those areas. What’s nice is, as we paint, we get a live preview over in the window on the right of how what we’re painting away affects the Content-Aware fill fix.
If you paint away an area and it makes the fix look worse, just press Command-Z (PC: Ctrl-Z) to undo that paint stroke. It has multiple undos so don’t sweat it; feel free to try painting away different parts. You can see that painting away the areas between the doors really helped, and now it fills in the left door pretty nicely. It’s not perfect, and we’re not done, but it did a good enough job that with a little Clone Stamp tool work we’ll be set (check out this column back in the April issue of Photoshop User for more on cloning). So we’re not done yet, but we’re closer.
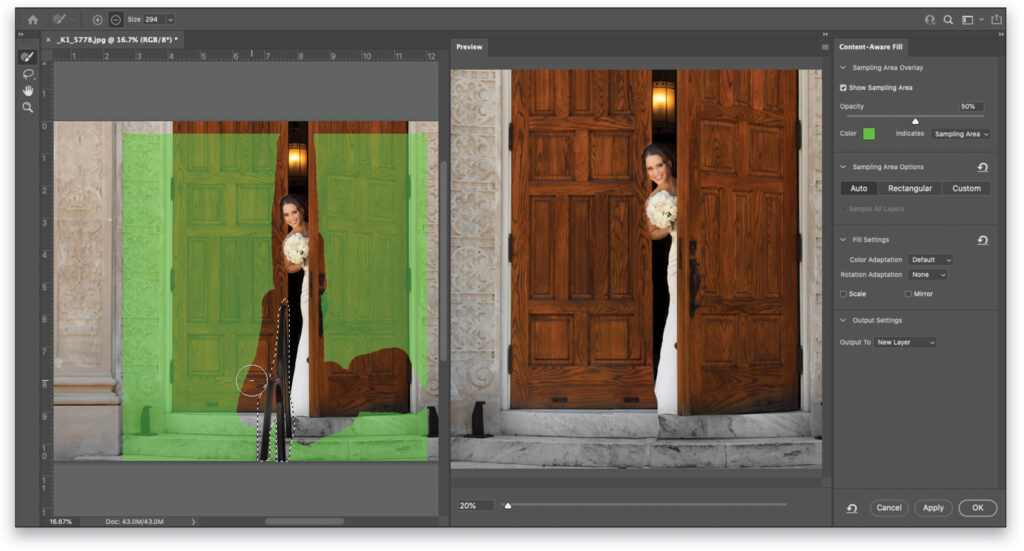
Step Five: Go ahead and just try painting away different parts and see how it affects your image using the live preview. Don’t forget to undo anything that looks funky. Here I’m painting over to the left side of the railing to see if it can do a better job on the bottom of the door, and that’s helping (see previous page). Again, a little cloning work will fix that up, but I want Content-Aware to do as much as possible so
I have less cloning to do. The edge of her dress is still cut off, but luckily, we copied into memory a version where her dress looked great (remember?).
Step Six: In the Output To drop-down menu in the Output Settings at the bottom of the Content-Aware Fill panel, you can select to send your changes to the Current Layer, New Layer, or Duplicate layer. Choosing New Layer will put the Content-Aware fix on its own layer for more editing flexibility, but we’re just going to choose Current Layer for now. Click OK at the bottom-right corner of the Content-Aware Fill panel to apply your edited Content-Aware Fill.
Now we’re going to put that version of our photo that we copied into memory (the one with the good dress) to good use. Press Command-V (PC: Ctrl-V) to paste that copy directly on top of your image.
It appears on its own layer in the Layers panel. Of course, it’s covering the image we just repaired, so we’re going to hide the copied image completely from view, and then we’re going to paint in just the corner of her dress. Here’s how: Go to the bottom of the Layers panel, hold the Option (PC: Alt) key, and then click the third icon from the left (it looks like a rectangle with a circle in the center). That’s the Add Layer Mask icon. This will hide your layer (the one with the dress that looks good) behind a black mask so it won’t be visible any longer.
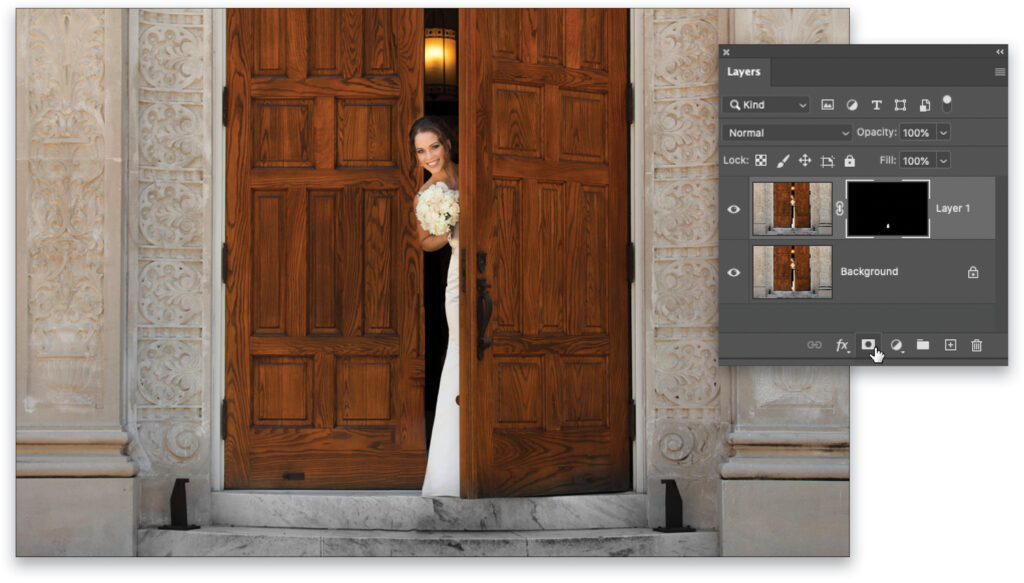
Next, get the Brush tool (B) from the Toolbar, press D to set the Foreground color to white, and carefully paint over that area where the dress was missing, and it reveals just that part of the hidden top layer. If you paint back too much of the copied layer, press X to set your Foreground color to black, and paint away those areas. The image below shows where we painted in the edge of the dress. Again, it still needs a tiny bit of cloning, but you’re pretty much there.
Of course, there are more features in the Content-Aware Fill workspace than what we’ve shown you here, but since this column is for folks who are new to Photoshop, we’ll leave it for another time, but at least you now have a game plan when the regular Content-Aware Fill doesn’t work out the way you’d hoped.
This article originally published in the July, 2021 issue of Photoshop User magazine.
About Photoshop User and KelbyOne
Photoshop User magazine comes out digitally 12 times a year and is part of KelbyOne, the leading educational resource for Photoshop, Lightroom, and photography. Pro members have access to more than 900 video courses and 100 back issues of Photoshop User. To learn more about KelbyOne, click here.