Creating composite images wasn’t something I ever set out to do when I first became a photographer, but was something I gravitated toward more out of necessity. There were many occasions when I’d have a shoot that involved considerable planning, including location scouting, obtaining permits, travel arrangements and more; however, one thing you can’t plan for is unpredictable weather. Needless to say the shoot would have to be rescheduled. Whether you’re shooting for a personal project or a client, there are only so many times you can postpone to another day; hence, my welcome to the world of compositing.
In this article I want to give you some insight into what is, without question, the most important part of compositing—the photography. Whether your goal is to create a realistic or maybe even a surrealistic picture, having the right starting image with the correct perspective and lighting is vital to a successful composite. The best possible starting image will make the creation of your composites much easier, freeing you up so your time in Photoshop can be creative as opposed to corrective.
Perspective
Let’s kick things off by discussing perspective, which is something I get asked about a lot. People want to know how to get the angle of the subject and the angle of the background to match.
When you’re taking the photographs yourself, as opposed to using stock images, it’s actually easy to do, and getting it right at the time of the photo shoot can save heaps of time in Photoshop. To get the perspective pretty much spot on, when I shoot a full-length photograph of a model in the studio or on location, I’m generally low to the ground and using my go-to lens, a 70–200mm. Because this is the position I use when photographing a full-length shot, I know that when I’m out and about and see what I think would make a great background, I adopt the same position using the same lens with roughly the same focal length.
In this example, I photographed the door and floor from the crouched position and in the studio photographed the model from exactly the same angle. Doing this ensured that both the perspective of the background and the model match up, as can be seen from the feet and the floor, and no alterations were needed later in Photoshop.
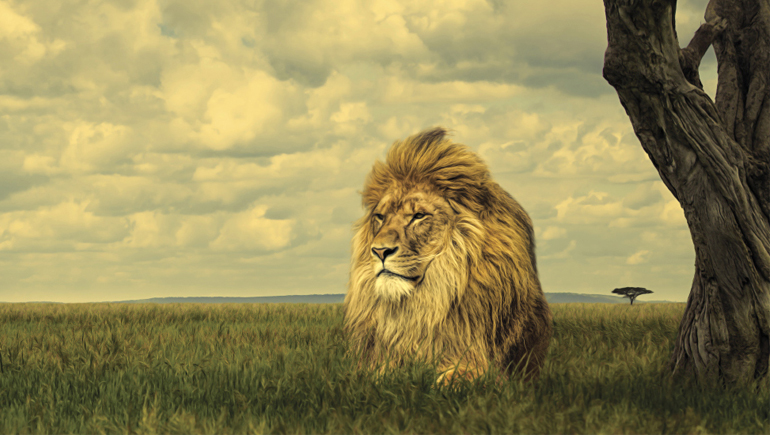
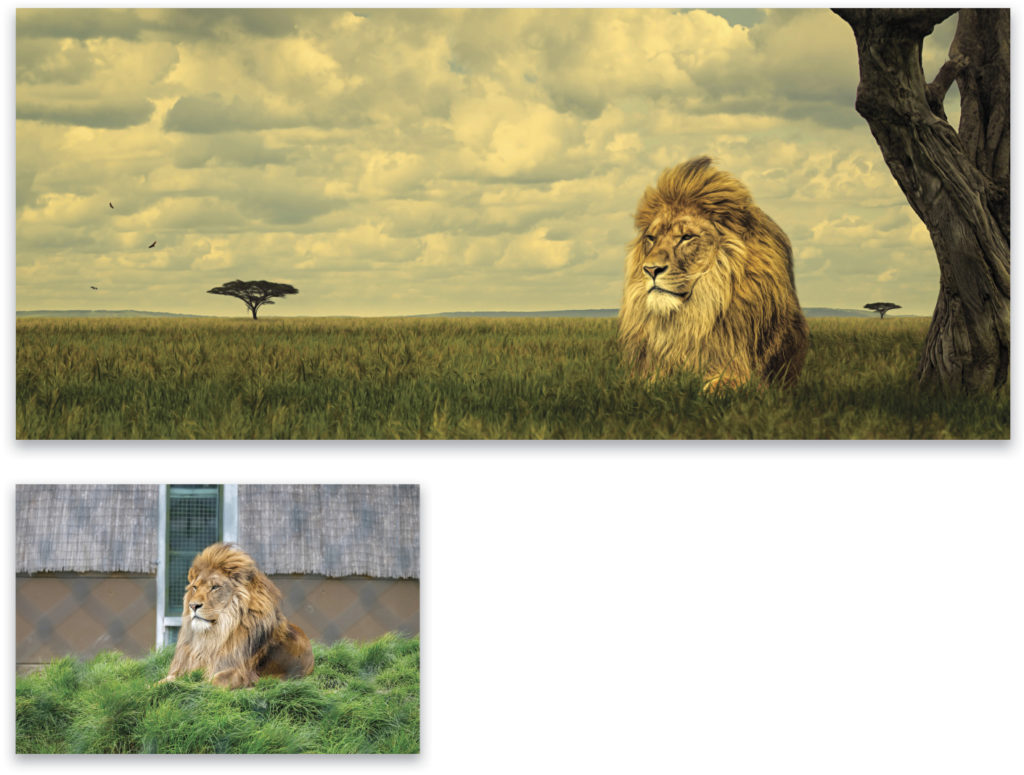
If the angle you photograph the subject is beyond your control (e.g., when photographing animals from inside a car at a wildlife park), then when you photograph the background elements, simply remember to photograph them from roughly the same height.
![]()
Three-Quarter-Length Composites
The same rules above apply when creating composite images when you’re using a photograph of a model from the top of the legs and above. For these images, I’ll photograph the model from a standing position, lowering myself so that my camera is roughly in line with the model’s chest area. When photographing a suitable background, I shoot from the exact same position. I guess you could argue that it’s not so important for these kinds of pictures, but I think we should always aim to get it right in camera first. Even though the difference might be slight, later on in the retouching, it’s the small things that make the big difference.
What Should You Photograph First?
A question I get asked a lot (and for good reason) is, “What should you photograph first? The background or the subject?” I’d love to give you a definitive answer here but in truth, the only one I can give is that it depends. Let me explain.
If I were to create a composite where the subject was going to be photographed in the studio and then added into an outdoor scene, I would photograph the outdoor scene first. The reason for this is simply because I would know what lighting I would need to use in the studio when photographing the subject, so that the shadows and highlights cast on them would match. On the other hand, if I photographed the subject first, I would have to wait for the perfect conditions outdoors when the lighting would look right. Does that make sense?
Sometimes I work on pictures where I have to photograph the subject first, as is the case with my ongoing animal composite series. For these pictures I have to photograph the animals first; otherwise, I don’t know what I’ll have to work with, as I have absolutely no control over them. Obviously, I can’t give them any direction or get them to stand in any particular way, so these pictures are what I call reactive. By this I mean that there are only certain days when I’m able to photograph the animals, so if on those days there’s hard sunlight or cloudy skies, then I know what lighting conditions I need for my background elements. This is pretty much the opposite of when I know I’m going to be photographing the subject in the studio.
Lighting
As I’ve already mentioned, when it comes to lighting, if you’re creating a composite that shows a subject in an outdoor scene and you have already photographed the background, then you simply need to reproduce that lighting in the studio for your subject.
Tip: On the subject of photographing backgrounds, whenever I do this I always take a tripod with me. I’ll take a number of pictures of the background and when I’m done, I’ll set my camera on the tripod and, using the self-timer, take some pictures of myself in the scene. These are incredibly helpful as reference pictures for me in the studio as they show how the highlights and shadows need to be on the subject.
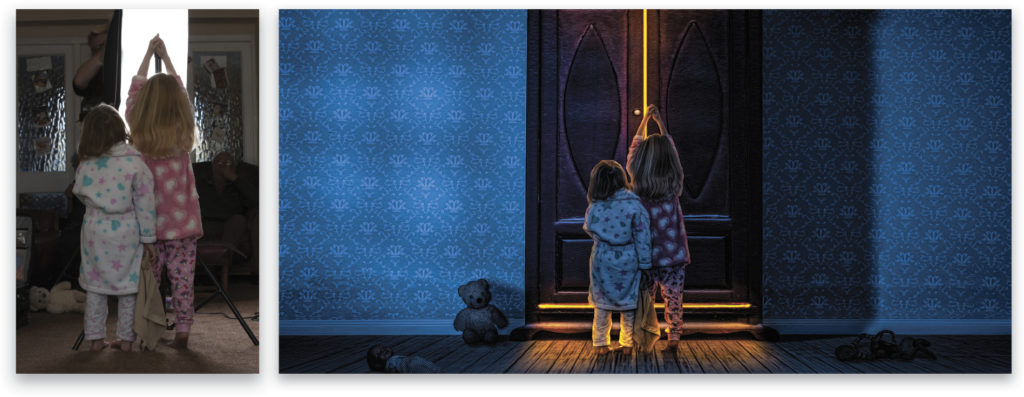
Knowing what you want your final picture to look like is the biggest help of all. When you’re photographing your subjects and using artificial lighting (studio lighting or strobes), you simply set them up to replicate the light that they represent. For example, in the picture of the children opening the door to the wardrobe on the previous page, they were photographed in front of a strip box to add the highlights on them, similar to what a bright light coming from the wardrobe would give. (Note: A light stand was used for the children to interact with, as if they were reaching up to the wardrobe door handle.)
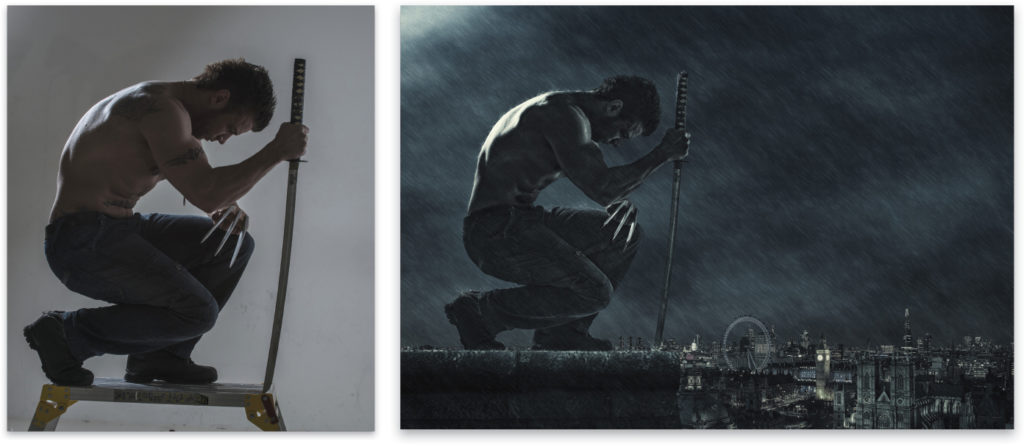
In the superhero photo, one light was positioned behind the model to replicate the moonlight shining on his back, and one light was positioned in front of him aiming upwards to replicate the ambient light coming from the streets below.
Depth of Field
One final thing I do for added realism in composites is to give backgrounds their true depth of field. To do this, focus on someone in the scene where you’ll add your subject. When you have the focus locked, have the subject move out of the scene, and then photograph the background. If there’s no one available to stand in, focus on an area of the ground at roughly the same distance and space as your subject will be, lock the focus, recompose, and take the shot.
Having the best possible starting image with the correct perspective and lighting is incredibly important when creating composites. It will save you time, save you from having to make unnecessary edits during the retouching, and will ultimately lead to much more believable and successful composite pictures. ■
This article originally published in the April, 2015 issue of Photoshop User magazine.


