
The ability to create attention-grabbing text or graphics is both practical and fun, whether you’re a commercial graphic designer or a weekend dabbler. In this column, you’ll learn how to use multiple layer styles to add a neon effect that you can easily apply to text, shapes, or drawn objects. Read on!
Step One: As you learned in my article in the November issue of Photoshop User when to use Photoshop vs. Lightroom, special effects are a job forPhotoshop, not Lightroom. So fire up Photoshop and open the image you want to use as a background for the neon goodies you’re about to make, e.g., a photo of a brick wall. If you’re starting in Lightroom, select the image thumbnail in the Library module and choose Photo>Edit In>Edit In Adobe Photoshop 2021.
The photo we’re using here is 1000×749 pixels, which is the size of the Adobe Stock preview image so you can easily follow along. If you’d like to download the low-res watermarked version of this image to follow along, click this link, log in with your Adobe ID, and click the Save to Library button. Double-click the image in the Libraries panel (Window>Libraries) to open it in Photoshop. This image is in Grayscale Mode but we need it in RGB, so go to Image>Mode>RGB Color.
Tip: If you aren’t starting with a photo background, choose File>New in Photoshop and enter the size document you want. If you’re planning to print the end result, use at least 300 ppi (pixels per inch), so the pixels will be nice and small once printed.
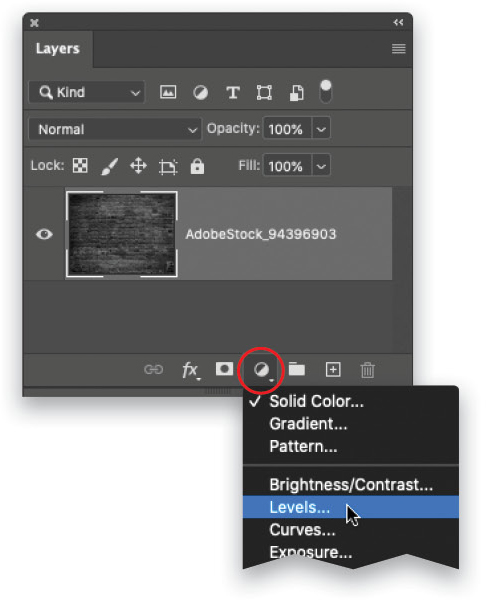
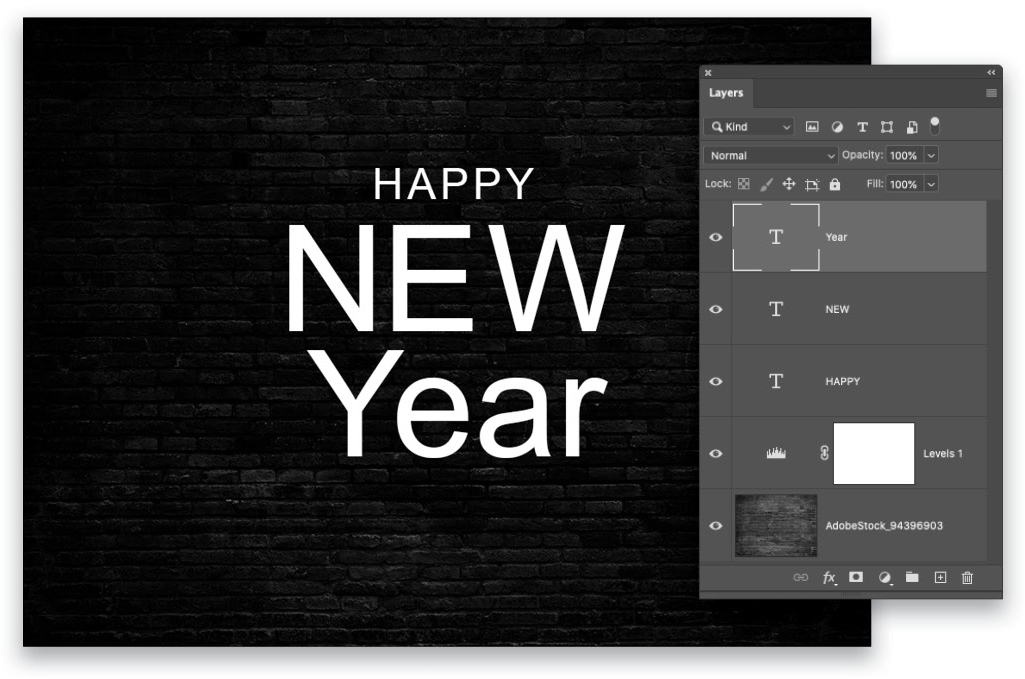
If necessary, darken the brick wall. To do that, click the half-black/half-white circle at the bottom of the Layers panel (circled) and choose Levels.
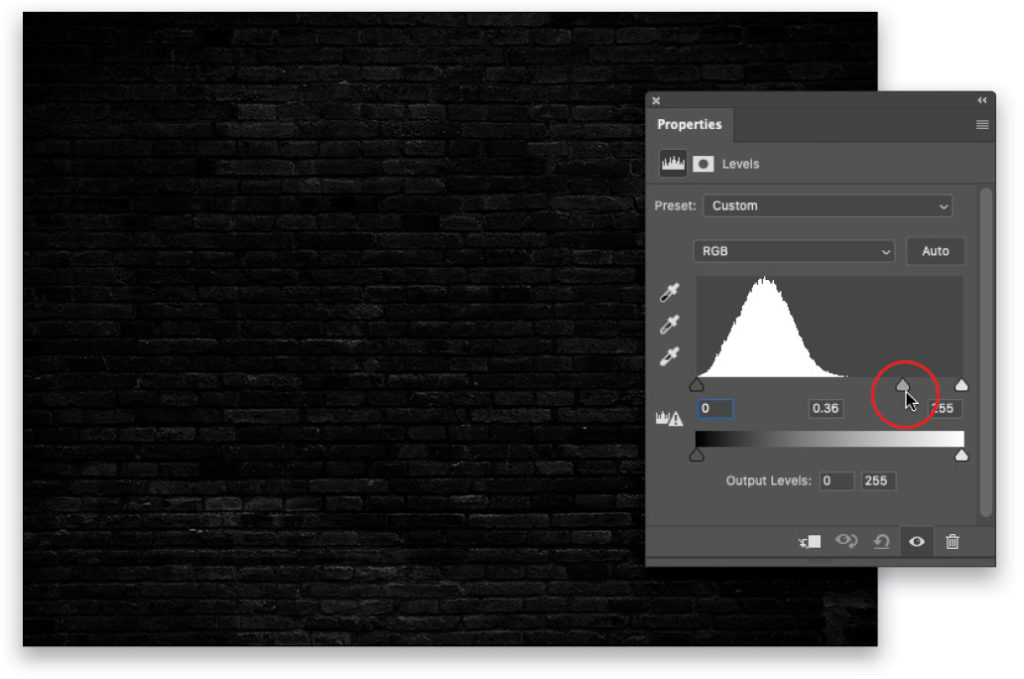
Step Two: In the Properties panel that opens, drag the midpoint slider (circled) rightward to approximately 0.36.
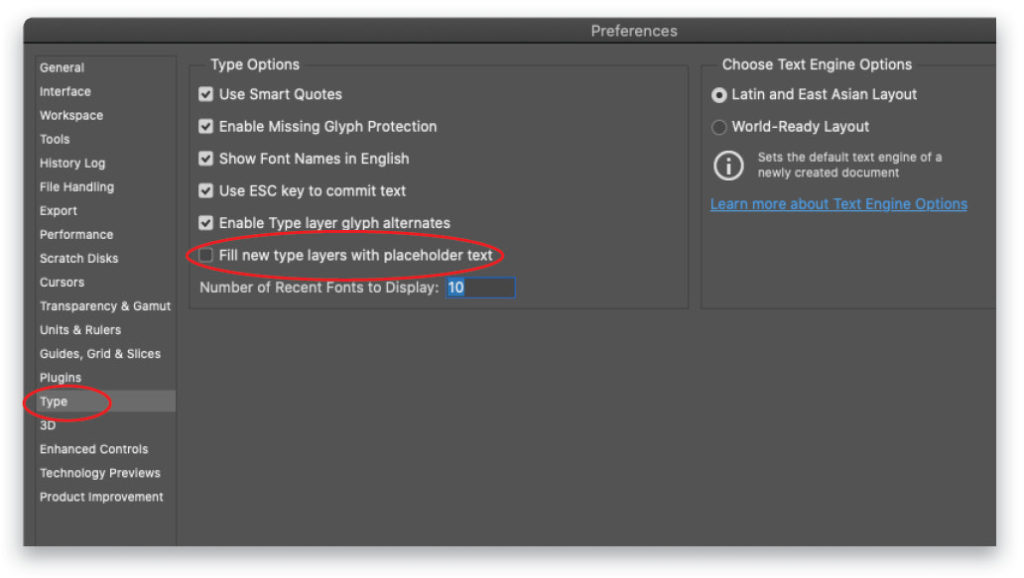
Step Three: This is optional, but you may find it useful to turn off the automatic placeholder text Photoshop adds with each type layer. To do that, choose Photoshop (PC: Edit)>Preferences>Type, turn off Fill New Type Layers with Placeholder Text, and click OK.
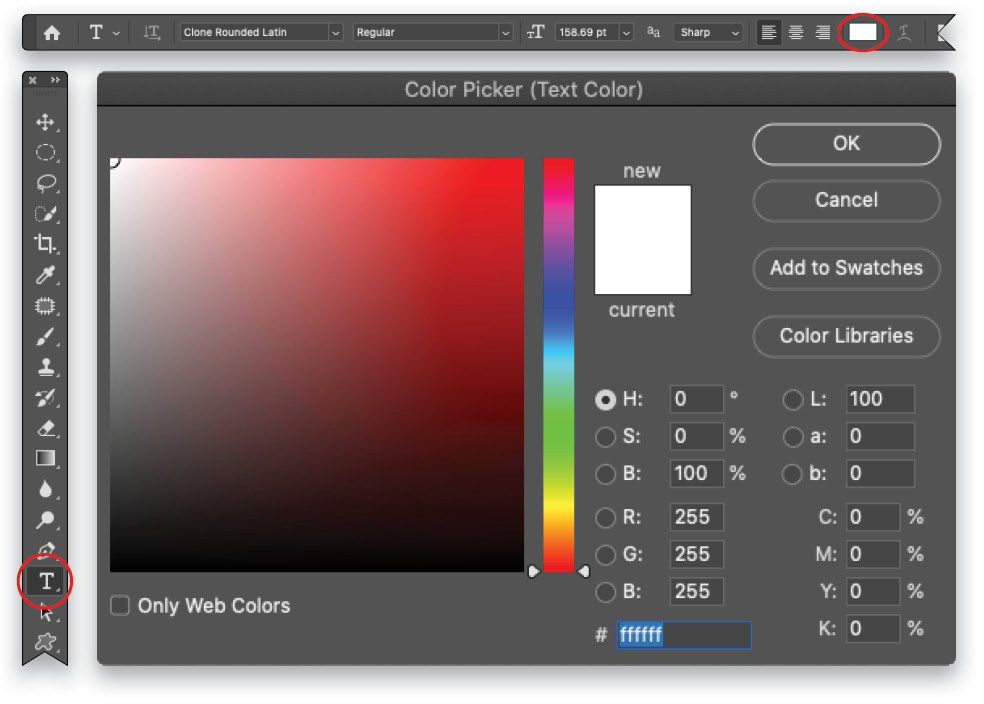
Step Four: Press T to grab the Horizontal Type tool (circled) in the Toolbar, and in the Options Bar, click the color swatch (also circled). In the Color Picker that opens, choose white (simply enter FFFFFF into the # field) because it’s easy to colorize using layer styles later on. Click OK to close the Color Picker.
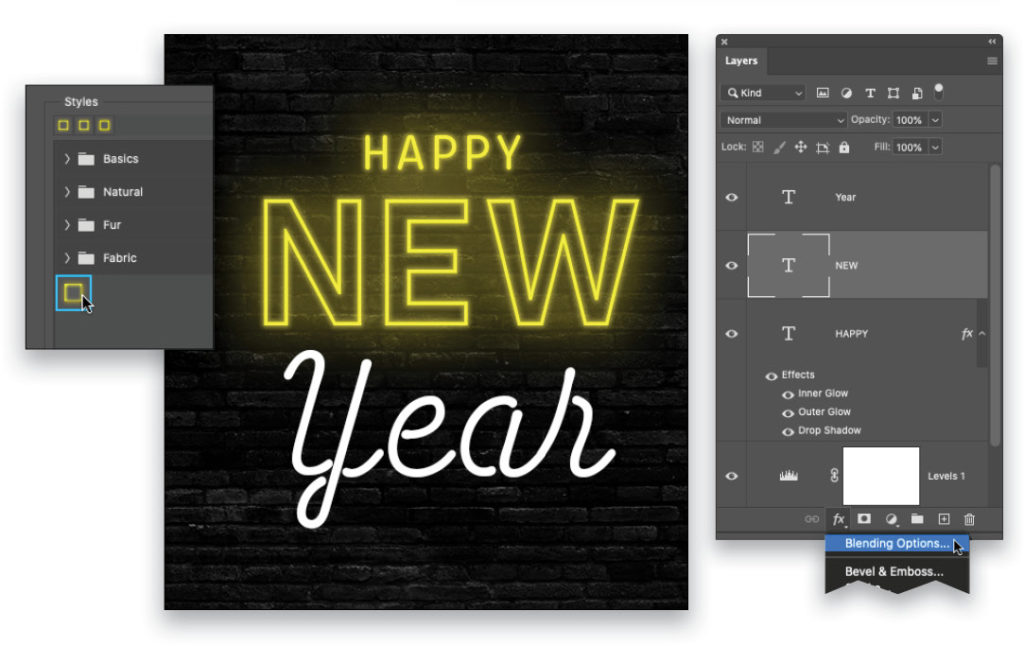
Step Five: Click within your document and enter the word “HAPPY” in all caps. For maximum flexibility in positioning and rotating each word, let’s put each word on its own layer. To do that, Shift-click beneath the first word to force Photoshop to create another type layer and enter “NEW,” also in all caps. Shift-click beneath that word and enter “Year.”
To experiment with font size, double-click the word to highlight it and use the Size field in the Options Bar. To reposition the word, press V to grab the Move tool and then drag the word into place. Don’t worry too much about size and placement as you can always change it later on. We’ll select the fonts we want to use in the next step.
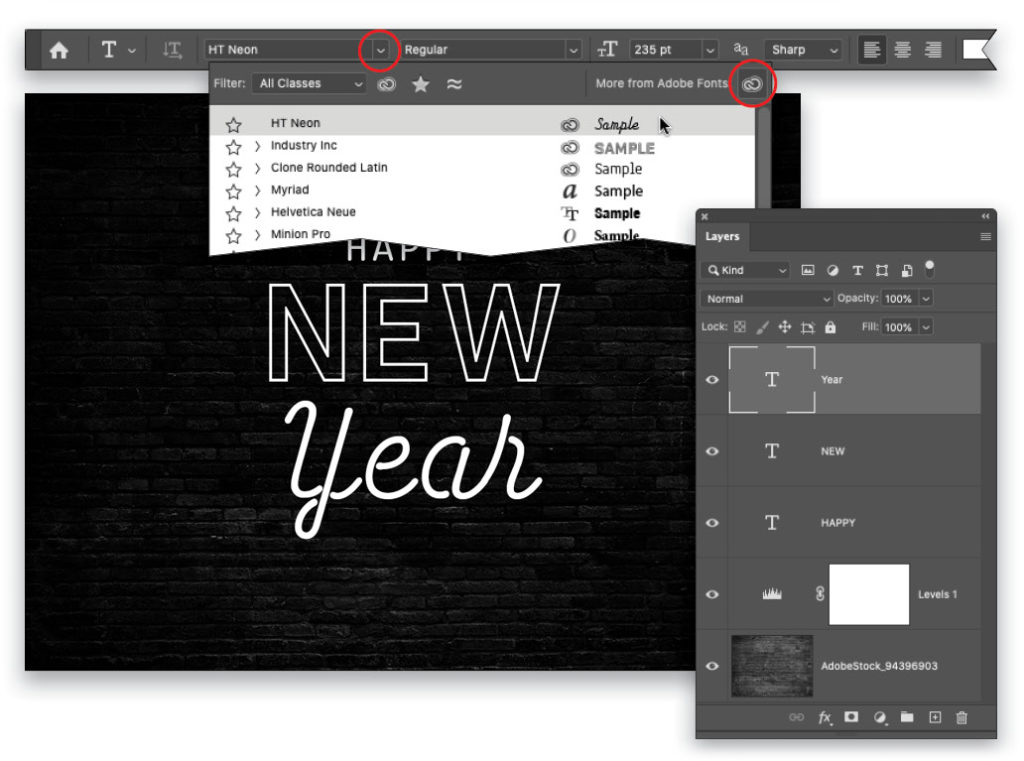
Step Six: To change fonts, activate the type layer you want to change in the Layers panel—don’t highlight
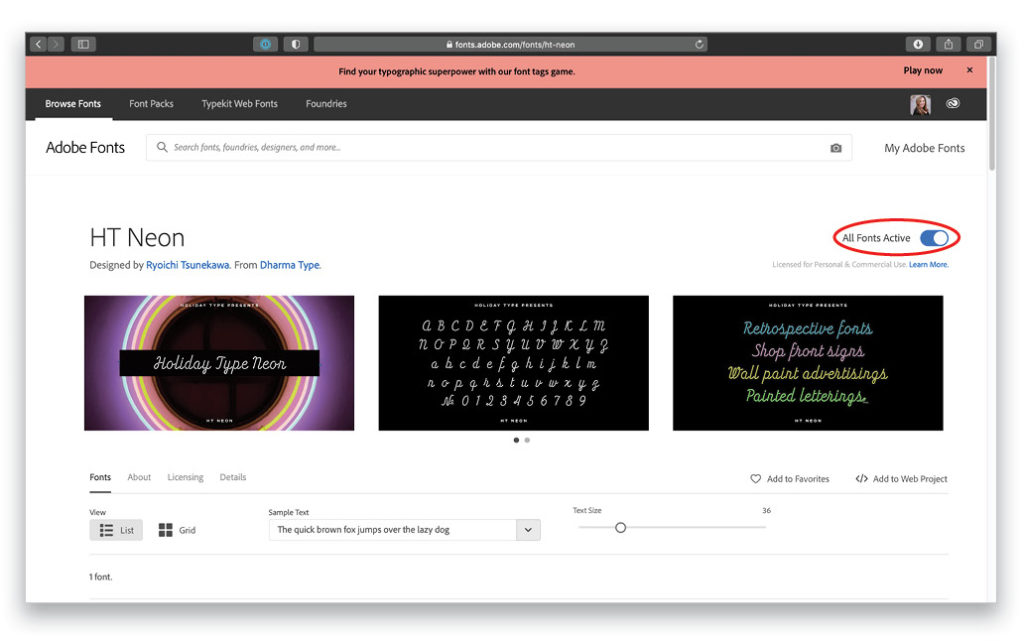
the word—and then with the Type tool active, click the Fonts menu in the Options Bar (circled). As you point your cursor at the fonts in the menu, the text in your document changes in real time. You can also download fonts by clicking the Creative Cloud icon at the upper right of the fonts list (also circled), which opens the Adobe Fonts website (free with a Creative Cloud subscription).
Use the Search field to find keywords like rounded, outlined, or neon. When you find a font you like, turn on the Activate Font switch (circled) and the font immediately appears in Photoshop’s font menu. In this example, the Adobe Fonts named Clone Rounded Latin Regular (at 68 pt), Industry Inc Outline (at 224 pt), and HT Neon (at 235 pt) were used for Happy, New, and Year, respectively.
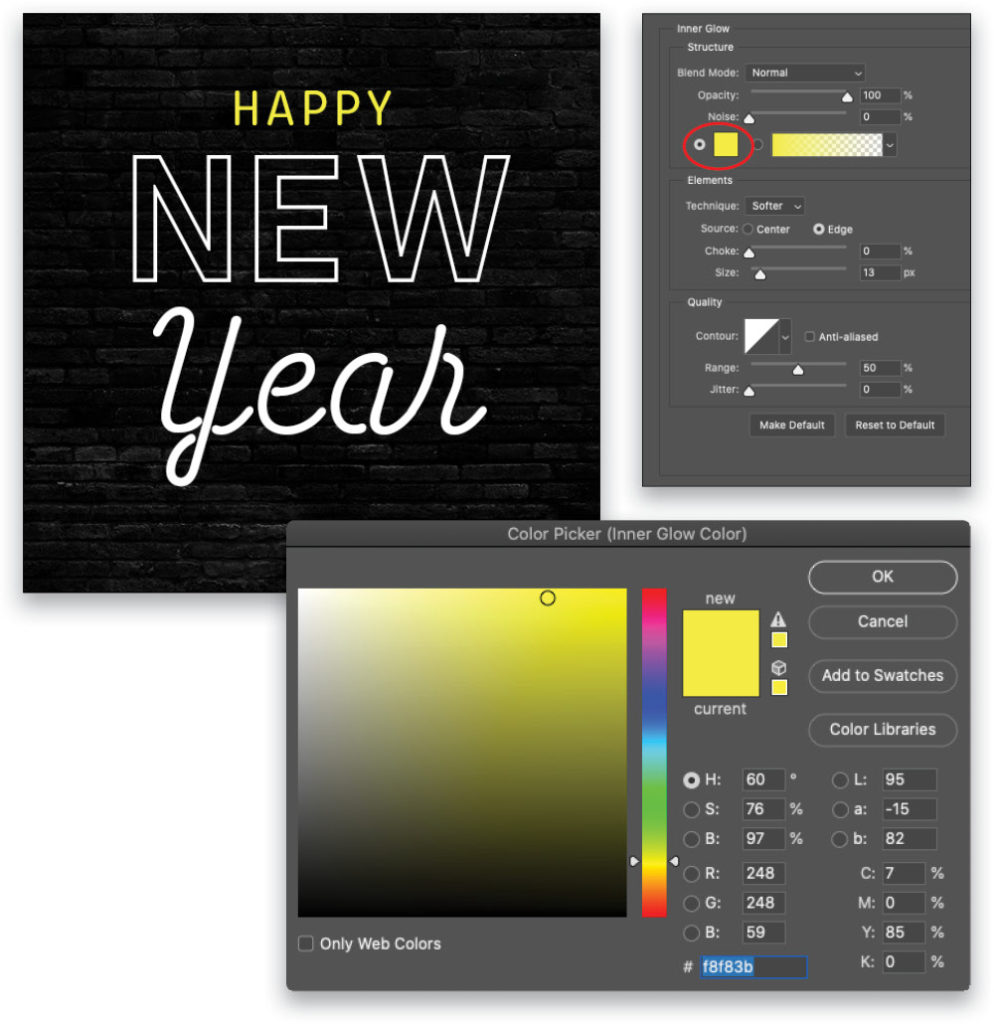
Step Seven: In your Layers panel, activate the layer named Happy, click the ƒx icon at the bottom of the Layers panel (circled), and choose Inner Glow.
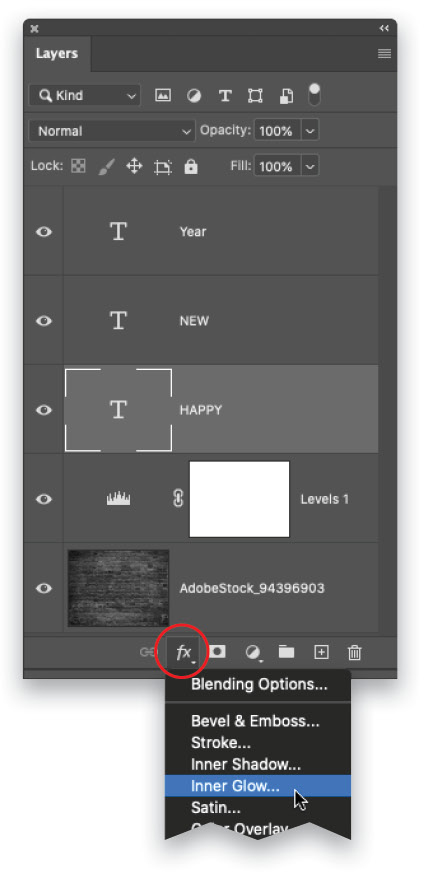
Step Eight: In the Layer Style dialog that opens, set the Blend Mode menu to Normal and Opacity to 100%. Click the color swatch (circled) and in the Color Picker that opens, choose a light, yet bright yellow (say #f8f83b), and click OK. Back in the Layer Style dialog, set the Technique to Softer and Source to Edge. Set Choke to 0% and Size to 13 px. Leave the Layer Style dialog open for the next step.
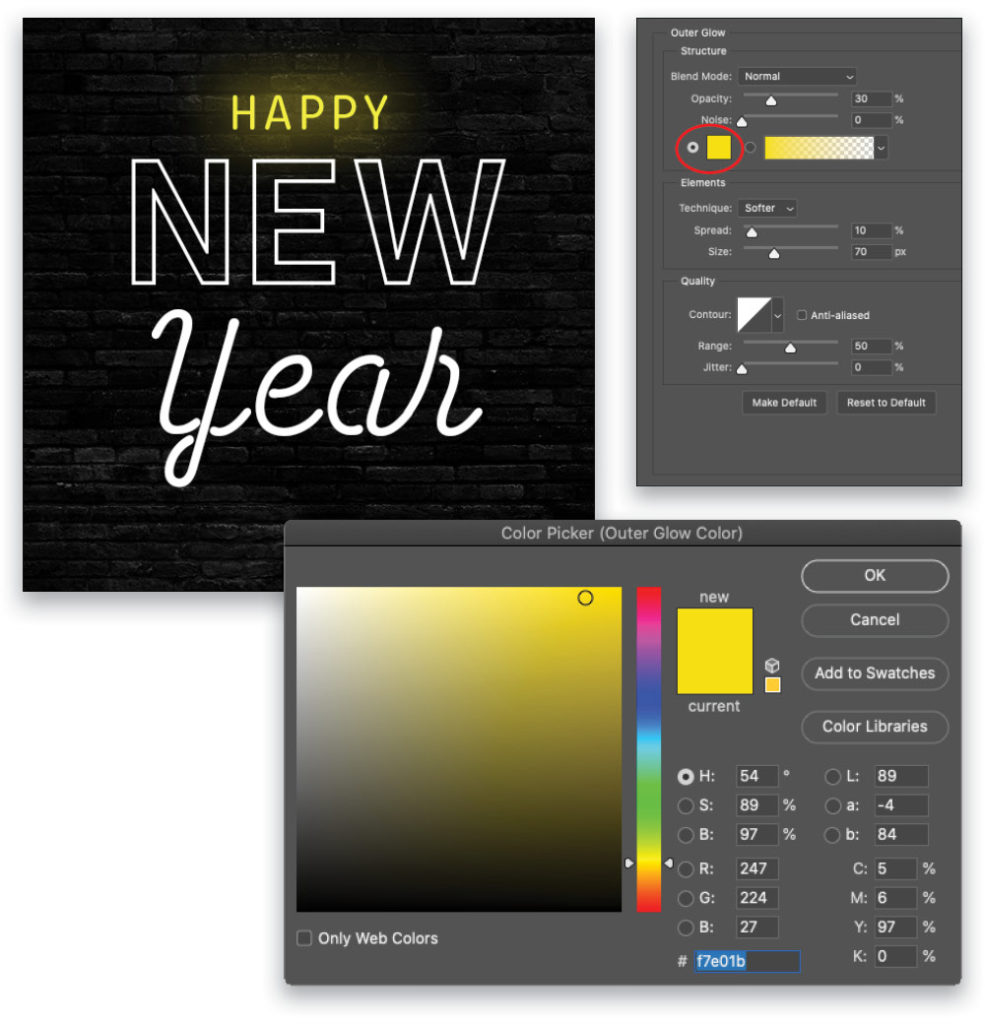
Step Nine: Back in the Layer Style dialog, click Outer Glow in the list on the left. Set the Blend Mode menu to Normal and Opacity to 30%. Click the color swatch and in the Color Picker, choose a brighter yellow (#f7e01b). Click OK to close the Color Picker. In the Layer Style dialog, set the Technique to Softer, Spread to 10%, and Size to 70 px. Don’t close the Layer Style dialog just yet.
Tip: When adding layer styles, it’s important to click the name of the style in the list on the left. If you only click the checkbox, the options in the middle of the dialog don’t change.
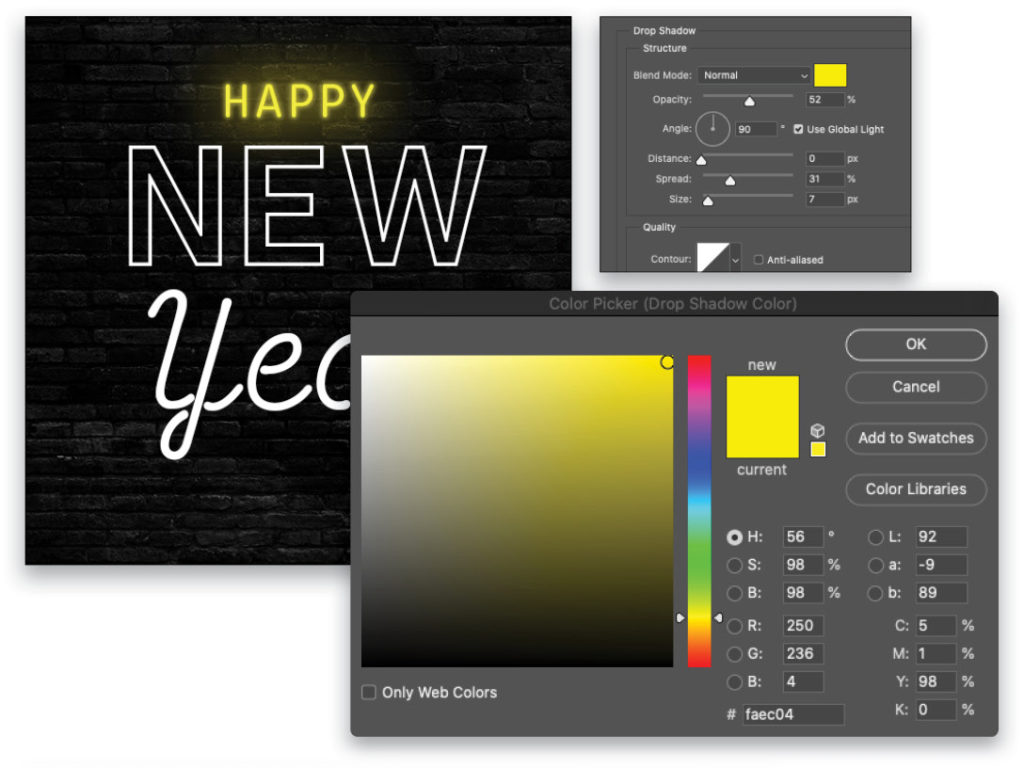
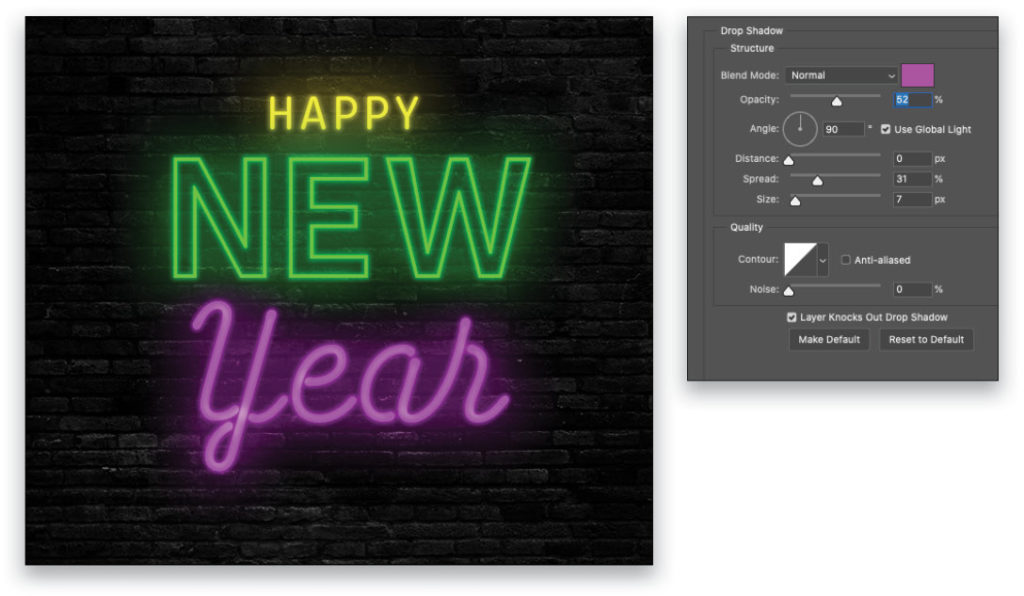
Step 10: In the Layer Style dialog, click Drop Shadow in the list on the left. Set the Blend Mode menu to Normal and Opacity to 52%. Click the color swatch and in the Color Picker that opens, choose an even brighter yellow (#faec04). Click OK to close the Color Picker. In the Layer Style dialog, set the Distance to 0 px (so the drop shadow looks like another inner glow), Spread to 31%, and Size to 7 px. Leave the Layer Style dialog open.
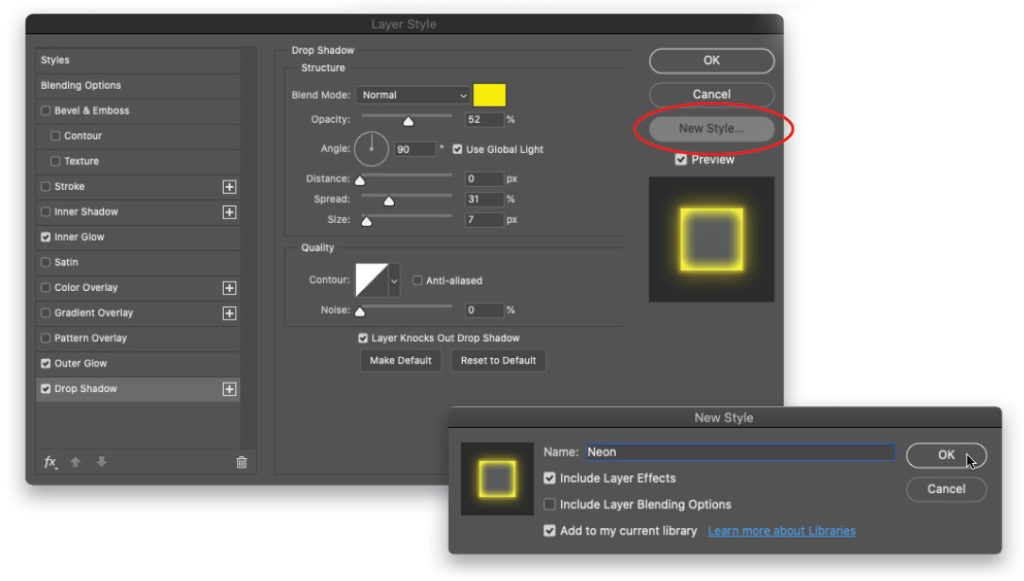
Step 11: We’ll save this effect as a new style so you can apply it to other layers. In the Layer Style dialog, click the New Style button (circled). In the dialog that opens, enter “Neon” for the name, and click OK. Click OK again to close the Layer Style dialog.
Step 12: Activate the “NEW” type layer in your Layers panel, click the ƒx icon at the bottom of the Layers panel, and choose Blending Options. In the resulting Layer Style dialog, click Styles at the top of the list on the left, and then click the new style you just made (it should be at the bottom of the list). Leave the Layer Style dialog open.
Step 13: Now change the color swatches used in the effect so the word “NEW” is green. To do that, click Inner Glow in the list on the left of the Layer Style dialog. Click the color swatch, and in the Color Picker, drag the sliders on the vertical bar to the green range; there’s no need to change anything else. Click OK to close the Color Picker.

Step 14: Repeat the previous step for Outer Glow and Drop Shadow. When you’re finished, click OK to close the Layer Style dialog.

Step 15: Repeat steps 12–14 for the “Year” type layer, though this time drag the sliders on the vertical bar in the Color Picker to the pink range.
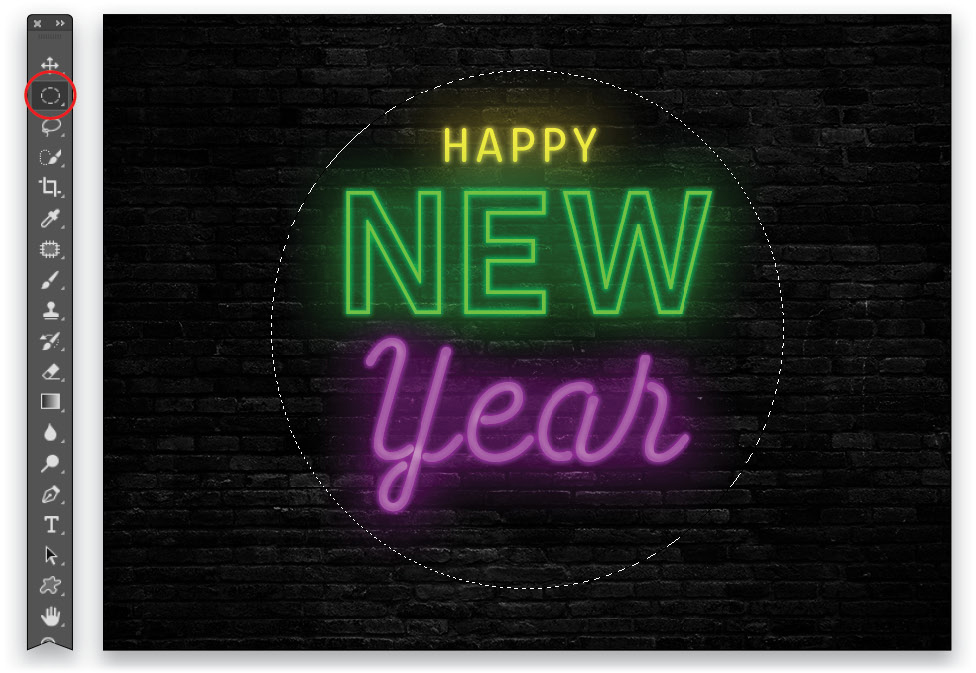
Step 16: Now, let’s brighten the wall behind the neon a little. Grab the Elliptical Marquee tool (circled). You’ll find it nested below the Rectangular Marquee tool (M) in the Toolbar. Hold the Shift key, and click-and-drag to draw a perfect circular selection around the neon text. Tip: While drawing the ellipse, press-and-hold the Spacebar to reposition it.
Step 17: At the bottom of the Layers panel, click the half-black/half-white circle and choose Solid Color. In the Color Picker that opens, choose a really light version of the main color in the image, which is green (#b2f3b0). Click OK.
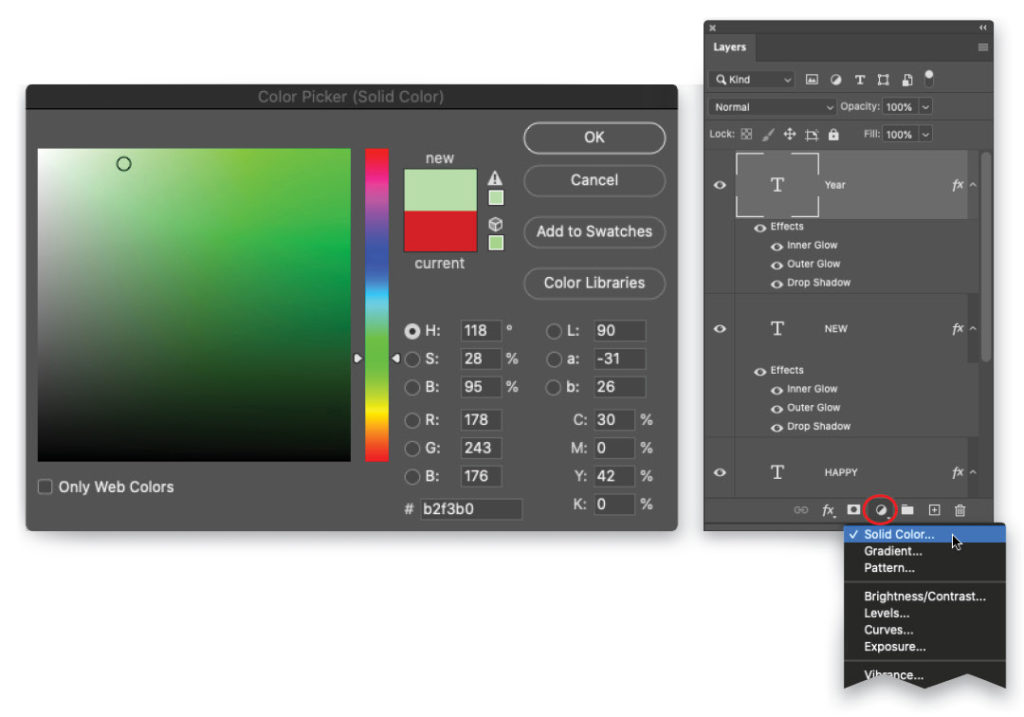
Step 18: In the Layers panel, drag the Solid Color Fill layer beneath the first type layer and double-click its mask thumbnail (circled). In the Properties panel that opens, drag the Feather slider (also circled) rightward to around 50.
Note: If this is the first time you’ve ever double-clicked on a layer mask thumbnail, Photoshop will ask if you want that behavior to View Properties or Enter Select and Mask. The choice is yours, of course, and you can always change that behavior in Photoshop (PC: Edit)>Preferences>Tools. If you have it set to open Select and Mask, just click on the layer mask thumbnail in the Layers panel and then manually open the Properties panel (Window>Properties).
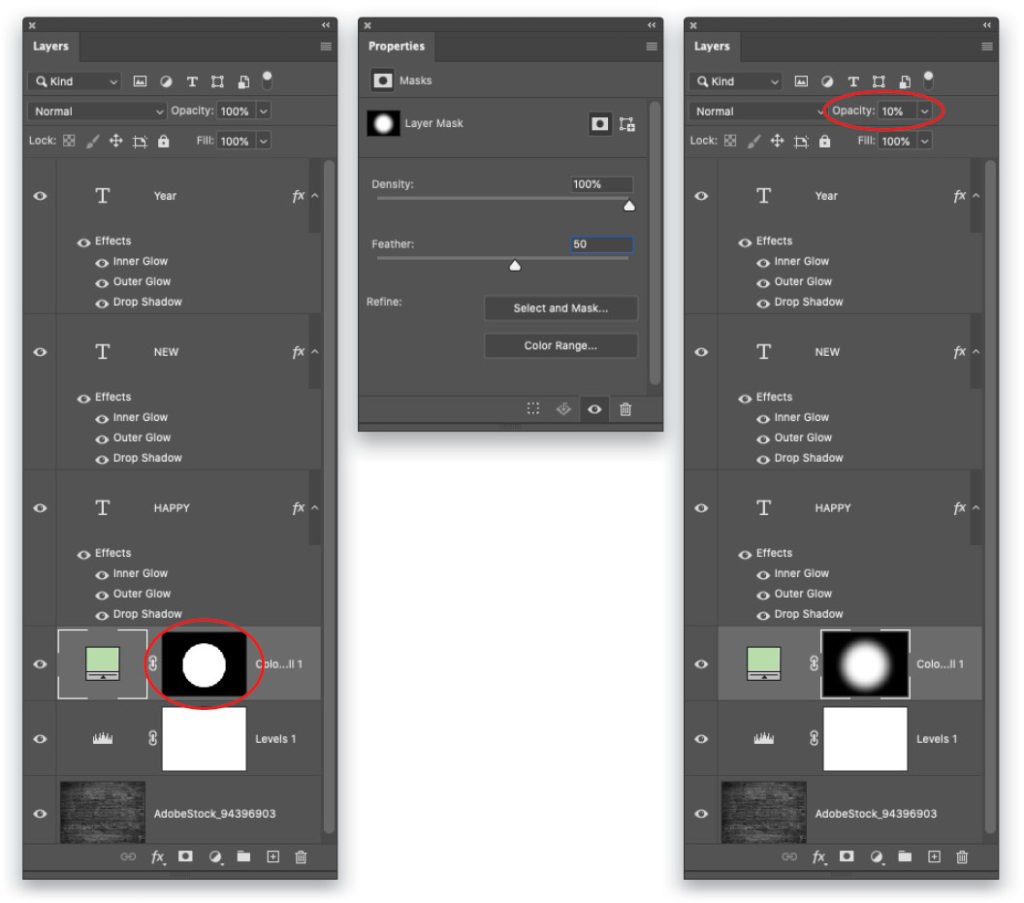
Step 19: Lower the Opacity setting at the top of the Layers panel (circled) to around 10%.
Step 20: Choose File>Save As and pick Photoshop from the Format drop-down menu so your layers remain intact. If you started in Lightroom, choose File>Save instead. Here’s the final result after rotating the word “Year” using Free Transform (Command-T [PC: Ctrl-T]), adding a couple of Photoshop’s built-in custom shapes, applying our custom Neon style to them, and changing the colors in the layer styles to blue.
As you can see, once you create the neon style, it’s a piece of cake to apply it to other layers and then change the color. Until next time, may the creative force be with you all!

This article originally published in the January, 2021 issue of Photoshop User magazine.


