The strategy, the goal that every photographer has is to create a compelling, memorable image. The tactics for making this strategy a reality include concept, composition, and exposure—the latter arguably the most important foundation of any photograph.
A great photograph is built on a great exposure. Ansel Adams knew this. The great landscape photographer and master of the negative and print said, “The negative is comparable to the composer’s score and the print to its performance. Each performance differs in subtle ways.”
A photographic RAW file is the undeveloped negative. The interpretation of that digital negative in Camera Raw is the performance Adams cites. The proper exposure of his film negatives formed the foundation for his amazing prints. Today, shooting onto digital sensors, that proper exposure is just as critical for a RAW or JPEG capture even though it seems that mistakes can be corrected in postproduction. Proper exposure provides the headroom for creative expression in post.
What Is Exposure?
Exposure is the amount of light that reveals the true tone of the subject in a photograph. The amount of light making up an exposure is controlled by a combination of ISO, aperture, and shutter speed: ISO is the sensitivity of the sensor, aperture is the amount of light passing through the lens, and shutter speed is the length of time the light strikes the sensor.
These are the camera controls that set the exposure. When camera automation is involved, the exposure compensation settings allow the auto setting to be refined. Additionally, a proper exposure wants to have reproducible detail in both the highlights and the shadow. Achieving that exposure requires an understanding of how light is measured. There are two kinds of light meters—reflected and incident.
Measuring Light
I’ll say it right here. Exposure can be really confusing, particularly with modern digital cameras. Why? First, there’s that screen on the back of the camera that seduces us into believing we nailed it. Second is the type of light meters built into the cameras.
Reflected Metering
Those in-camera meters are reflected meters. They measure the amount of light bouncing off of a subject. A reflected meter’s exposure makes whatever amount of light bouncing off a subject 12.5% gray. Always.
Here’s an easy experiment that shows what a reflected meter does. Take a white card and a black card outside on a sunny day. Put your camera on P (for Professional—er, no, that’s actually Program or Auto mode). Set the camera on the spot metering. Put the white balance on Daylight or Sunny. Zoom in to fill the viewfinder with the white card then take a picture. Don’t look at the LCD screen on the camera just yet. Put the black card over the white card so it’s in the same light. Again, fill the frame with the black card then make the photo. When you look at the monitor on the back of the camera, you know that you’ll have one photo of a white card and one of a black card, right? Well, check your camera’s monitor. What do you see? That’s right, two almost identical gray cards. What’s happening here?
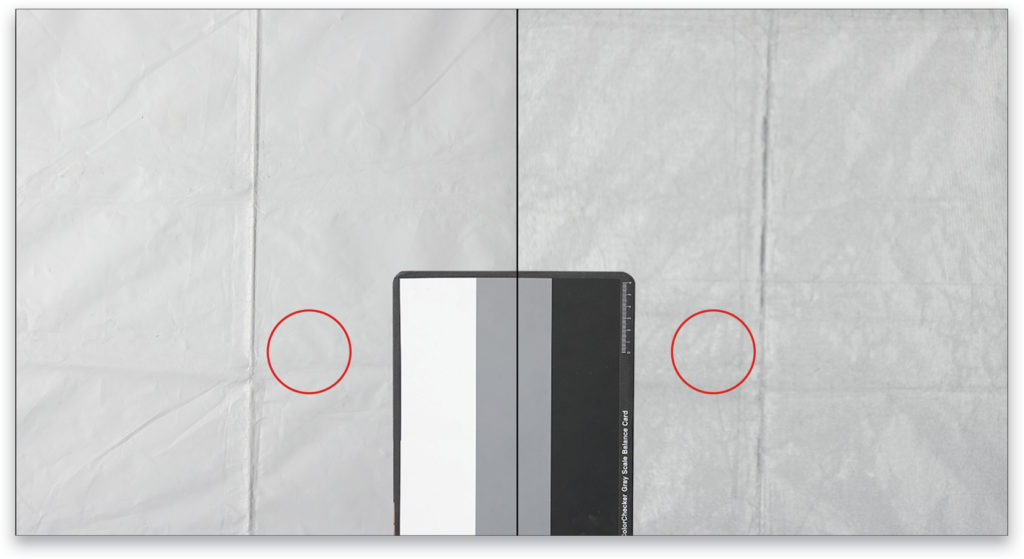
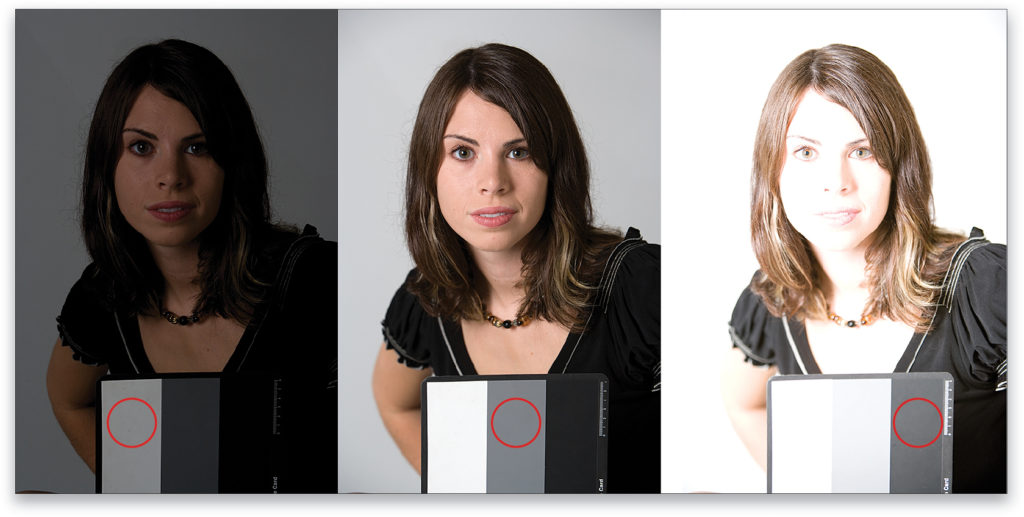
This composite of three images shows what reflected meters do. On the left is a white fabric panel. On the right is the black side of the same panel. Each of the two sides were exposed at the setting given by the camera’s built-in spot meter reading the area inside the red circles. They are both almost the same gray as the ColorChecker Grayscale balance card in the middle. The exposure for it was made with the spot meter setting on the camera centered on the gray patch. The card shows actual white and black on either side of the gray, so you can easily see how far off a reflected reading can be.
White Shirts & Bridal Gowns
When shooting someone in a white shirt or a bridal gown, this is a problem. Huge. The photo will be underexposed by more than two stops. Not a good thing.
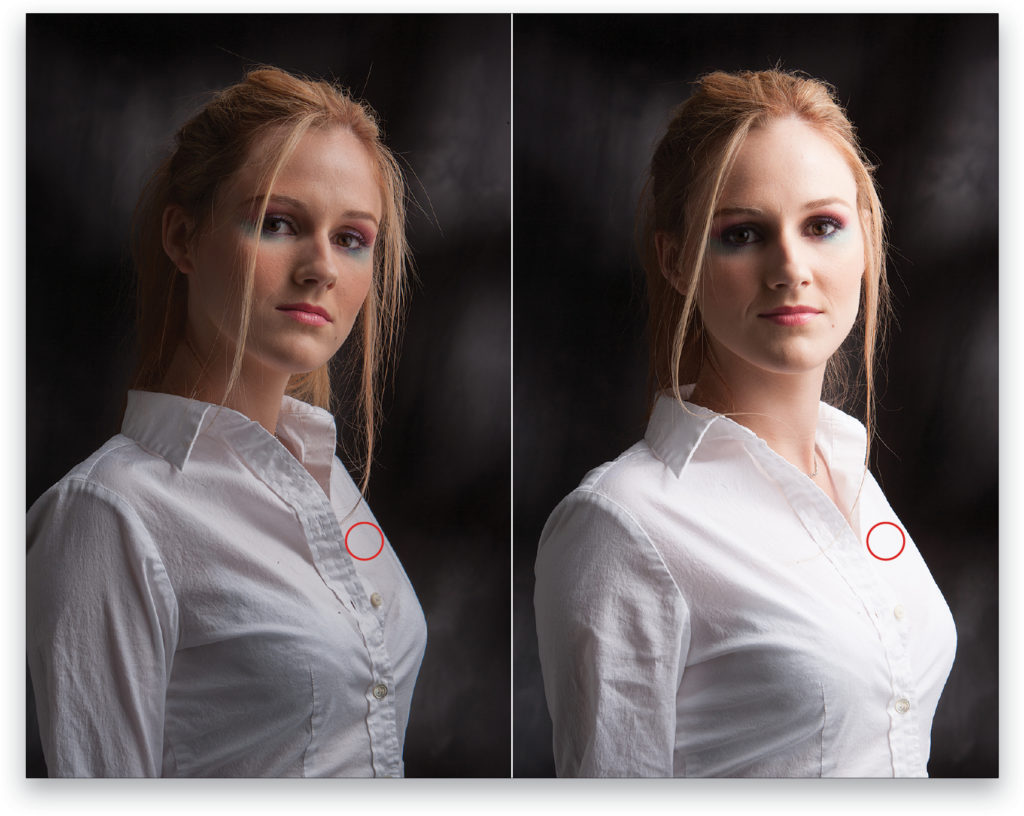
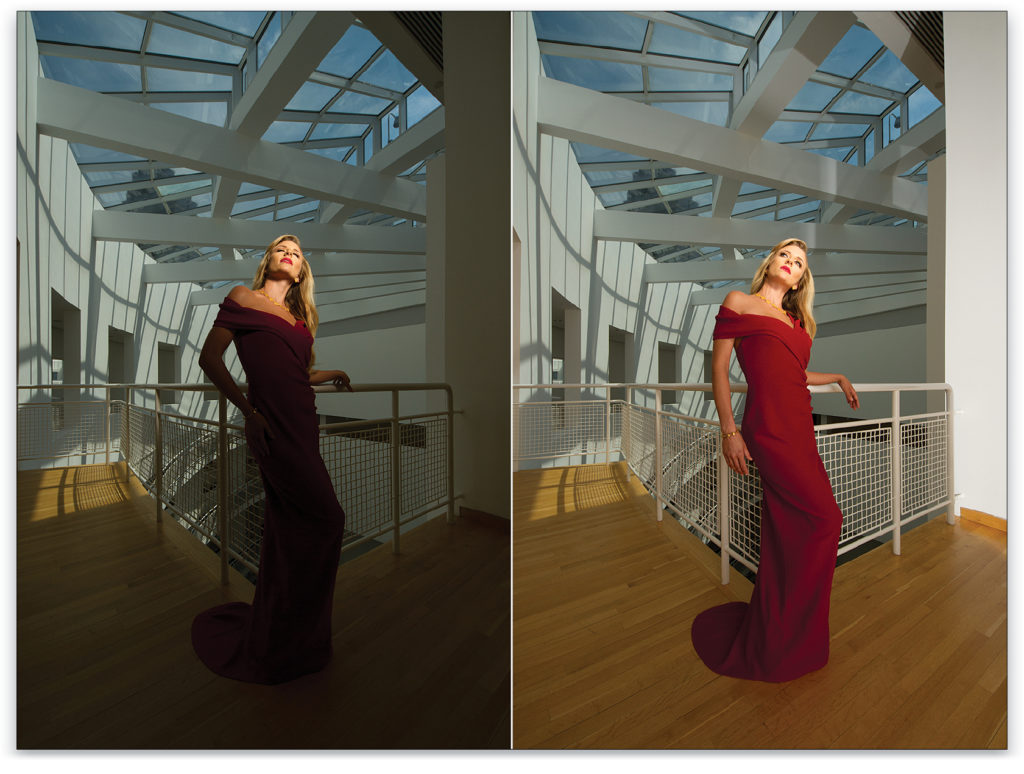
Here’s an example (below). The red circle in this image is the spot-reading point. The model’s blouse is gray as predicted. For the image on the right, I added 2 2/3 f-stops of light to get that blouse white with detail. Everything looks much better with the right amount of light.
How does that right amount of light become the right amount? Guesswork? Nope. It’s really quite simple. Sort of.
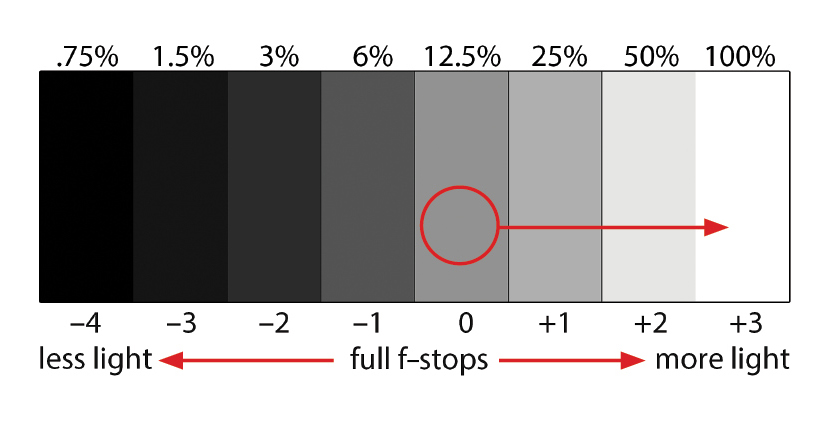
Start with the reflected meter. We know it gives an exposure that makes whatever it sees 12.5% gray. The correct exposure for white wants to be a little less than 100% reflectance; 100% is white after all. The reflectance chart shows the difference between what the meter says and what the exposure wants to be. Shifting the 12.5% reading to almost white now makes sense. Add one stop of light and the reflectance becomes twice as bright at 25%. (Adding one stop is two times more light, which doubles the reflectance.) Add another stop of light and the reflectance is now 50% because the amount of light has doubled again. Another full stop of light would be 100%, or pure white. There would be no detail in Catherine’s blouse. An increase of 2/3 of a stop is just right, pushing the reflectance to a little more than 80%. Perfect.
One Subject, Three Exposures
A reflected reading overexposes the black card. Its reflectance wants to be somewhere between 1.5% and 3%, or two to three stops less exposure than the reflective reading. Here’s how reflective readings render a subject when reading a white card, a gray (12.5%) card, and a black card. The results (next page) are, from left, underexposed, correctly exposed, and overexposed. Note: The areas in the red circle that were read with the spot meter are all 12.5% gray.
The reflectance chart can help unravel exposure issues. It interprets what the meter sees to what you actually want the photograph to be. It’s a good guide although not completely accurate. There’s another way.
Incident Metering
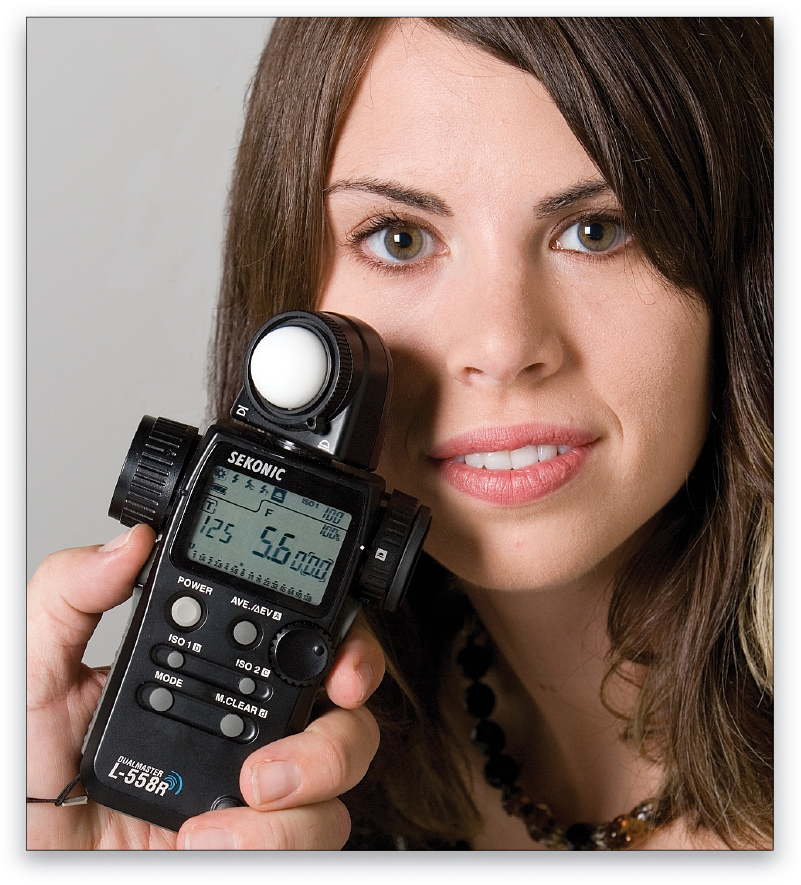
It’s difficult to get the exposure right with the reflected meters in our cameras. They measure the light without being able to differentiate whether a subject is bright, dark, or in-between. To get accurate exposures every time, measure light before it hits the subject. That’s what incident meters do. These meters have the little white dome. Best of all, most modern incident meters measure flash and ambient light separately or at the same time (bonus!).
Measuring the light that illuminates a subject eliminates the variables of reflectance. It seems obvious. When the amount of light to make an exposure is known, dark subjects are rendered dark and light ones appear light. Perfect.
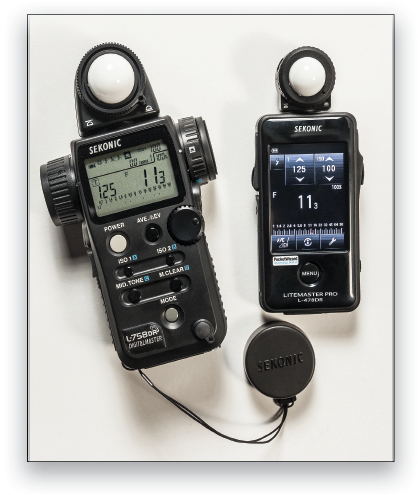
There are two major players in the light meters for photography field: Gossen and Sekonic, made in Germany and Japan, respectively. I have used both brands over the years, along with the venerable and, sadly, no-longer-available Minolta Flash Meters.
Fortunately, light meter science has progressed a lot. Since digital capture came on the scene, I’ve been using Sekonic’s L-758DR. I was an early adopter (serial number 21). It can be calibrated to the sensor in the camera and it has a built-in PocketWizard transmitter for triggering electronic flashes wirelessly. This isn’t an endorsement of either brand; it’s an enthusiastic endorsement of using incident metering to determine exposure.
Using Incident Meters
Walk up to the subject of the photograph. Point the dome of the incident meter at the source of illumination then take the reading. That’s it. Simple, right? I know you’re thinking, “It can’t be that easy. Nothing in photography is that simple.” For the most part, it really is that easy. Why? No matter how complex the lighting setup is, there’s always a primary source of light for the most important part of the photo. Measure that one light, then set that exposure reading on the camera. Every other light, and that includes reflectors, in the image functions in support of the exposure for the primary source that’s set on the camera. The quality, color, and intensity of the other lights is a matter of the photographer’s vision, aesthetic, or simply taste.
Source of Light
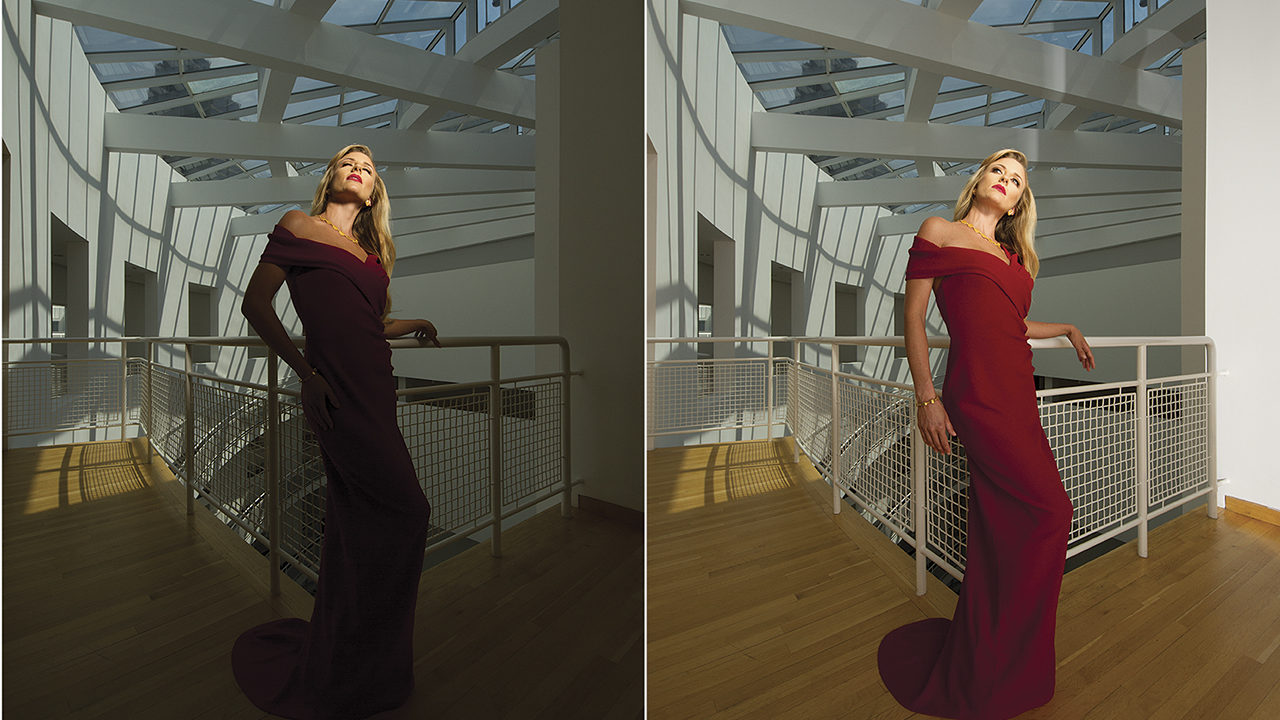
Jessica’s face is lit with a gridded Dynalite studio head in a 22″ beauty dish (below). This is my source of illumination. This light is the one that I metered with the incident meter to get the exposure to set on the camera: 1/125 at f/11, ISO 100. With the exception of her face, Jessica is a silhouette. The photo on the left shows the high contrast between her body and the background.
Fill Light Lowers Contrast
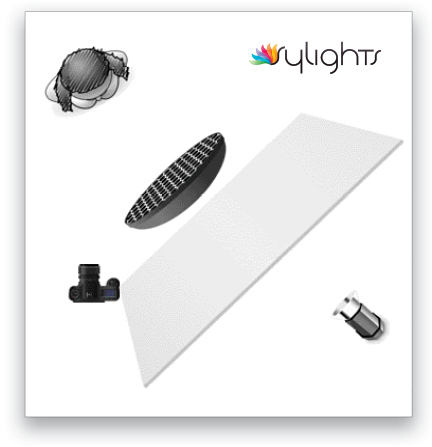
The only way to lower contrast is to add light to the shadows. The photo of Jessica on the right has much lower contrast thanks to a 6′ square Chimera light panel with a single Dynalite head behind it. This light is about a stop darker than the light from the gridded beauty dish. It’s the primary source of lowering the contrast. Its brightness is entirely my choice. It can even be brighter than the dish if I want it to be. How these lights are set and so forth is the exclusive decision of the photographer. The exposure still remains the same. My intention for this image was to have Jessica’s face be the brightest part of my photograph. The viewer will see her face first then look at her red St. John’s gown. The slightly darker background makes her stand out in its frame.
The lighting is simple, as shown in the lighting diagram for this shot. The exposure is set for the amount of light from the beauty dish. Fill comes from the panel lit by the flash head behind it.
One more thing: Whenever possible, I shoot tethered to my computer so exposure, color, composition, and focus can be monitored during the shoot. Nothing’s worse than returning from location only to find a problem that would have been easy to fix on the set.
In the next issue, the “Dynamic Range” column covers the postproduction tactics for refining color and perfecting exposure.
This article originally published in the November, 2014 issue of Photoshop User magazine.
ALL IMAGES BY KEVIN AMES


