Starting in the 1860s, photographers began exposing their shots two, three, or even more times before moving to the next frame, allowing them to superimpose various images into the same photograph. Thus was the birth of double-exposure photography, an entirely new outlet for photographers striving to create interesting and thought-provoking imagery. And, while it’s still an absolute rush to create a stunning double exposure in-camera, it can be just as exciting and creatively stimulating to do the exact same thing using only Photoshop.
Step One: Choose Your Photos
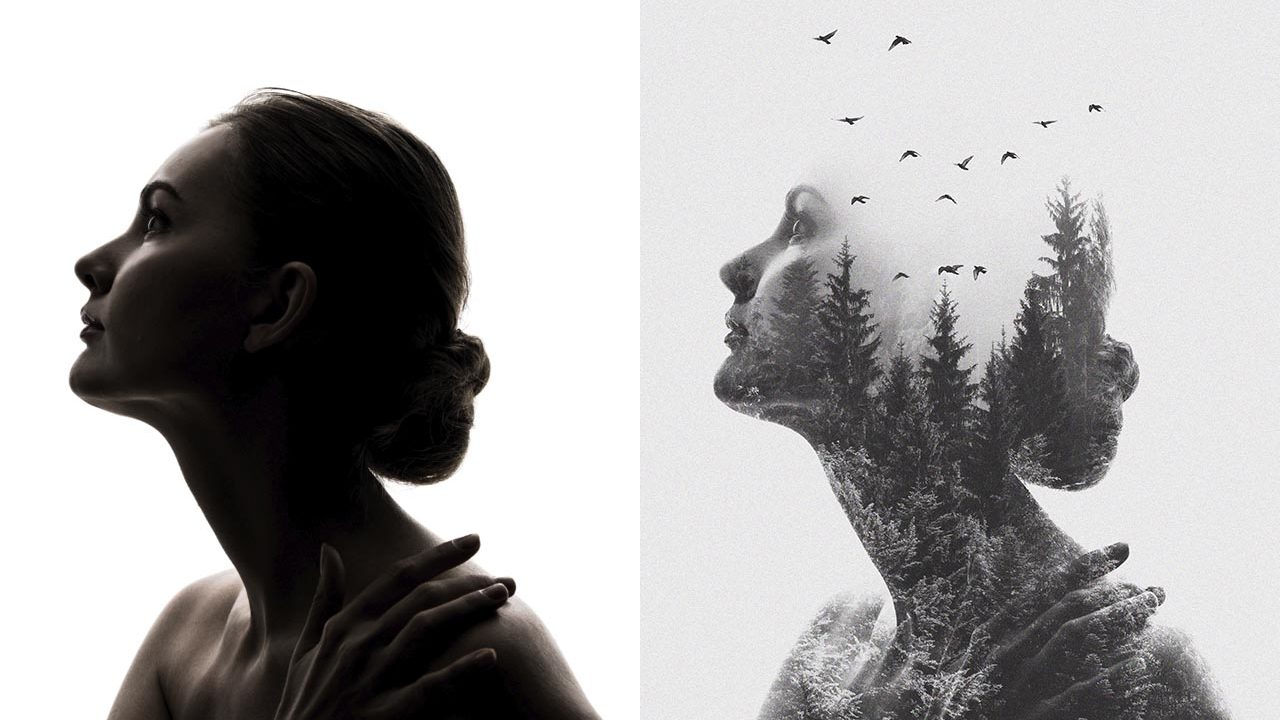
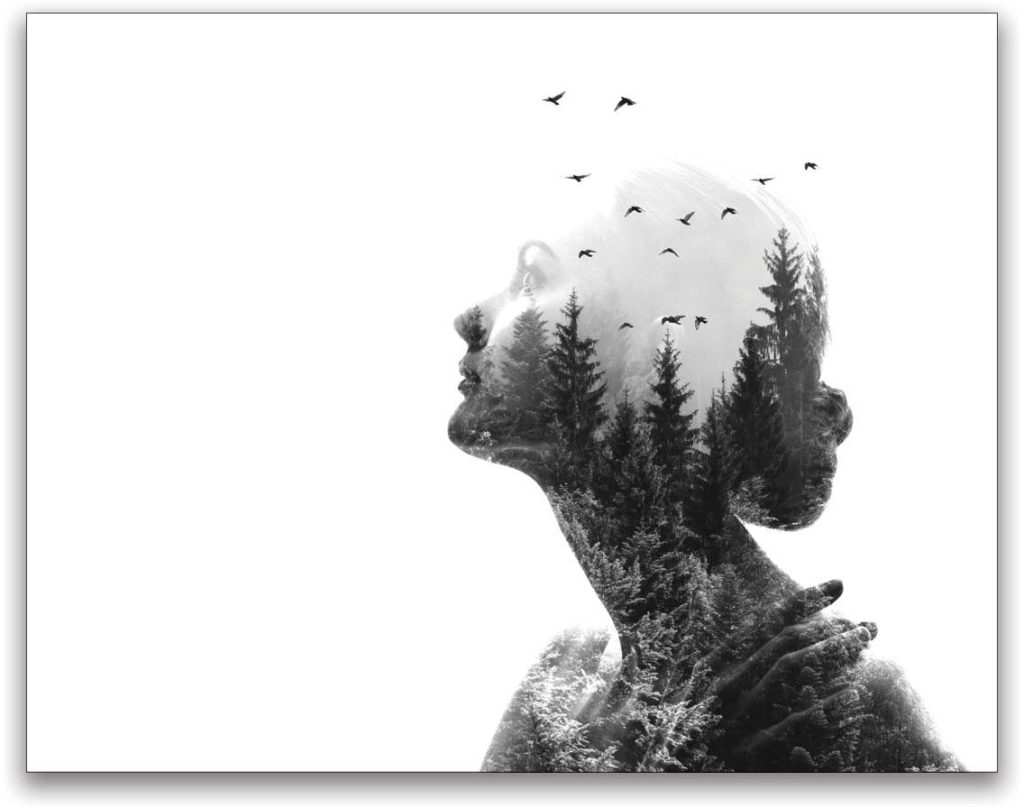
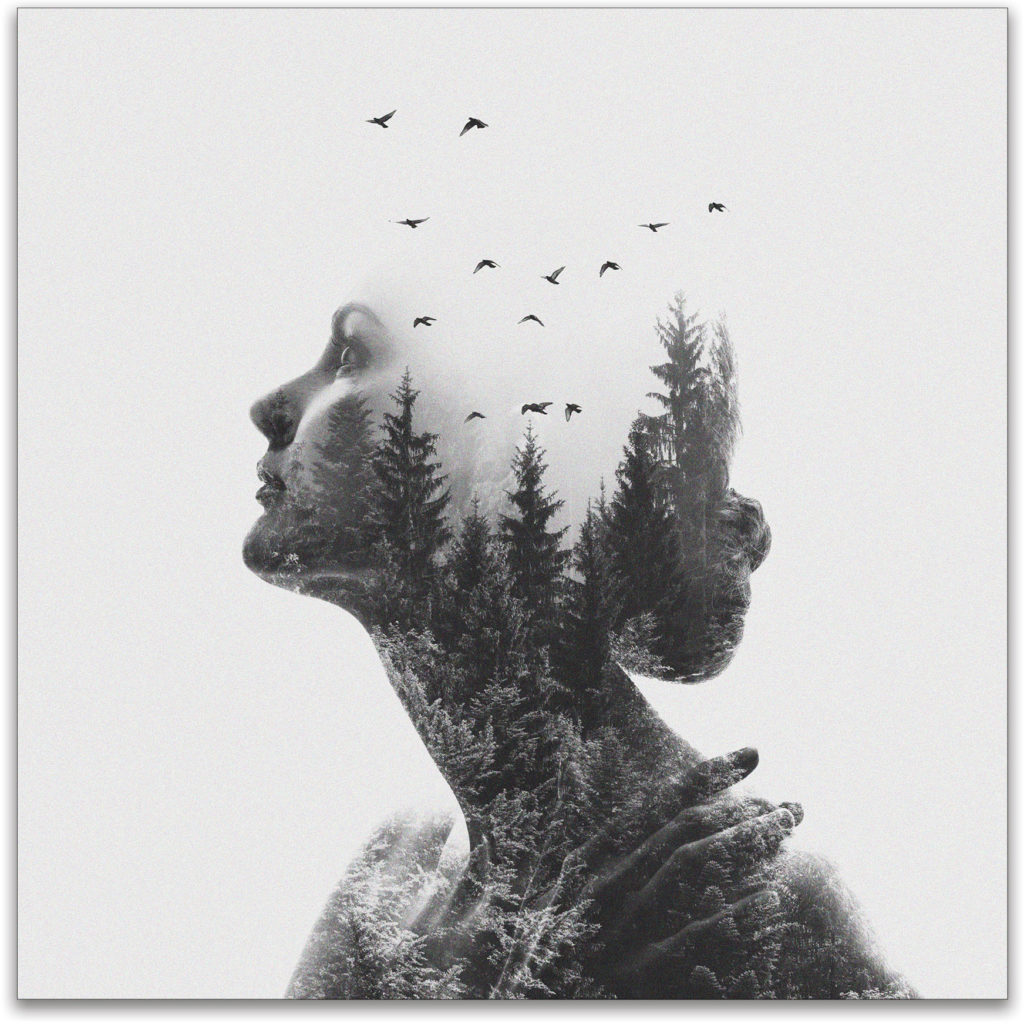
To create this particular double exposure, we’re going to use three different photographs: a portrait of a woman on a white background, a landscape image of a foggy mountain scene, and a photograph of some birds flying in the distance. Using a portrait on a clean background allows us to create a mask easily around her, but any portrait could be used.
To download the watermarked previews of the images we’re using here from Adobe Stock directly to your Libraries panel (Window>Libraries), click on the link for each image below. When the Adobe Stock web page opens, make sure you’re logged in to your Adobe account, then to the right of the image, you’ll see the option to Save Preview to My Library (you can click on My Library to select a different library or download option). Click on the cloud-with-an-arrow icon, and the preview image will automatically be downloaded to your Libraries panel in Photoshop.
- Silhouette of a Caucasian woman
- Forested mountain slope in low lying cloud
- Flock of pigeons on a white background
Step Two: Separate the Main Subject from the Background
The portrait (in this case) is the most important photo of the three we’ll be using, because this is going to provide the basis for the additional exposures. If you downloaded the Adobe Stock preview images, simply double-click the portrait image in the Libraries panel to open it in Photoshop. To make it a little easier to work with this image, you can increase its resolution. (We normally don’t recommend enlarging images, but this is only for practice purposes.) Go to Image>Image Size, turn on the Resample checkbox, set the Resolution to 100 ppi, and click OK.
Once your image is open in Photoshop, you’ll want to separate the subject from the background. Since we already have a clean difference between the outline of the woman and the white background, we can easily select her with the Quick Selection tool (W). Once selected, press Command-J (PC: Ctrl-J) twice to duplicate the selection into two new layers.

If your photograph has limited space around the subject, you can use the Crop tool (C) to add a bit of extra space wherever it may be needed. We’ve added some additional space at the top in this example. Just click the Clear button in the Options Bar to remove any aspect ratio settings, press D to set your Background color to white, click in the image to activate the crop boundary, drag the top of the crop boundary upward, and press Enter.
Step Three: Add Your Additional Photographs
Drag your main background photograph (the forest) from the Layers panel into the portrait image and press Enter. Then, drag the birds into the portrait and press Enter. (Note: My image of the birds is a PNG with a transparent background; if you’re using the Adobe Stock preview images, you can set the layer blending mode of the birds layer to Multiply to hide the white part of that layer.)
Set the Opacity of the forest layer to about 50% so you can see the main subject, and then use Free Transform (Command-T [PC: Ctrl-T]) to adjust the forest to appear however you like when combined with the subject photograph. In this example, I also Right-clicked inside the bounding box and chose Flip Horizontal. Press Enter to commit the transformation.
Do this same step with any additional photos, as we’ve done here with the birds (which I also flipped horizontally). When finished, raise the Opacity of all layers back to 100%.
Step Four: Adjust Layers and Blending Modes
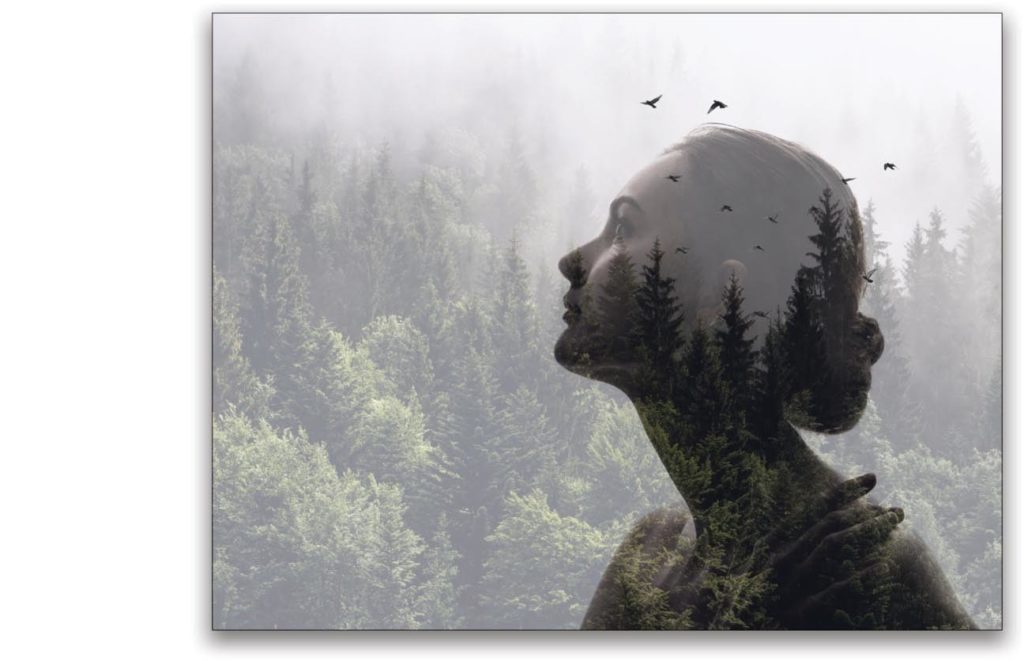
In the Layers panel, drag the top portrait layer to the top of the layer stack, and change its blending mode to Lighten. For the forest layer, you can experiment with different blending modes to find your preference, but for this example, we’ve set it to Linear Dodge (Add). This allows the forest to show only through the shadow areas of the portrait layer below it.
Step Five: Add New Background and Layer Masks
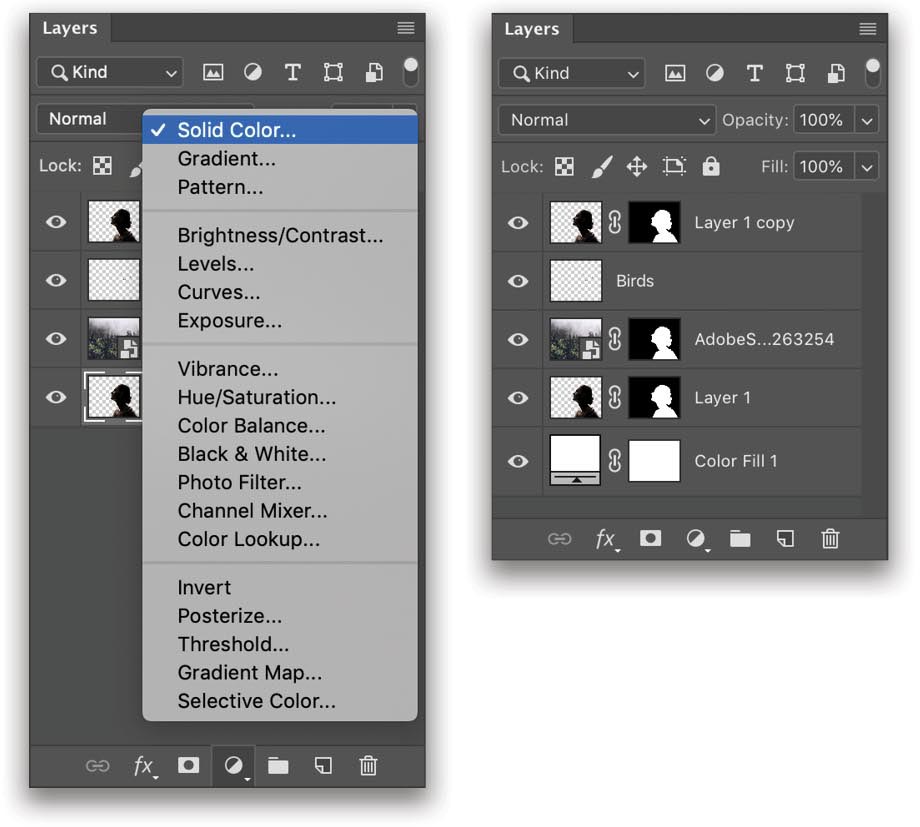
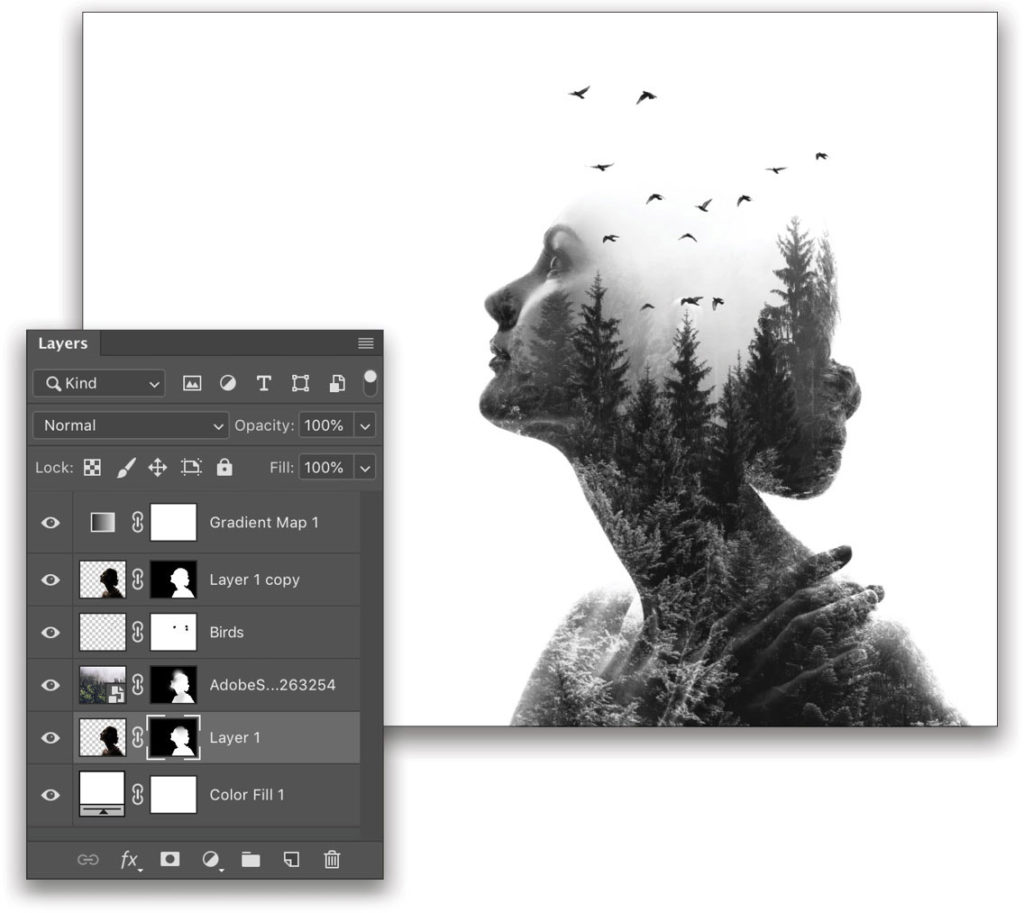
The original subject photo is no longer needed, so go ahead and drag it to the trash icon at the bottom of the Layers panel to delete it. Then, click the Create a New Adjustment Layer icon (half-black, half-white circle) at the bottom of the Layers panel, and select Solid Color. Choose white for now and click OK to close the Color Picker. Drag this layer to the bottom of your layer stack.
Next, click on one of your subject layers to make it active, press-and-hold the Command (PC: Ctrl) key, and click on its layer thumbnail to place a selection around the subject. Click the Add Layer Mask icon (circle in a square) at the bottom of the Layers panel. The layer mask should appear in the shape of the subject. While holding down the Option (PC: Alt) key, drag this layer mask to the other layers (except for the birds layer) to duplicate it. We omitted this layer mask on the birds layer because we didn’t want to hide the birds above her head.
Step Six: Change Image to Black and White
The colors of the photographs used here complement each other nicely, and if we had more room in this tutorial, we might keep it in color and explore color grading and matching color tones. We’ve decided, however, to convert the image to black and white in case any images that you decide to put together for your first double exposures aren’t remotely similar in terms of color tone.
There are countless ways to switch your image from color to black and white, but we’re going to use a Gradient Map. First, select your topmost layer and set your Foreground and Background colors to black and white, respectively, by pressing D. Then, click the Create New Adjustment layer icon, and choose Gradient Map.
Step Seven: Blend Your Masks
Now for the fun part! This is where you get to blend your images together to create the desired effect. With the Brush tool (B) set to a soft, round brush at 20% Opacity in the Options Bar, begin experimenting with the mask associated with each layer. Depending on your personal taste, you might want to brush away more of the background, or possibly even more of the subject.
In this example, we’ve brushed away some of the background by painting on the forest layer’s mask so we can better see the subject’s face, as well as around the subject’s hand and collarbone. We also brushed away some of the forest at the top of the subject by painting on the layer mask of the bottom portrait layer. Finally, we added a layer mask to the Birds layer and brushed away several of the birds that were spilling outside the subject’s outline.
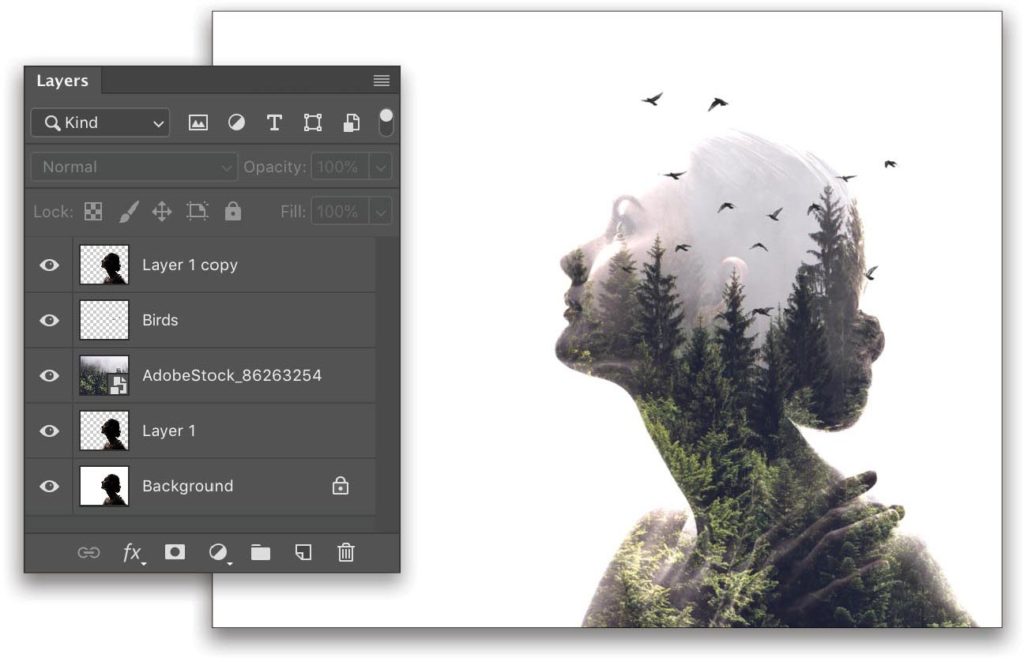
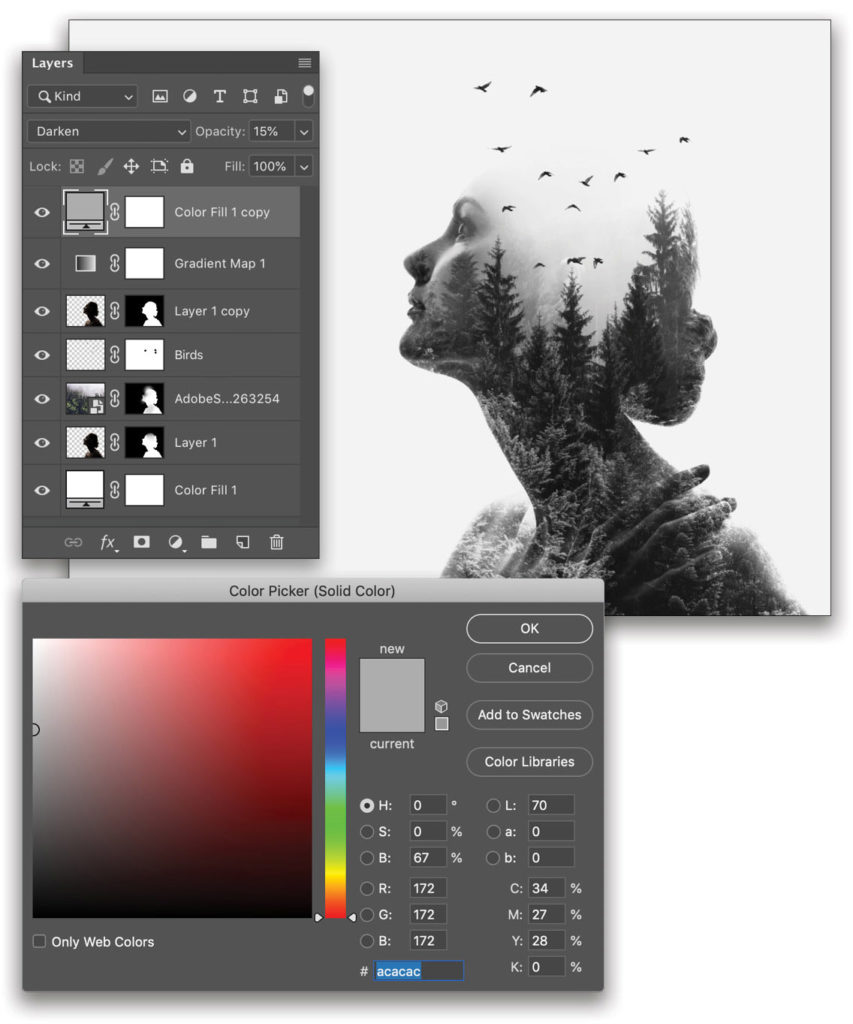
Step Eight: Adjust the Background Color
If you like the white background, that’s perfectly acceptable, but in this case we’re looking for an overall softer feel to the image. First, duplicate the Color Fill layer acting as your background, and drag it to the top of the layer stack. Then, double-click on the new Color Fill’s layer thumbnail to bring up the Color Picker. A medium gray will work well for our purposes here. Click OK, and then change the blending mode to Darken and the Opacity to about 15%. Feel free to use any color here, but a medium gray works well with our black-and-white scheme.
Step Nine: Crop and Merge Visible
Since the final edits will all be adjustments, this is a good time to crop the image. Select the Crop tool from the Toolbar and crop your image in the desired ratio. We’ve chosen a square ratio for our final crop.
This is a great image on it’s own, but we want to add a few final touches. Click on the topmost layer, and press Command-Option-Shift-E (PC: Ctrl-Alt-Shift-E). This will create a new layer at the top of the layer stack that’s a combination of all the visible layers. Now we can make our final adjustments to this layer.
Step 10: Final Edits
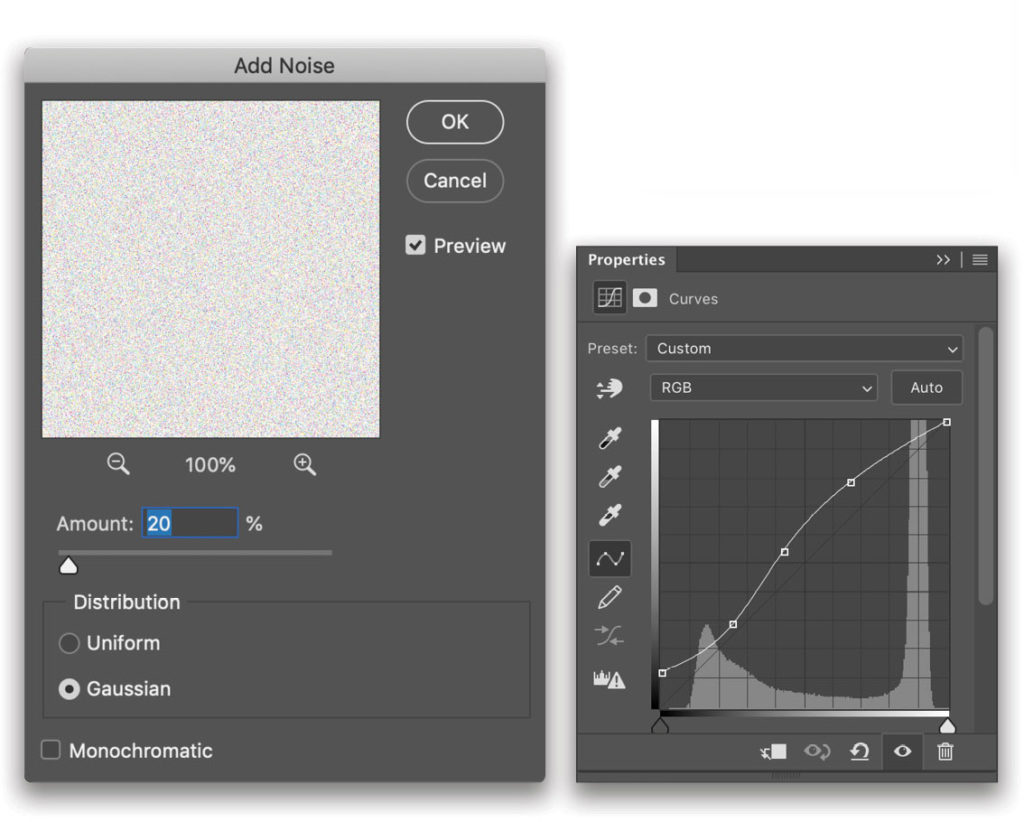
Of course, nothing can truly replicate the grain of genuine film, but Photoshop can sure get us close! First, duplicate the merged layer, and then with that layer active, go to Filter>Noise>Add Noise. The settings are dependent on personal preference, but in the dialog, we’ve selected Gaussian, and set the Amount to 20%. Click OK.
Next we added a Curves adjustment layer (Layer>New Adjustment Layer>Curves) to add a bit more contrast while also raising the blacks. Finally, we set the Opacity of the duplicated merged layer to 50%. And there you have it!
Don’t Take It Too Seriously!
Half the fun of creating a double exposure photograph, whether in-camera or in Photoshop, is the surprise of what you’re going to get! It’s all about experimentation, and even if you already know exactly what you want the final image to look like, don’t be afraid to play a little. The beauty in double exposures is how well unexpected subjects can complement each other. Using layer masks, you can add as many images as you like and brush away any section of the photograph you don’t want visible. The freedom is yours; now go create some amazing double exposures!
This article originally published in the February 2019 issue of Photoshop User magazine.


