I am an accomplished Flamenco guitarist and composer, a graphic designer, and (for the past few years) a photographer. I have traveled to many points on this planet. I possess a hyperactive imagination, along with an obsessive need to create. I have a tendency to romanticize just about everything in my life. Oh, and I hear colors (synaesthesia). Simply put, my style is the visual amalgamation of these things.
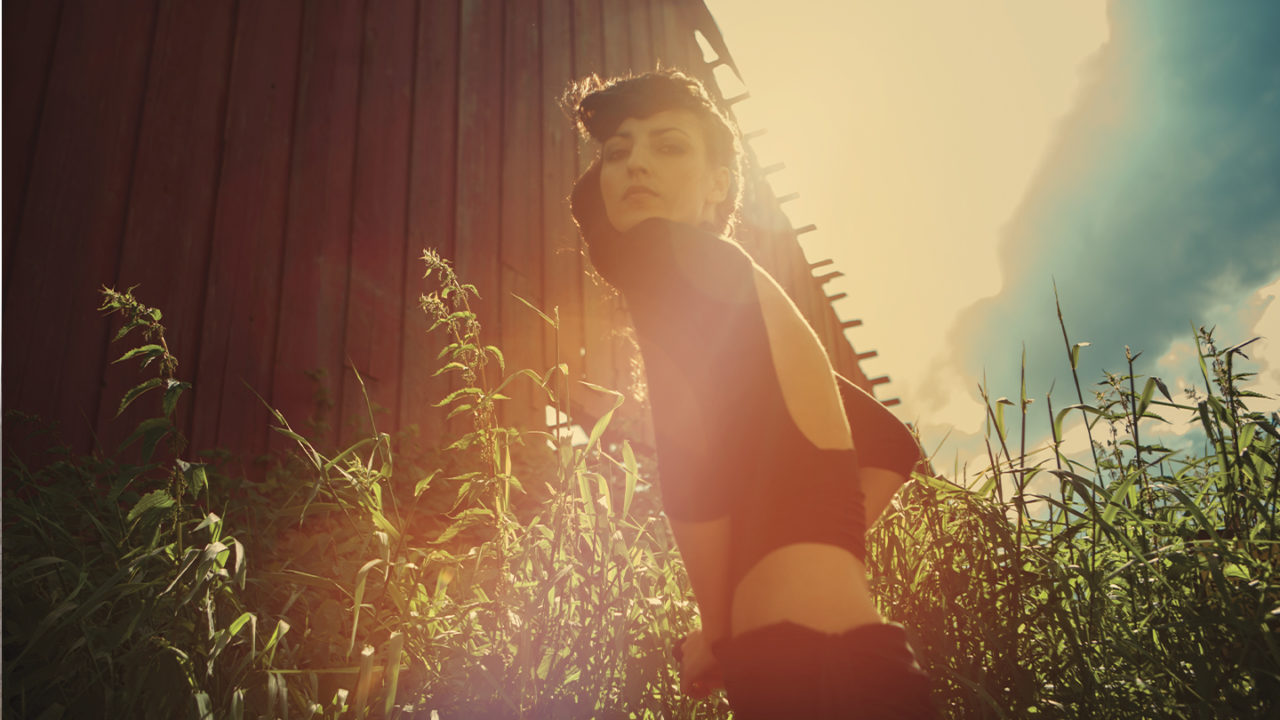
Normally, I work off of a concept, and work on that concept under a controlled environment. But sometimes you’re driving down the road and you see an opportunity that you didn’t plan on, such as this old barn in Sauvie Island, Oregon. I was on the way to a shoot along with the model and hairstylist when we happened upon this decrepit-looking barn. We just had to pull over and shoot in front of it.
The sun was positioned perfectly, just behind the roofline of the barn. I wanted to try a backlit shot, which I had little experience taking. This image was shot on an unusually bright day. The sun was directly behind the model’s head, and no fill flash or bounce card was available during this impromptu shoot. I should have exposed for the model, but I didn’t, so the exposure wasn’t optimal for her. However, I was able to satisfactorily salvage the image using Adobe Camera Raw and Photoshop. Let’s take a look at how.
STEP ONE:
In the Basic tab in Adobe Camera Raw, set Exposure to –2.30, Highlights to –28, Shadows to –34, Clarity to +22, and Temperature to 4400K.
STEP TWO:
In the Tone Curve tab, click on the Parametric tab and set Highlights to –23, Lights to –9, Darks –2, and Shadows to –17.
STEP THREE:
In the HSL/Grayscale tab, set the following Hue values: Reds: –52, Oranges: –5, Yellows: –33, Greens: +16, Aquas: –29, and Blues: –23. Leave Purples and Magentas at 0.
STEP FOUR:
Still in the HSL/Grayscale tab, set the following Saturation values: Reds: +11, Oranges: +45, Yellows: +29, Greens: +59, Aquas: +38, and Blues: +62. Leave Magentas and Purples at 0.
STEP FIVE:
Finally, set the following Luminance values: Reds: +11, Oranges: +45, Yellows: +35, Greens: +12, Aquas: +7, and Blues: +12. Leave Magentas and Purples at 0. Click on the blue link at the bottom of the Camera Raw dialog to open the Workflow Options. Set Space to Adobe RGB (1998) and Depth to 8 Bits/Channel. Click OK. Open the file in Photoshop by clicking the Open Image button in the lower right-hand corner of the Camera Raw dialog.
At this point, we’ve saturated the colors surrounding the model in a somewhat surrealistic manner, leaving room to add a warm glow from the sun behind her head. The blue cloud in the sky will provide nice color contrast to that warm orange glow. That same orange will provide further color contrast to the long green grass. While the photo itself doesn’t contain much luminosity contrast, we can create contrast with color, instead.

STEP SIX:
Now, let’s glorify the sun a bit more. Click the Create New Adjustment Layer icon (half-white, half-black circle) at the bottom of the Layers panel and choose Solid Color. Select black in the Color Picker and click OK. Set the blend mode to Soft Light near the top left of the Layers panel. Double-click the layer’s name and change it to “Burn.”
STEP SEVEN:
Click the layer mask thumbnail attached to the Burn layer. Press D then X to set the Foreground color to black. Choose the Gradient tool (G), and change the gradient type to Radial Gradient in the Options Bar. Right-click in the document and choose the Foreground to Transparent preset in the Gradient Picker (it’s the second preset).
Click on the sky above the model’s head, about where the sun would be, and drag to the bottom-left corner of the image and release. This reveals the sun, but darkens everything surrounding the model just a bit, providing some luminosity contrast. This serves to intensify the sun a bit more.
STEP EIGHT:
At this point, the grass along the bottom of the image is too dark. To fix this, select the Brush tool (B), Right-click in the document, and set the Hardness to 0% and the Size to 1,300 pixels. Set the Opacity to 10% in the Options Bar. With the Burn layer mask still active, make several brush strokes over the darkest areas of the grass to lighten it. You’ll notice that the side of the barn in the top left is quite dark, too. Use the same brush to remove the darkness on the barn.

STEP NINE:
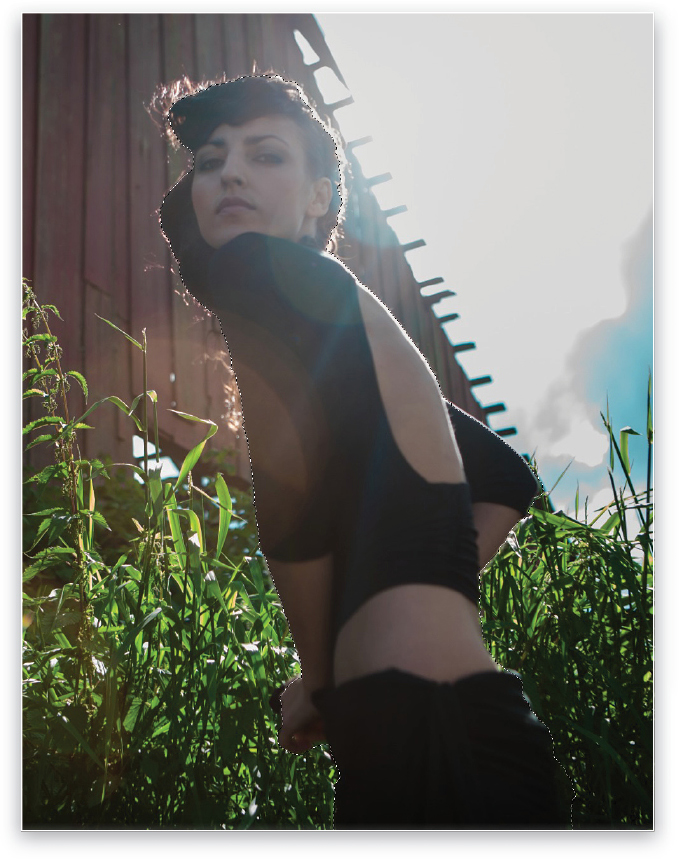
At this point, the overall color temperature of the image is on the cool side. Let’s warm up the model to differentiate her from the rest of the environment. To do this we’ll need to make a selection. Create a merged layer on top of the layer stack by clicking on the Burn layer, then pressing Command-Option-Shift-E (PC: Ctrl-Alt-Shift-E). Rename that new layer “Merged.” Next, use the Quick Selection tool (W) to select the model. This can get delicate in the lower half of the image due to all of the grass texture, so if it selects outside of the model, just hold down the Option (PC: Alt) key to remove any selected areas other than the model.
Making a selection like this can be complicated, so I like to save my selections in case I need to reload them for any reason. To do this, go to Select>Save Selection. Name this selection “Model,” and click OK. With the selection around the model, go to Select> Modify>Contract. Set Contract By to 10 pixels, and click OK. Go back to Select>Modify but this time choose Feather. Set the Feather Radius to 10 pixels, and click OK.
STEP 10:
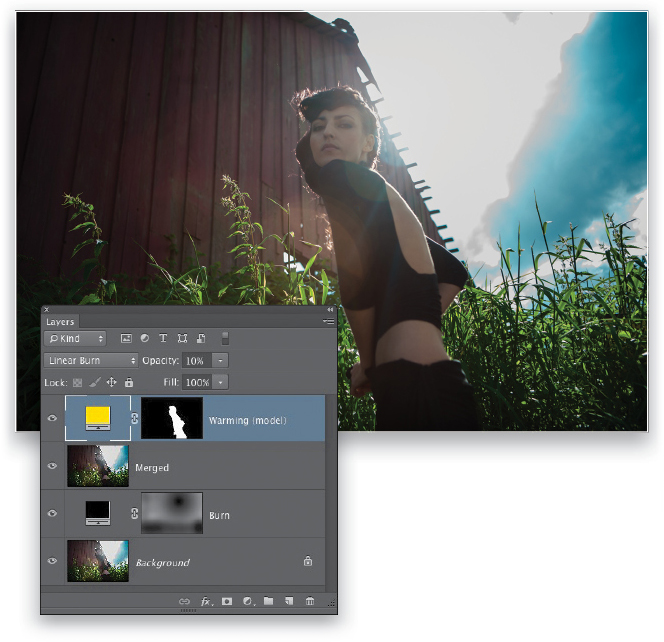
Add a new Solid Color adjustment layer to the top of the layer stack. Set the RGB values to R:255, G:221, and B:0 in the Color Picker and click OK. Rename the solid color adjustment layer “Warming (model).” Change the blend mode to Linear Burn, and set the Opacity of the layer to 10%.
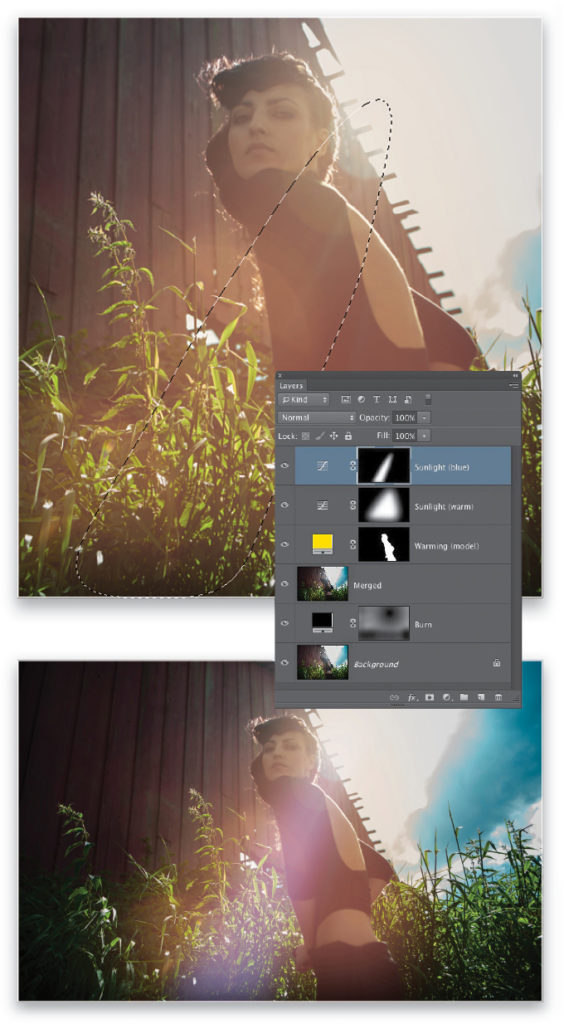
STEP 11:
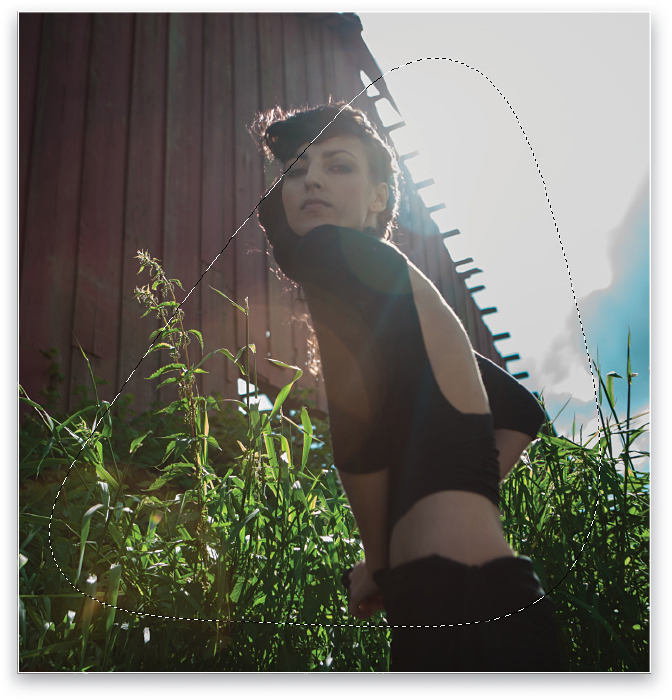
It’s time to add some magic to the sun flare that’s already happening behind the model’s head. Click on the layer Merged to make it active and choose the Lasso tool (L). Enter a Feather value of 250 pixels in the Options Bar, and make sure that Anti-alias is checked. Draw the selection shown above.
STEP 12:
Next, add a Curves adjustment layer above the Warming (model) layer. In the Properties panel grab the bottom-left control point in the curve and drag straight up until the following values are reached: Input: 0, Output: 51.
Still in the Properties panel, select Red in the RGB drop-down menu, grab the bottom-left control point, and drag straight up until the following values are reached: Input: 0, Output: 71.
Again, in the Properties panel, under Blue, click the center of the linear curve to make a new control point, and drag straight down until you reach the following values: Input: 130, Output: 94.
Rename this layer to “Sunlight (warm).” This layer provides some warm light emitting from the sun above. If the effect is too intense, try lowering the Opacity for the layer.
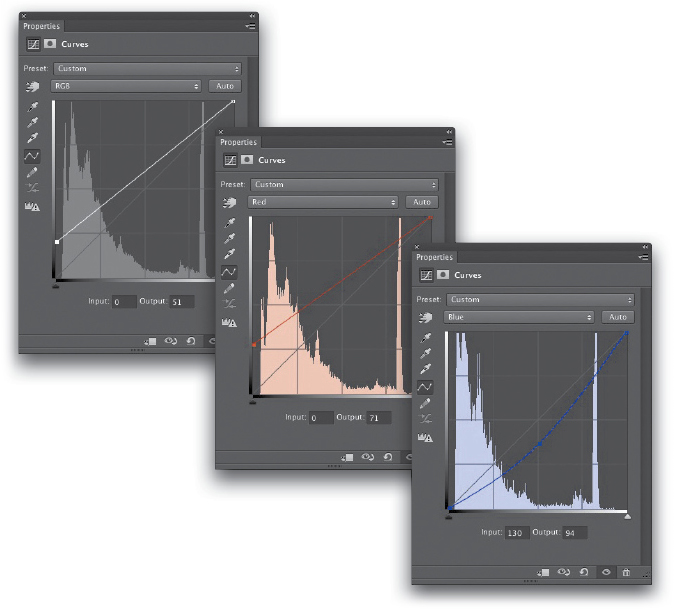
STEP 13:
Now, let’s add a bit of blue to the sun flare. Select the Lasso tool, set the Feather to 120 pixels, and draw the selection shown here. Add a new Curves adjustment layer. In the RGB controls, drag the bottom-left control point straight up until it reaches the following: Input: 0, Output: 58.
In the Blue curve, take the bottom-left control point straight up until it reaches the following: Input: 0, Output: 74. Rename the Curves adjustment layer to “Sunlight (blue).”
STEP 14:
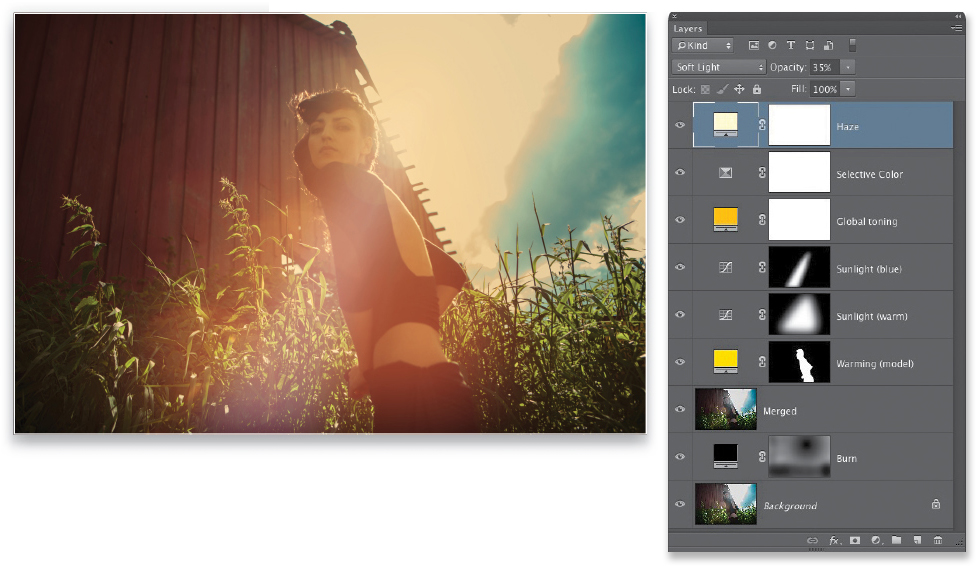
Because there are so many differentiating hue values present in the image, I like to do some overall toning (“glazing”) to give the image more overall consistency. Add a new Solid Color adjustment layer to the top of the stack with the following RGB values: R:255, G:192, and B:0. Set the blend mode to Linear Burn, change the Opacity to 31%, and then rename this layer to “Global toning.”
STEP 15:
Add a Selective Color adjustment layer to the top of the stack. Using the Colors drop-down menu, set the values to:
Reds—Cyan: –35, Magenta: –6, Yellow: +19, Black: +22
Yellows—Cyan: 0, Magenta: 0, Yellow: 0, Black: –26
Greens—Cyan: 0, Magenta: 0, Yellow: 0, Black: –37
Cyans—Cyan: +39, Magenta: –14, Yellow: –36, Black: –24
Whites—Cyan: 0, Magenta: +21, Yellow: 0, Black: 0
STEP 16:
To make this a bit more dream-like, let’s add a warm haze to the image. Add a new Solid Color adjustment layer to the top of the stack with the following RGB values: R:255, G:254, and B:210. Set the blend mode to Soft Light, change the Opacity to 35%, and rename the layer to “Haze.”
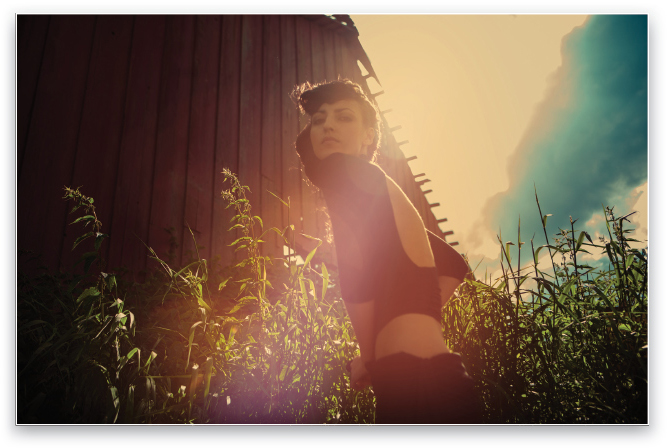
And there you have it—the transformation from a poorly exposed experimental shot to a warm summer dream!
This article originally published in the April, 2013 issue of Photoshop User magazine.


