Color, as recorded by a camera, is much different than it appears to the eye. Why? The brain lies. Actually, it doesn’t lie at all: The brain understands what is white no matter what the light’s color may be. That doesn’t mean the brain sees color accurately. It simply makes things look right to us. A white mouse sitting on a table in a room lit with incandescent bulbs looks white; but is it really white? Look at it again. Our brain says, “Yup. It’s white.” The white of the mouse (and any other color) appears as we believe it should. Yet incandescent light in photography is yellow, so what gives?
The Color of Light
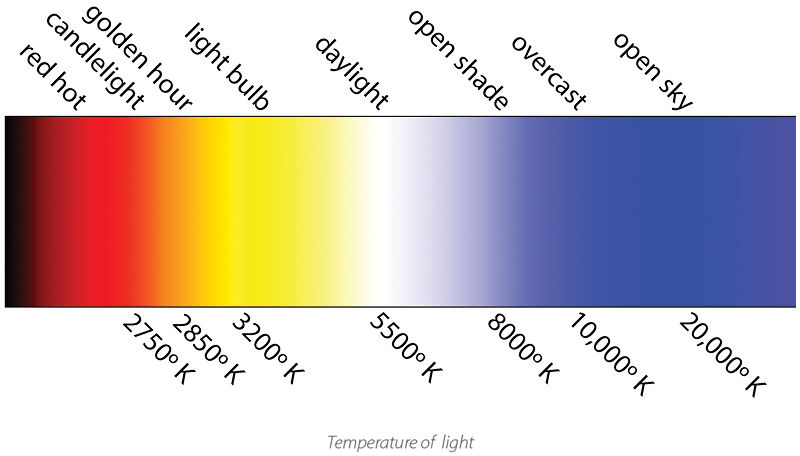
Managing color in photography means working with the color of the light, which always has a color. Think of candlelight, which is very warm and yellow-red in color. A light bulb gives light a yellow hue. Daylight, while chosen as the standard of “white” most of the time, is blue(ish). And overcast light shines really blue. Colors of light are measured in degrees Kelvin (º K), also known as color temperature. The lower the temperature, the warmer (redder) the color of light becomes.
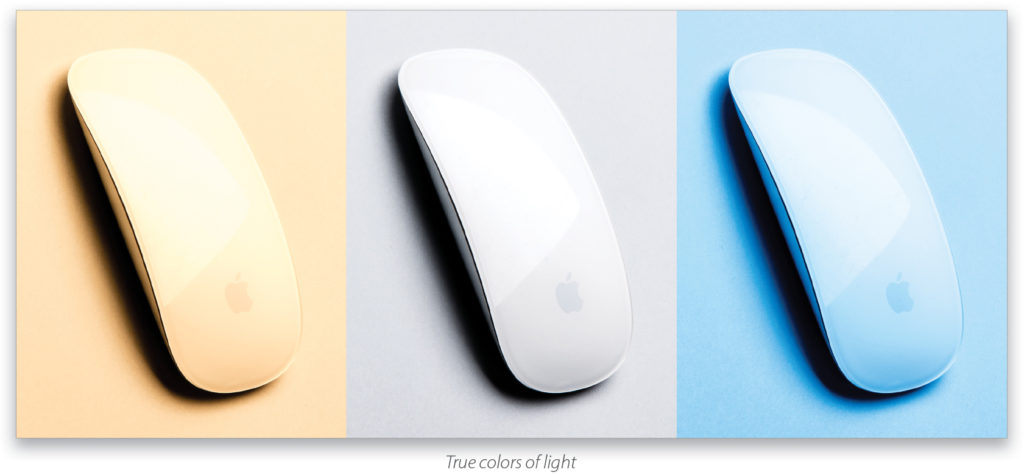
Thanks to our brains, our eyes see the mouse as white no matter what color the light illuminating it happens to be; however, the camera doesn’t share the brain’s predilection to prevarication. In this image, when we photograph the mouse with the camera’s white balance set on daylight, it reveals the true colors of the light from a bulb, daylight, and open shade.
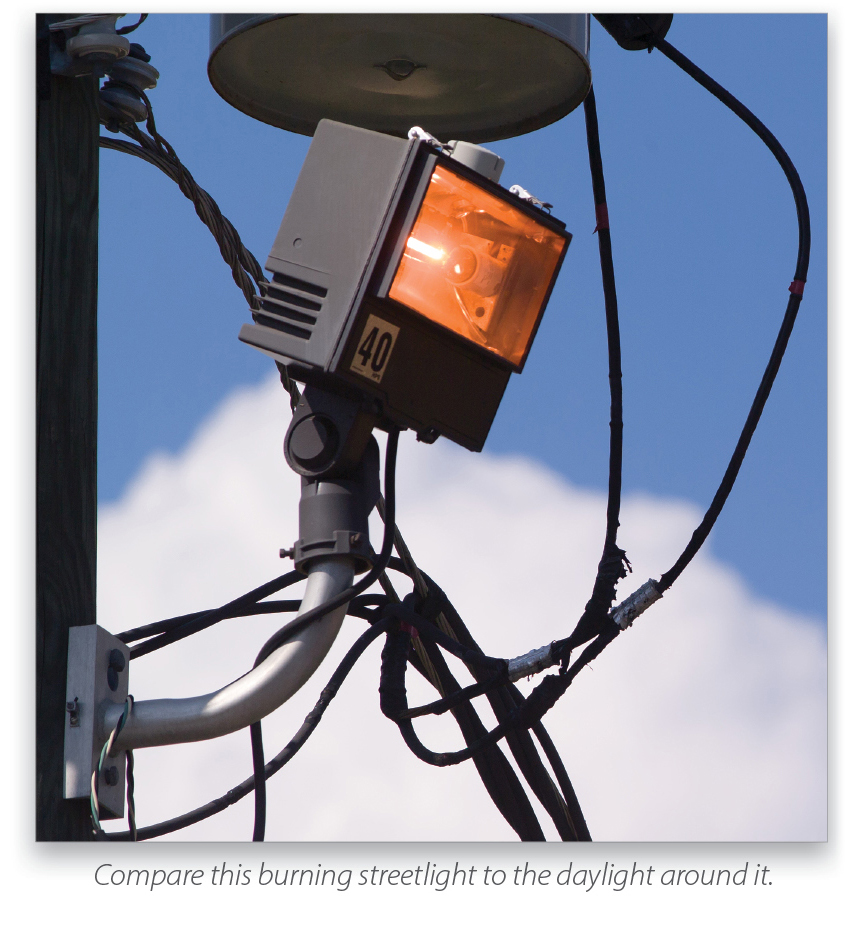
While the ordinary light bulb is close in color to late afternoon sunlight, other sources add challenges to controlling color photographically. Fluorescent light tubes historically have a green component. This is easy to see when you go shopping: Stand with the outside window slightly behind you, look into the store, and you’ll notice that signs close to the windows are white while those farther into the store take on a greenish hue. The advent of LED and fluorescent replacements for light bulbs make color control even more important. Other sources of the hideous color variety are found lighting streets, parking areas, and in older arenas; for example, sodium vapor and similar outdoor lights have truly awful color.
White Balance
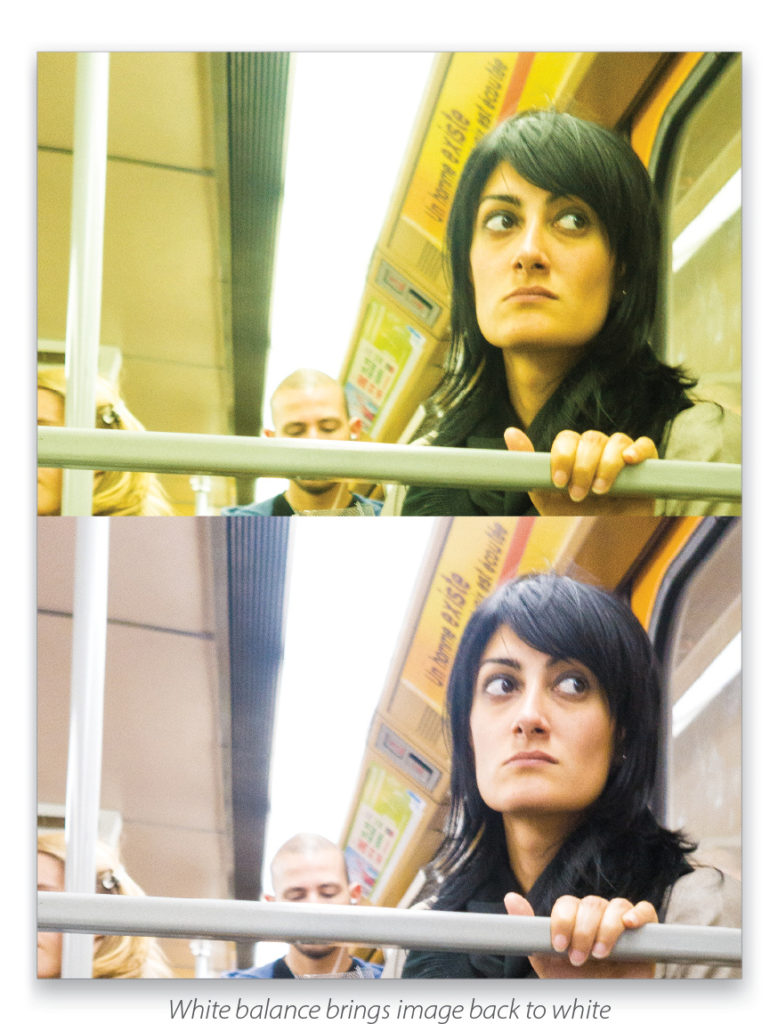
White balance is for the camera’s recording of color, similar to what the brain does for the color of light. Setting the white balance filters the color of the incoming light digitally to a close approximation of white light. Since photography started with daylight as the only light source, it’s considered photographic white light at 5500º K. The tungsten (Canon) or incandescent (Nikon) white-balance setting adds blue filtration to the yellow light from a bulb to bring it back to white. Warming filtration is added when the setting is for shade or cloudy. Fluorescent’s green light is handled by the addition of magenta (the complement of green) to neutralize it.
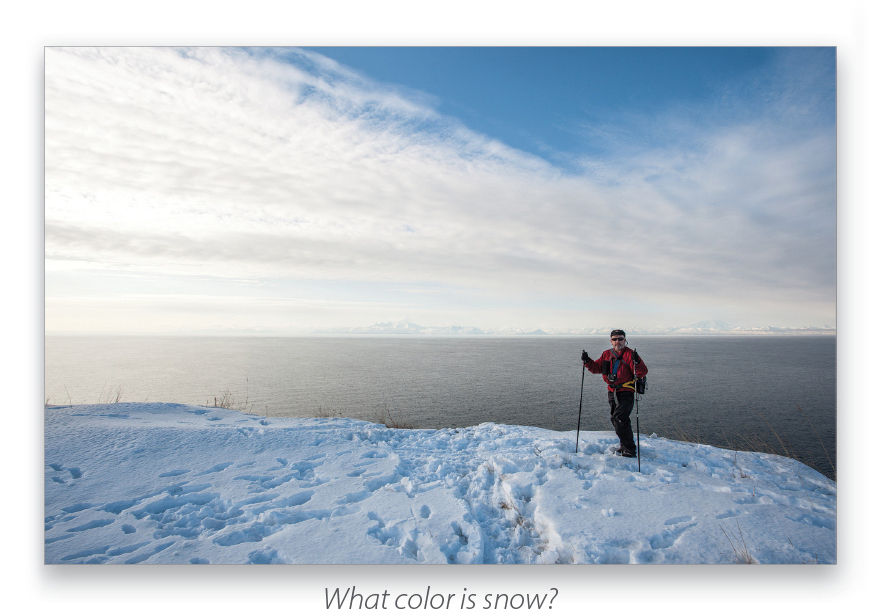
White-balance settings get the photograph close to white; however, there are situations where even the best white-balance choice leaves something to be desired. Consider a bride in a beautiful white wedding gown photographed standing on a lush lawn on a sunny day: White dress plus light bouncing off green grass equals a green tinted gown. Not good. And what color is snow on a bright sunny day? It’s not white. The Alaskan sky behind me in this image is bright blue; the white balance is daylight; and the snow is blue. These are all examples of color cast.
By the way, Auto White Balance (AWB) is the camera’s best guess at what the color of the light is. To my way of thinking, however, guesswork is best left to psychics.
Color Cast
What is color cast? It’s a color that affects a photograph in a global way. Both the greenish gown and the blue snow are examples of color cast. So is the golden light of late afternoon sunshine. The first two are unwanted, while the latter is highly desirable. It’s a matter of aesthetics.
Controlling Light’s Color
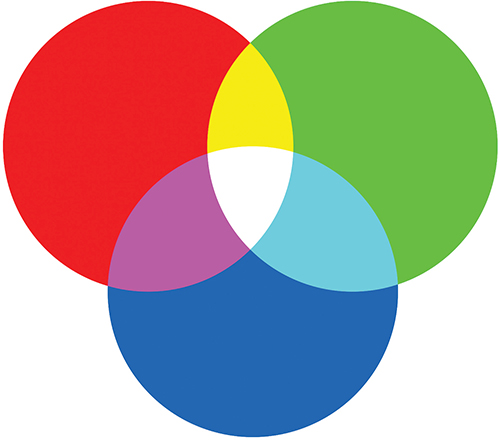
Simply put, when one color of light is stronger than the others, there will be a color cast in a photograph. When all of the colors are of equal strength, the photograph will be neutral. This color wheel shows the primary colors of photography: red, green, and blue. Where two colors overlap it creates their complements: yellow, cyan, and magenta. All three combine to make white.
Neutralizing Color
Using white-balance settings in the camera is one method of neutralizing color; for example, photographs shot as JPEGs must be neutralized in camera using the white-balance tools. On the other hand, RAW files don’t have any color in them at all. Instead, they have black-and-white data about the image and a lookup table (LUT) that tells the RAW converter the color of each pixel on the camera’s sensor. RAW files don’t care what the color of the light was during capture, because it can be set easily in the RAW processor. I’ll show you below how to do this in Camera Raw.
Since the brain is a lousy judge of color, photography requires a neutral third party in the form of a known reference, and X-Rite makes the industry-standard known as ColorChecker Targets for this purpose. I carry the ColorChecker Passport Photo in my camera bag, and I also have one on the shooting cart in the studio and another clipped to the tray of my studio stand. I use both when shooting tethered. The ColorChecker Passport has the standard 24-patch color target that was developed by Macbeth in 1976. Additionally, it has a set of patches designed to warm or cool a photograph consistently just by clicking with the White Balance tool. Even when I’m not shooting tethered, I include a ColorChecker whenever the light changes. It can be as simple as holding it at arm’s length in the same light as the subject, then releasing the shutter.
Camera Raw
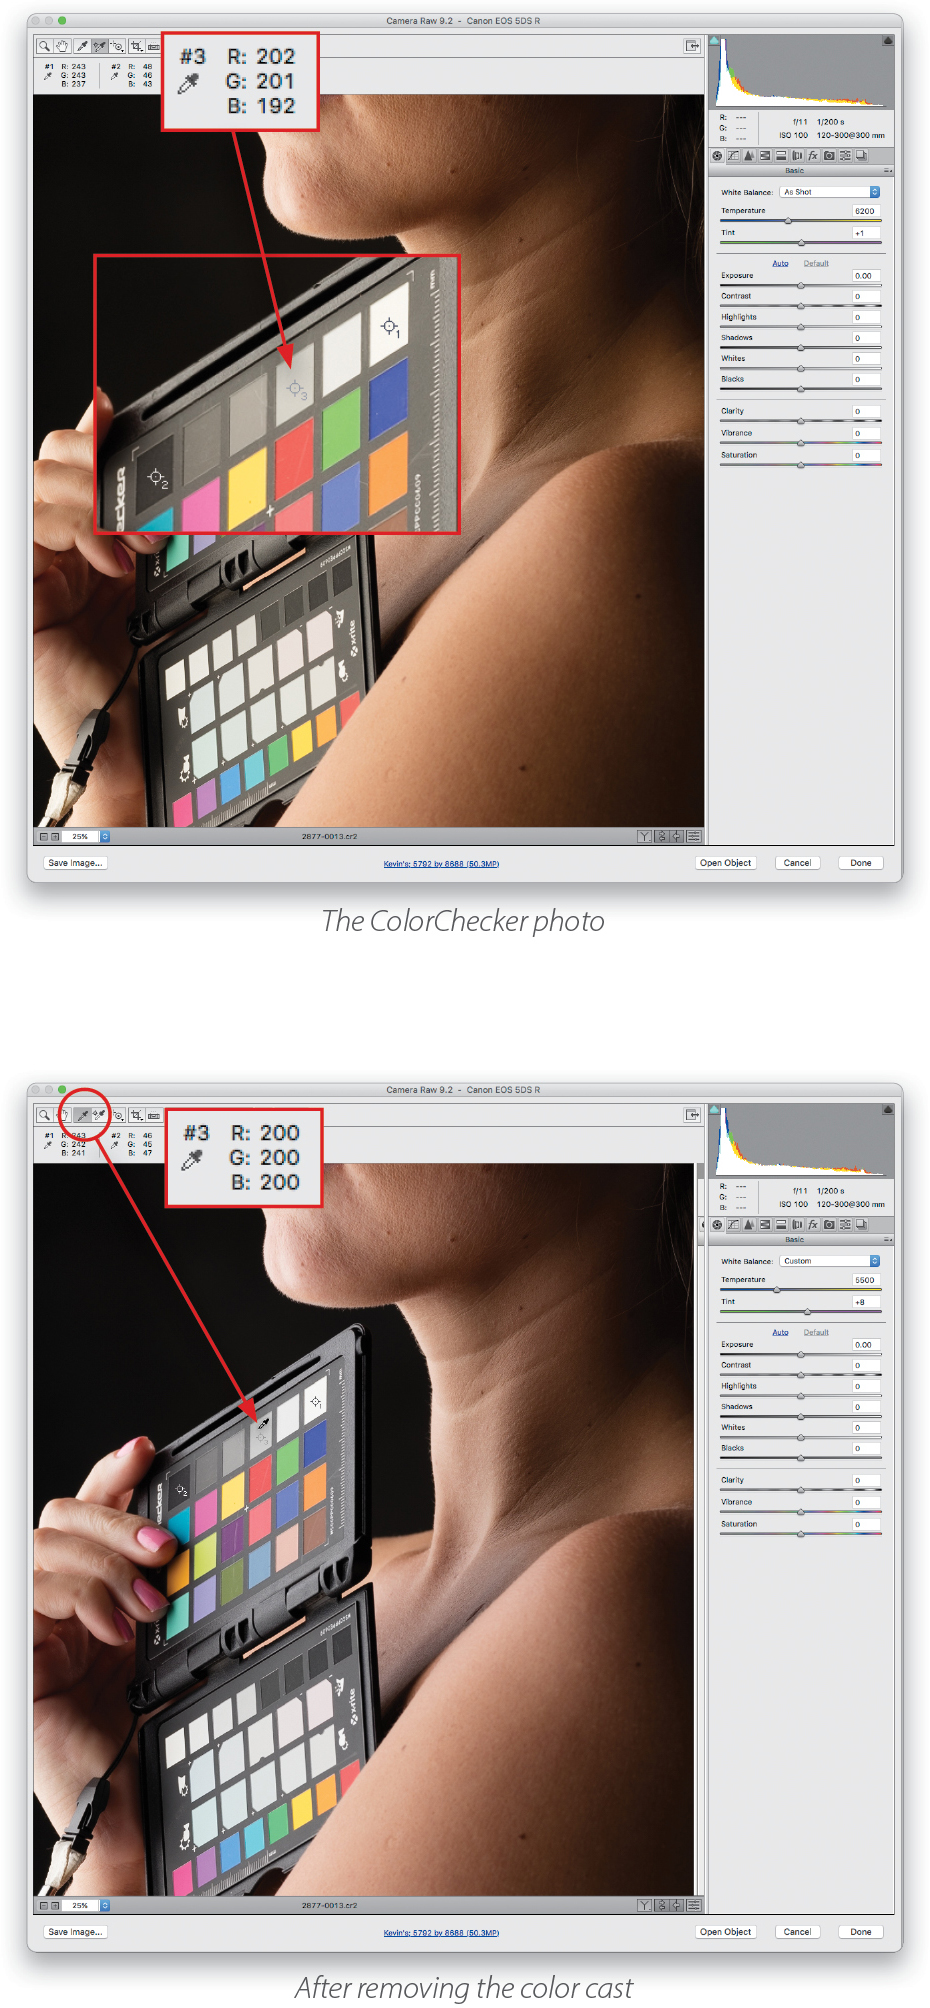
As I mentioned, the ColorChecker is my known reference. Each Passport has a line of six identical, colorimetrically neutral patches running from white to almost black. (Usually, the ColorChecker is the first photograph I make, because if I wait to do it last, I’ll probably forget to shoot it at all.) After a shoot, I open the ColorChecker photo in Camera Raw through Bridge. I get the Color Sampler tool by tapping S on the keyboard, then click on the white patch (#1), then the black patch (#2), and finally on the third one away from the white one (#3).
The screenshot shows the results out of the camera. Looks great, doesn’t it? That’s our brains going about their lying ways. The RGB numbers for the samplers show the true story: R(ed): 202 and G(reen): 201. These two are very nearly the same. B(lue), at 192, is a lot less. Now, let’s look at the color wheel: Yellow is the complement of blue and exactly what occurs when equal numbers of red and green overlap. And so, this photograph has a yellow color cast.
Balancing Color in Camera Raw
A tap on the I key brings up the White Balance tool and then a single click on the #3 patch equalizes the RGB numbers to 200 each. Equal numbers remove the color cast. Compare this image to the ColorChecker photo above with the yellow color cast—a really big difference.
Once the color is balanced, I click Done, and back in Bridge, the shot with the white-balanced ColorChecker is still selected. I choose Edit>Develop Settings>Copy Camera Raw Settings, and then I select all of the photographs shot in the same light as the ColorChecker. Finally, I go back to Edit>Develop Settings and choose Paste Camera Raw Settings. All of the selected photographs are now white-balanced with great accuracy and impressively fast.
The ColorChecker is the truth detector that keeps our brains from telling us those colorful lies.
This article originally published in the January, 2016 issue of Photoshop User magazine.